Showing posts with label Fish and Seafood. Show all posts

Saturday, July 9, 2011

Height...... Makes all the difference in presentation....

It is often said that baking is science while cooking is art, I believe it. In the first you follow formulas, if you don't get the right "ratios", your results won't be good. It's all about how one element reacts with another giving the desired effect, but in cooking you get so much freedom and leeway that "your" creativity, style and passion have a chance to interpret ingredients and take them to places maybe no one has taken them before and if you add artistic sensibility to this, well, a dish presentation can be brought to "art". Indeed.

We have an old saying: "El amor entra por los ojos".... which means: "Love enters through the eyes" and if you apply this to Culinary Arts it definitely means that dish presentation or "plating" occupies a very important role in whatever you cook because if it's not well presented on the plate, taking into consideration colors, textures, ingredients, accents and most especially, height.... you could turn what could be an amazing dish that everyone wants to eat into a so-so meal that won't excite anyone. It could mean the difference between success and failure (or a good grade vs. a failing one if you apply this to Culinary training), or in the business world, could mean a popular selling offering that can deliver profits and acclaim. Who doesn't like great looking food?

You can get technical on the aspect of food presentation and there are several schools of thought on this from the "minimalist" to "architectural", "contemporary", "European", "classic", etc. that can get pretty involved and Culinary students are trained in so they can best recognize and produce successful "platings". You need to select the correct plate for the dish you are presenting, professionals prefer white plates in bold shapes (like you see in prominent restaurants), since white shows off the food better and busy plates tend to obscure the food. One of the Master Chefs that trained me taught me to "think with the results in mind". Think of the colors of your food, the main element, the sauce, the garnishes and how they will all come together to be pleasing not just to the taste but to the eye as well.

For the past couple of years there has been another element that has taken an important place in plating food: height. Now it's all about the height of the dish and how you can bring height into your dishes to better present them. Adding height to a dish makes for a bold statement drawing attention to the elements on the plate, creates interest plus it directs your sight exactly where you want it to go. So now you're asking yourself, how do I start? what will I need? how involved will all this be?

Never fear, these are easy to make, practical to serve and all you need is your imagination and some items. To make these little projects work you will need to use a free hand or maybe some empty cans of different sizes. Cut the tops and bottoms off (I have a can opener that cuts the outside of the can leaving a clean line and the tops to re-use), wash them really well (or you can use professional rings like the ones shown), molds, have vegetable spray on hand and your ingredients. Basics are: For Binders and to hold things together (yet don't go too wet or the stack will crumble): rice, pasta, avocado, couscous, potato, quinoa, wontons, cookies, crepes, etc. Then you will use any vegetable, meat, fish, cheese, fruit, seasonings or sauces you've planned on.

Now stacking food is not new, a long time ago "Timbales" or even "Terrines" functioned in this way by layering ingredients, adding texture and color to have a beautiful result. Same here, just with a new, more modern spin..... so let's see what we can come up with, ok? By the way, I love these, find them fun to do and enjoy showing them off. It never fails when you have company over or you do these for your family, once they see them.... they're impressed and delighted!

Here's an easy, pretty one: Zucchini Confetti Stack.- Lovely colors and a light texture combine to make a most attractive appetizer or side dish.

4 zucchini
1 sweet red bell pepper
½ cup whipping cream
½ cup shredded Swiss cheese
2 large fresh eggs
1 tablespoon olive oil
salt and pepper

Slice zucchini lengthwise, thinly, save the middle two slices from each one. Chop the rest. Steam or blanch all zucchini and carefully remove the middle slices and dry on paper towel. Strain rest of zucchini until dry. Dice the red pepper finely and saute in the olive oil, until soft. Make a mixture with all of the ingredients, minus the middle slices and half of the pepper dice.

Butter, oil or spray your molds. Place in each mold two slices of the zucchini, arranging them as a cross on the bottom of the mold and up the sides. Fill the mold with the mixture and bake the in water bath for approximately 20 minutes at 400F degrees. Carefully invert them on individual plates. Sprinkle them with the saved pepper dice. You could serve with a little sauce, aioli if you like or you could add some shrimp, crab meat or ?
******************************

Avocado, Sweet Potato and Quinoa Salad.- The flavors coalesce to bring you amazing colors and an amazing dish!

1 cup quinoa, cooked in vegetable stock and cooled to room temperature
1/2 jalapeño, minced
1/4 cup plus 1 tablespoon fresh cilantro, minced
1 sweet potato, peeled and cut into 1/4-inch dice
5 tablespoons extra-virgin olive oil
Sea salt and freshly ground black pepper
Canola Oil
2 corn tortillas, cut into 1/4-inch strips
1 teaspoon Cajun seasoning
Juice of one lime
2 tomatillos in olive oil, skins removed
1 tablespoon rice vinegar
1 teaspoon light agave nectar
2 avocados, diced

In a medium bowl place quinoa, jalapeño, 1 tablespoon cilantro, 1 tablespoon extra-virgin olive oil, lime juice, and salt and pepper to taste, and toss to combine. Preheat the oven to 400F. In a small bowl, toss the sweet potatoes with 2 teaspoons olive oil, and season with salt and pepper to taste. Spread a single layer on a baking sheet and roast for 15 minutes, or until soft in the middle and lightly browned; be careful not to let the sweet potatoes burn.

Lower the oven temperature to 350F. In a small bowl, toss the tomatillos with 1 teaspoon of olive oil. Place on a baking sheet and roast for 15 minutes. Transfer to a food processor, add the vinegar, 1/4 cup cilantro, and agave nectar, and pulse to combine. With the motor running, pour in the remaining 3 tablespoons olive oil in a thin stream. Continue blending until emulsified. Season with salt and pepper to taste. Pour 2 inches of canola oil into a small, heavy pot and heat until the oil shimmers. Add the tortilla strips and fry until crisp and browned, 1 to 2 minutes. Drain on paper towels and sprinkle with Cajun seasoning.

Place a 3-inch mold in the center of one of 4 salad plates. Fill with 1/4 of the quinoa mixture and press down with a spoon to pack the mold, smoothing the top. Place 1/4 of the sweet potato pieces on top of the quinoa and press down gently. Top with 1/4 of the avocado and press down gently. Carefully remove the mold. Repeat on the remaining salad plates. Carefully place 2 tortilla strips parallel to each other about 1 inch apart on top of each. Place 2 more tortilla strips perpendicular on top of those. Top them with the microgreens and drizzle the dressing around.
***************************

Asian Crab Stack with Tomato Gazpacho.- Lovely color and sophisticated flavors, in other words, a hit!

Crab Salad:
4oz white crab meat
1/4 cup crème fraiche
1 tbs Dijon grain mustard
1tsp mayonnaise
1tbs chopped chives
Mix the ingredients together and chill

Salsa:
½ mango diced
2 avocados diced
1tsp finely chopped chile (no seeds)
1tbs chopped coriander
1tbs finely chopped red onions
1tbs lime juice
1tsp chopped pickled ginger
Mix all the ingredients together and keep in the fridge

Gaspacho:
4 vine ripe tomatoes
1 clove of garlic
1 spring of tarragon
1 spring of basil
1 red pepper
1 cucumber with skin off and seeds off
1 red chilli chopped with the seeds
1 tbs cherry vinegar
½ juice of a lemon
olive oil
Salt to taste

Put all the vegetables in a blender and process until smooth, strain through a fine sieve and finish with the olive oil, vinegar and lemon juice. Season and put in the fridge. Now build the stack in metal rings, first add the salsa then the crab mix and top it up with cream fraiche to seal.

Serve it with the gazpacho, very cold, and a drizzle of olive oil.
*********************************

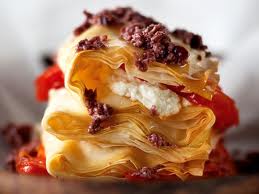
You can also build these "free form" without the use of molds or cans just by using things like Phyllo Dough, Fried Wontons, crepes, blinis, grilled veggies, tomato or bell pepper slices since you use these to make the "levels"..... then you add one ingredient, top it off with a sauce or cream or cheese, add another level and so on.... done in a jiffy and looks incredible! Here is an example:

Phyllo, Salmon, Onion and Greens Salad.- A wonderful first course or an elegant supper.....

Phyllo, baked to a golden brown with butter, add some pine nuts and dill, 4 in squares
Onion, caramelized in butter and oil until deep brown. Add some sugar and balsamic vinegar
Have the salmon sliced and ready
Goat cheese in thin slices, 1/8" thick, chilled
Chives, chopped, chilled and 2 left long for garnish
Microgreens, mixed greens, mesclun
Vinaigrette of your choice
Sour Cream
Caviar

When you're ready to assemble and serve (these don't keep well so be ready to serve), cut the phyllo diagonally into triangles. Select your plates and lay them out. Line your plates with the greens that have been lightly tossed in your vinaigrette. Place a phyllo triangle on top of the greens in the center. Top with salmon and 1 tbl of the onion. On goes another phyllo triangle, this time pointing the tips in another direction as the first. A slice of cheese now goes on top, followed by salmon and onions. The third phyllo triangle goes on, facing the points in another direction, the last slice of salmon now is placed with another tablespoon of onions.

To garnish, put some sour cream, caviar, sprinkle with some chives, and some pine nuts. Drizzle a little vinaigrette over everything and rest 2 whole chive spears on the side of the stack so they point upward. Serve.
**************************************

So now you're asking: "just salads?", "vegetables only?"..... Of course not, here are some combinations you can try:

For appetizers or starters:
  • Cellophane noodles, mushrooms, ginger and scallops
  • Tiny crepes with apples, duck and wild mushrooms, nuts
  • Truffled mashed potatoes with caviar and lobster
For the salad course:
  • Pancetta, avocado and shrimp with pineapple or mango salsa
  • Mushroom, Gruyere, spinach with barley
  • Shrimp, roasted peppers and quinoa
  • Sushi and rice
Main courses:
  • Couscous with apricot glazed lamb and red onions
  • Grilled fillet, garlic mashed potatoes, leeks and red wine sauce
  • Sausage, red cabbage, apple and fruit coulis
For dessert:
  • Brownies with grilled bananas, whipped cream, nuts and melted caramel sauce
  • Pound cake, caramelized peaches, vanilla custard, whipped cream and berry coulis
  • Phyllo, rhubarb & strawberries, peppered creme anglaise topped with toasted almonds
As you become more familiar with ingredients you can use as a "binder" and the unlimited combinations of ingredients, sauces and garnishes, you will see there are no limits to the kinds of stacks you can create. Let your imagination soar and have fun with these.... get your family involved and see who can create the wildest combinations and the good part is that once you're done, you've got something great to eat! So let's play with our food.....

Tuesday, June 21, 2011

Is it too hot to cook?..... You're still hungry, right?.....


Yes, it is really hot. Supposed to be 104F today with an expected high tomorrow of 109F (yes, crazy... I know), and you can't just hole up at home, become "mole people", crank up the AC and wait it for to pass.... no matter how much you want this to be.... Just think of others that are under hotter conditions than you, like my friends in Merida, Yucatan where their summer is hot and humid, Yikes!!!! Gets so hot and feels much hotter than here, although I miss them all the time, the weather is worth it just to be there, really.....

Anyhoo, let's get back to living in Hades.... the weather does not keep up from eating, it should and we should just stop eating, I know, but we don't and have no plans to either, so we scurry out past sunset, quickly grill and run back. Luckily we like our meat rare so it doesn't take too long either, but even if you don't cook outside, meals are still de rigeur (required) so whatever, we're cooking but maybe we can make cooler foods that will allow us to eat yummy foods while trying to keep the house cool (have to conserve energy, AC is expensive after all... and so nice), so I've got some great options for you..... And no, we won't be eating just salads and ice cream either, we want real food after all.....

This traditional dish is supposed to cook in a Dutch Oven, first searing the meat stove top and then finishing it up in the oven for h o u r s, but here is where having a bomb at home is worth its weight in gold. Instead of heating up the house and the oven for hours, you can use the good 'ol Pressure Cooker (no heat felt) and cook for about 30-40 min max.... pretty nifty I say.

Traditional Italian Pot Roast.- Wonderful flavor, hearty meal and sure to become a favorite.

1 boneless beef chuck-eye roast (3-4 lbs), tied
2 tbls vegetable oil
1 med onion, rough chop
2-3 carrots, rough chop
2-3 turnips, rough chop
1 rib of celery, chopped
1 pound cremini or white mushrooms, in large pieces
2 tbls tomato paste
2 cups tomatoes, medium dice or 1 (14 1/2 oz) can diced tomatoes
1/2 fresh tomato sauce or 1/2 cup canned tomato sauce
2 tsp sugar
1/2 cup water
1 cup red wine, Merlot or Beaujolais preferably
1 large head of garlic, remove the outer paper skin, then cut in half
1 sprig thyme, fresh
1 sprig rosemary, fresh
salt & pepper to taste

If using regular method, but you will begin the same for both techniques:
Put your oven rack in the middle position and heat the oven to 300F. (If using bomb, don't turn on the oven and you will sear the roast in the pressure cooker pot). Pat fry the roast with paper towels and salt and pepper liberally. Heat some oil in the Dutch oven (or pressure cooker) over med-high heat until just smoking and brown the roast on all sides, about 10 min. Transfer roast to large plate until you're ready to put it back in the pot.

Reduce heat to medium and cook the onion, celery, mushrooms, and tomato paste until the vegetables begin to soften, about 6 min. Add the diced tomatoes, tomato sauce, sugar, water, 1/2 cup of the wine (reserve the rest), garlic, and thyme. Return roast and the juices in the plate to pot and bring to simmer over medium-high heat. Place piece of foil over pot, cover with lid, and transfer pot to oven. (If using the pressure cooker, turn the heat to high and cover. Wait for the pot to come up to temperature and once the cooker begins to hiss, lower the heat to low and set the timer to 30 min.)

If using the oven: Cook until roast is just fork-tender, 2 1/2 to 3 1/2 hours, turning the roast after 1 hour. Uncover pot and let the roast rest in its juices for 30 min, skimming any surface fat after 20 min. Transfer the roast to a carving board and cover with foil. Remove and reserve the garlic head and skim any remaining fat from the pot (once you open the cooker you can skim off fat too). Add remaining 1/2 cup wine to pot, bring to boil over medium-high heat, and cook until sauce begins to thicken, about 12 min. Meanwhile, carefully squeeze garlic from the halves and mash it into paste, it should be very soft. Add the rosemary to the pot and simmer about 2-3 min. Remove and discard the rosemary and thyme sprigs, stir in the garlic mash and season with salt and pepper.

Remove the twine from the roast and cut the meat against the grain into 1/2" thick slices, or you can pull it apart into large rustic pieces. Transfer the meat to a serving platter and pour some of the sauce over the meat. Serve the rest of the sauce at the table.
**************************

Or maybe you just want to grill or pan fry a steak (chicken or pork even) and just get it over with yet it still has to taste great.... How about a great "Chimichurri Sauce":

Chimichurri Sauce.- We all know Argentina is known for its beef (amazing!!!), here's their traditional accompaniment to beef, which I use on almost everything:

1/4 cup hot water
2 teaspoons dried oregano
2 teaspoons kosher salt
1 1/3 cups loosely packed flat-leaf parsley leaves
2/3 cup loosely packed cilantro leaves
6 medium garlic cloves, minced or pressed through garlic press (about 2 tablespoons)
1/2 teaspoon red pepper flakes
1/4 cup red wine vinegar
1/2 cup extra-virgin olive oil

Combine hot water, oregano and salt in small bowl; let stand 5 minutes to soften oregano. Pulse parsley, cilantro, garlic, and red pepper flakes in food processor until coarsely chopped, about ten 1-second pulses. Add water mixture and vinegar and pulse briefly to combine. Transfer mixture to medium bowl and slowly whisk in oil until incorporated and mixture is emulsified. Cover with plastic wrap and let stand at room temperature at least 1 hour (if preparing sauce in advance, refrigerate and bring to room temperature before using).
*******************************

Zucchini and Leeks en Papillote.- A traditional French technique that can be applied to many different dishes, is very healthy and locks in flavors and prevents food from drying out:

2 zucchini, cut in long, thin strips
1 leek, cut off the tough tops and slice the white in fine juliennes
1/2 lb asparagus, trimmed into 2 parts
4 sprigs tarragon, fresh
4 garlic cloves, unpeeled
salt & pepper to taste
1 egg, beaten optional
water (optional)
cornstarch (make paste optional)

Preheat the oven to 400F. You can use a potato peeler to slice the zucchini lengthwise into thin strips.

Cut 4 sheets of parchment paper, 12 x 15 inches in size. Fold it in half. Draw half a heart shape when folded so it will be a whole heart unfolded. Cut along the inside of the line and open out.
Divide the vegetables between each heart. Position the filling on the right side of the fold line and top with tarragon and the unpeeled garlic clove. Season to taste.

Brush the edges of the paper with the beaten egg and fold over. You don't have to use the egg and can fold it without using the egg. I found this site on the web which I thought was a really good explanations of how to accomplish this technique. Cut and paste onto your browser http://www.sundaysupper.com/parch.htm gives directions and shows photos of the no egg technique, it will make you an expert at "Papillote".

Pleat the edges so it is sealed. Put it on a cookie sheet and bake for 10 min. It will puff up so make sure to move the oven racks and leave room. Serve immediately. You can let each person open their own packet on their own with scissors, but be sure and tell them that heat will escape and could burn, so open with care and enjoy the lovely aromas this technique gives.
NOTE: Once you've mastered the making of the packets this way, you can use it for fish and vegetables giving you a clean and very healthy alternative to cook.
*******************************

In keeping with "cool" foods, here are two desserts which can be made ahead and will deliver flavor and comfort in a refreshing dish. First of all I want to give you a "foolproof" pastry crust you can use for all types of pies, you'll love it:

Foolproof Pie Crust.-This pie crust can be pressed into the pie plate and refrigerated for up to 2 days or double wrap in plastic and freeze for 1 month. Once baked, cool, the shell can be wrapped tightly in plastic and stored at room temperature for up to 1 day.

1 1/4 cups all-purpose flour
1/4 tsp table salt
8 tblsp butter (1 stick), softened but still cool (I've used shortening too)
2 oz cream cheese, softened but still cool

Lightly spray 9" glass pie plate with cooking spray. Whisk flour, sugar, and salt together in a bowl. With an electric mixer at med high speed, beat the butter and cream cheese, scrape down the beaters and sides of bowl, and beat until completely mixed, about 2 min. Add the flour mixture and combine on medlow until it looks like coarse cornmeal, about 20 seconds. Scrape down sides of bowl. The mixer speed now to med high and beat it until dough begins to forms large clumps, about 30 seconds. Set aside 3 tblsp of the dough.

Turn the remaining dough onto a lightly floured surface, gather it into a ball and flatten into a 6" disk. Transfer this disk to greased pie plate.

Press the dough evenly over bottom of pie plate toward sides, using heel of your hand or the bottom of a smooth cup (you can also roll out the pastry with a rolling pin as usual and then place it on the pie plate). Make sure that the dough is evenly distributed yet should be thin. Continue to work the dough over the bottom of the pie plate and up the sides until even. On floured surface, roll the reserved dough into a 12" rope. Cut into three pieces, then roll each piece into a 8" rope to form a fluted edge. Wrap it in plastic and refrigerate at least 1 hour.

With the oven rack in the middle of the oven turn oven to 325 F. Lightly prick the bottom of the crust with a fork. Bake until golden brown, 30 to 40 min. Cool on wire rack. (If large bubbles form, wait until the crust is fully baked, then gently press on bubbles with a kitchen towel or back of spoon. The bubbles will settle as crust cools.)
***********************************

Amazing Lemon Pie.-This simple recipe forms a custard type filling. You need 6 tablespoons of lemon juice for this recipe so have an extra lemons on hand in case the 3 sliced lemons do not yield enough juice.

1 double-crust pie dough (see above and make 2 batches)
3 large lemons, sliced thin and seeded (I use Persian Lemons)
1 cups sugar
1/8 tsp salt
1 tbls cornstarch
4 large eggs
1 tbls heavy cream

Adjust your oven rack to lowest position and heat the oven to 425 F. Line a 9" pie plate with 1 dough round and refrigerate for 30 min.

Squeeze the lemon slices into fine strainer set over a bowl; reserve the juice (you should have 6 tablespoons). Put the drained slices and 2 cups water to boil in a saucepan, then reduce the heat to med low and simmer until slices are soft, about 5 min. Drain the slices well and discard the liquid. Combine the softened lemon slices, sugar, salt, and 1/4 cup reserved lemon juice in a bowl; stir until the sugar dissolves.

Whisk the cornstarch and remaining lemon juice in a large bowl. Whisk the eggs into the cornstarch mixture, slowly stir in the lemon slice mixture until well combined. Pour into the chilled pie shell. Brush the edges of the dough with 1 tsp cream and top with the remaining dough round. Seal, crimp edges, and brush the top of dough with remaining cream. Using a paring knife, cut 4 vents in the top of the dough.

Bake until light golden, about 20 min, then lower the oven temperature to 375 F and continue to bake until golden brown, 20 to 25 min. Cool on wire rack for at least 1 hour. Serve. Pie can be wrapped in plastic and refrigerated for 2 days after baking.

NOTE: Found some tips on pies and it said that using a knife to evenly cut the lemons into paper-thin slices was a difficult and time-consuming task. You get better results with a mandoline (or V-slicer), which produced perfectly thin. But, if you didn't have a mandoline, putting the lemons into the freezer for about 30 minutes firms them up for better hand-slicing, which is best accomplished with a serrated knife. But same goes when you want to thin slice other things too, like fish or meat.....
********************************
Perfect Strawberry Pie.-Here is a strawberry pie that truly delivers, but you have to make sure you have 2 cups of the berry mixture and you need to measure! The frozen fruit helps develop flavor and texture.

2 lbs frozen strawberries
2 tbls lemon juice
2 tbls water
1 tbls unflavored gelatin
1 pinch salt

1 lb fresh strawberries, cleaned and sliced thin
1 9" pie shell, baked and cooled

4 oz cream cheese, softened
3 tbls sugar
1/2 tsp vanilla extract
1 cup heavy cream

Cook the frozen strawberries in a large saucepan over med low heat until berries begin to release juice, about 3 min. Increase the heat to med high and cook, stirring, until thick and jam like, about 25 min (should be 2 cups).

Put lemon juice, water, and gelatin in small bowl. Let stand until gelatin is softened and mixture has thickened, about 5 min. Stir gelatin mixture, sugar, and salt into cooked fruit mixture and return to simmer, about 2 min. Transfer to a bowl and cool to room temperature, about 30 min.

Fold the fresh berries into the filling. Spread evenly in the pie shell and refrigerate until set, about 4 hours or even overnight.

With an electric mixer on med speed, beat cream cheese, sugar, and vanilla until smooth, about 30 seconds. With mixer running, add cream and whip until stiff peaks form, about 2 min. Serve pie with whipped cream topping.

NOTE: Be sure to m
easure the reduced strawberry mixture: You need exactly 2 cups. Put the strawberry mixture into a measuring cup. If its more than 2 cups, return it to the pan and cook it down. It may seem OCD to to measure, but the pie won't set or slice properly if you have more than 2 cups of the strawberry mixture, so take the extra couple of minutes to insure a perfect pie.
*******************************

So far this is as far as I got this time, took too long and put other things on hold so now's the time to get going on the rest. The house is very smoky with the aroma of roasting Poblano's and the heat isn't letting me open windows for now so whatever.... at least I like the smell, right? But I've been whipping up some batches of some "fun food" from way back: jello & pudding shots in some creative flavors since these popular "kid friendly" foods grew up.... you'll see, I'll send you some ideas as soon as I finish this up later. Until then, relax and enjoy!......

Sunday, May 22, 2011

Fresh Fish.... the smell and taste of the Ocean in your mouth.....


I love fish and seafood or should I say I love FRESH fish and seafood. It's said this is the best source of protein and the one we assimilate the best. Full of the things our bodies need to keep it healthy and lean, amazing delicate taste and texture..... BUT in these times and unless you live right by the water (ocean or river) your access is limited by the quality and price. Yikes!

This happens to us here in the middle of the desert and many a time I've found myself debating about wild caught or farm raised, fresh or flash frozen, a good deal or price so high it's outrageous.... whenever the need arose to have some fish or seafood. Of course, in one sense we're lucky to have all the casinos in town with so much purchasing power that allow food vendors to make daily runs to Sin City which gives us variety, but then on the other hand they have to fly them in, treat them with tremendous care which drives up the price so most people on a budget simply can't make them part of their diet anymore. Plus there are lots of people that simply don't like fish at all.

Sure, we have some of the best celebrity chefs in the world with restaurants here but when you're looking at an average check of around $75-$140 per person or more, not including drinks, tax or tips, it tends to limit your options, right? Very unfortunate for most, so I poach their menus and reproduce their offerings at home which makes these dishes affordable (if you can find quality fish/seafood at decent prices that is, which does happen but not that often). I remember going fishing with my dad in Oregon, Idaho, Wyoming, Alaska, California, Mexico and anywhere we could, to this day I love it still and am sad I don't have the chance to do it anymore... well, maybe someday....

Got some pretty decent Red Snapper Fillets on sale at my local Smith's which is part of the Kroger chain, we've been partial to them for many years especially due to their penchant for excellent meat and steaks, great prices and their specials. This time it was fish and shellfish week so we get to indulge a little bit which is what brought me to this post. So I've got these two monster fillets of Red Snapper waiting to be turned into something amazing and I'm looking everywhere for inspiration..... here are some:

Greek Style Fish.- You can use almost any fish with this recipe, it's an old standby and always amazing, easy and quick.

1-2 lb fish steaks
Kosher salt
1 cup flour for dredging
1 Tblsp garlic powder (not garlic salt)
1/4 cup olive oil
4 Tblsp Asian fish sauce, or 2 Tblsp Worcestershire sauce
2 Tblsp olive oil
2 Tblsp honey
2 Tblsp ouzo or other anise-flavored liqueur (I'm using Tequila)
1 Tblsp chopped fresh oregano
Freshly ground black pepper

Make sure the fish looses the cold of the fridge for about 5-10 minutes. Sprinkle kosher salt on them. Mix the 2 tablespoons olive oil, the honey and the fish sauce together by whisking vigorously for a minute or so. Mix the garlic powder in with the flour.

Heat a large frying pan over high heat for a minute or two. Add most of the 1/4 cup of oil. Start with a little more than half. Turn the heat down to medium-high and let this heat up for 2 minutes. Dust the fish with the seasoned flour, shake off the excess and sear in the oil. Let the fish sear to a golden brown. You might have to cook the fish in batches if your pan is too small. Set aside the finished fish as you do the rest. Add more of the reserved olive oil if you need it.

Remove all the fish to a paper towel and let drain. Pour in the ouzo and scrape off any browned bits with a wooden spoon. Add the honey-fish sauce-olive oil mixture and mix everything well. Let this cook down until the whole surface of the pan is a mass of bubbles. Turn off the heat. Add the fish back into the pan and coat with the sauce. Serve over rice, garnished with the oregano and the black pepper.
************************************

Sichuan Sweet and Sour Crispy Fish.- Doesn't that just sound amazing! This is such a great recipe you have to try it so you too can see.....

2 whole (but scaled and gutted) rockfish or other pan-sized fish
3 green onions, chopped
1 inch piece ginger, peeled and finely chopped
1 Tblsp Chinese cooking wine (or Japanese Mirin)
1 Tblsp soy sauce
1 tsp freshly ground black pepper

3 inch piece of ginger, peeled and cut in julienne (very thin strips)
1/2 medium onion, cut in very fine half moon slices
3 cloves garlic, sliced very fine
1/2 habanero chile, or 1-2 Thai chiles or 1 serrano, very finely sliced
5 Tblsp water
5 Tbsp tomato sauce or catsup
3 Tbsp sugar
1 Tbsp Chinese cooking wine (or Japanese Mirin)
1 Tbsp soy sauce
1 1/2 tsp corn starch
1 Tblsp finely chopped cilantro
1 Tblsp finely chopped green onions or chives
4 cups peanut or vegetable oil
2 cups flour for dredging

Prepare the fish. Cut off the fins of each fish with kitchen shears or scissors. Remove the gills of the fish if they are still attached by cutting them out with the kitchen shears. Make three vertical slices along each side of the fish evenly spaced along its length. If you have a long fish, make four slices. Rinse the fish under cold water and pat dry.

Marinate. Mix the 3 green onions, the finely chopped ginger, the tablespoon of Chinese cooking wine, the tablespoon of soy sauce and the black pepper together, then pour the mixture into a glass or plastic container, or Ziploc bag, with the fish and make sure the marinade surrounds the fish. Let this sit in the fridge for 30 minutes.

Prepare the vegetables. Have the julienned ginger, the 1/2 onion, the garlic cloves, all ready. Pour the oil into a wok and turn the heat on to medium. If you do not have a wok, use the largest, deepest skillet you have. A wok helps here, since its shape prevents the tail fin from burning. Take care in a pan and make sure your fish fits.

Make the sauce. Mix the tomato sauce, sugar, soy sauce, Chinese cooking wine, water and corn starch and stir vigorously to combine. Set it aside. Take the fish out of the fridge and check the oil temperature. Should be about 300-325 degrees. If you don't have a thermometer, the oil is ready when a drop of water is dropped into the oil fizzles immediately.

Fry the fish. Remove the fish from the marinade and dredge in flour. Shake off excess, and when the oil is hot, slip the fish into the oil. Do one fish at time. Turn the oven on to "warm." Fry the fish for at least 5 minutes per side. You want it to be crispy, golden brown. With 300-degree oil, a 1-pound fish is fried for 8 minutes on the first side, 5 minutes on the other side. Larger fish will need more time so keep an eye on it. When the first fish is done, remove it to a plate and put the plate in the warm oven. Fry the second fish the same way as the first, etc.

Finishing up. When the fish are done, take out all but about 1/4 cup of the oil, reserve the rest (you can filter through a coffee filter, cool and save in a jar for another fish fry). Toss in the ginger, the onion, the chiles and the garlic and stir-fry over high heat for 2 minutes. Add the sweet-and-sour sauce and stir well to combine. Bring this to a rapid boil and stir well. Cook for 2 minutes. To serve, place the fish on a plate, sauce on top of it and garnish with the finely chopped chives and cilantro. This dish goes best with simple steamed white rice.
************************************

Parmesan Baked Fish.- Easy, quick and wonderful, what more could you ask for?

1/4 cup milk
2 tsp salt
2 lb fish fillets
1/2 cup fine dry bread crumbs (I use old bread, all kinds of bread, in a blender)
1/2 tsp paprika
1/4 cup grated Parmesan cheese
melted butter

Preheat oven to 375 F. Grease a rectangular baking dish. Blend together the milk and salt in a shallow bowl. Combine bread crumbs, paprika, and Parmesan cheese in another bowl. Dip fish fillets into milk mixture then into crumb mixture. Arrange in the prepared baking dish. Drizzle melted butter over fillets. Bake for 25 minutes, depending on thickness of fillets. Fish should flake easily with a fork when done.
*****************************************

Easiest and Crispiest Fish Fillets.- A basic recipe that yields great fish. Economical, practical and done in no time flat! I also like corn flakes for crispy pork chops and chicken.

1 to 1 1/4 pounds fish fillets
2 tblsp butter, melted
2 tblsp lemon juice
1/2 tsp salt
1/4 tsp pepper
1/4 tsp dried dill weed, optional (dill is amazing with fish & potatoes)
2 cups crushed corn flakes (in the blender but just pulsed so it's not all fine)

Grease a 13x9 inch baking dish. If fish fillets are large, cut into serving-size portions. Combine butter and lemon juice; set aside. Mix salt, pepper, and dill weed. Dip each piece of fish in butter and lemon mixture. Sprinkle salt and dill mixture over each side of fish. Coat with the corn flake crumbs. Place fish fillets in prepared pan and bake in a 350 F oven until fish flakes easily with a fork, 20 minutes, depending on thickness of the fish fillets.
*************************************

Salmon with Champagne Sauce.- So simple yet so elegant, very fast and impressive!

4 salmon filets
1 cup flour for dredging
1/3 cup unsalted butter
1 cup Champagne or other dry sparkling wine, like Prosecco
1 cup heavy cream
Salt and pepper to taste
Sprigs of parsley

Add salt and pepper to the flour. Flour the filets and shake off the excess. Melt the butter in a broad skillet over medium heat and cook the filets for 4 minutes, turning them after 2 minutes. Sprinkle half the champagne over them and continue cooking until it is reduced by half. When the filets are done, remove them to a heated serving dish and keep them warm.

Raise the heat to medium-high. Add the rest of the champagne to the pan and bring to a boil. Add the cream to the pan, season to taste, and continue to cook until the sauce becomes creamy. Taste to adjust seasonings. Spoon the sauce over the fish, garnish with parsley, and serve at once.
********************************

As always, for more recipes about fish or sauces you can use to complement a dish, please search through the blog, ok? Lots of tips, preparations and ideas for one thing can be adapted to suit other needs and you might just find something that will give you an amazing dish.

Don't forget that if you need help with a recipe or want to serve something special and you need more info, drop me a line and I'll be glad to help any way I can. Hoping everyone's weekend has been restful and lovely, we'll talk soon....

Sunday, April 24, 2011

Spain has become THE Culinary center of the world....


For many years there wasn't a doubt as to where the new tendencies in food would come from: France, of course, right? Except that little by little something magical happened which turned the culinary scene on its head and made everyone sit up and take notice of the domination executed by Spain. Yes, Spain and not the Madrid area even but the North, the Basque area of the country is where the most intriguing, amazing and new tendencies have come from. This has literally brought this once quiet and sleepy part of Spain into the forefront of anyone who is interested in good food, and what good food can be.

Of course, no conversation about the new food scene can be considered complete without mentioning the most innovative Chef that has come along in a long time: Ferran Adria. He is the head chef of the El Bulli restaurant in Roses on the Costa Brava, and is considered one of the best chefs in the world. He has referred to his cooking as deconstructivist. Adrià's stated goal is to "provide unexpected contrasts of flavor, temperature and texture. Nothing is what it seems. The idea is to provoke, surprise and delight the diner." As he likes to say, "the ideal customer doesn't come to El Bulli to eat but to have an experience." Although people refer to him as working in molecular gastronomy, there is confusion, but in any case his restaurant is renowned for new techniques that have revolutionized the world of food.

There are other best of the world restaurants in this area as well: Arzak, Mugaritz, El Celler de Can Roca, Martin Berastegui and Asador Etxebarri. Should you have the chance to go to Spain and wish to visit these Top 50 Restaurants of the World restaurants, be sure to make reservations with months of advance as they have limited hours and schedules, but always worth the experience. You might be surprised to see the location of these lauded food shrines too, not glitzy or showy at all but instead focusing on comfort and of course "the food". Meals take hours and offer many courses and are guaranteed to blow your mind.....

So let's take a look at some of the traditional food from Spain and revel in the flavors of our Mother country, shall we? These are by no means molecular gastronomy but just great dishes you're sure to enjoy!

Ajoblanco con Higos y Uvas (Garlic Soup with Figs and Grapes) .- What's more traditional than this garlic soup? You'll love it!

6 oz almonds, peeled
6 cups water
6 tablespoons extra virgin olive oil
3 tablespoons Sherry Vinegar (from Jerez if possible)
1 piece of stale bread
1 handful of grapes, peeled
4 fresh figs, cut in quarters
1/2-1 garlic clove
Salt to taste

Put the almonds, bread and garlic in blender / food processor / food mill and process until the
almonds are finely ground. Add water little by little until the soup is liquid. Add the oil at this time along with the vinegar and add a little salt. Check to see that the soup is nicely thickened and that the seasoning is pleasing.

Serve in soup bowls, topping with the grapes and figs.
****************************

Patatas a la Riojana (Rioja Potatoes).- Very traditional, very flavorful, very wonderful....

2 1/2 lbs potatoes, peeled and sliced
8 oz chorizo (Spanish style is best)
1 onion, chopped
2 green Bell Peppers, sliced and de-seeded
2 tablespoons Pimenton, Spanish Smoked Paprika, if not use regular Paprika
2 red Bell Peppers, sliced and de-seeded
2 garlic cloves, chopped
Olive Oil
1 Bay Leaf
1 Hot Pepper, or use crushed red pepper flakes
Salt to taste
1/2 cup Parsley, chopped

Using a large cazuela or Dutch Oven, we place it on a med-high heat. Add some oil and fry the onion and garlic for 1 minute. Add green peppers and potatoes mixing well for 2-3 minutes. Add the Paprika, Bay Leaf, hot pepper, red bell pepper, chorizo and we cover with water so the potatoes are covered. Allow to come to a boil then turn down the heat to simmer for about 30 minutes or until the potatoes are done. Check the seasonings, add salt and add some parsley.

Serve in bowls insuring everyone gets chorizo and top with fresh Parsley.
*********************************

Salsa Romesco.- From the Barcelona region comes this most amazing sauce that although traditionally served with Calcots (charred onions) is great on everything, even toast! There will be a flavor change due to no Romesco Peppers in the US (smaller and hardier than red bell peppers) but worth making anyway.....

6 oz almonds, toasted
6 oz hazelnuts, toasted
2.5 oz pine nuts
2 walnuts
1 onion
8 tomatoes
1/2 a head of garlic (yes, half)
5 Romesco Peppers (dried) or red bell peppers
1 tablespoon smoked Paprika, ground
1 garlic clove, pressed thru garlic press
1 teaspoon of sugar or to taste
1 teaspoon hot pepper, ground or to taste (cayenne?)
1 cup olive oil
1/2 cup red wine vinegar
Salt to taste

On a grill, char the onion, tomatoes, garlic and red bell peppers. You can use your oven at about 400 F (200 C) for 30 minutes or so. Cool the vegetables and then peel them (do not run under water). In a food processor, add the nuts, process a little- add the vegetables and process, then the seasonings. You finish with olive oil which you add slowly in a thin stream so the sauce comes together. You can add a piece of bread and mix it in to help with the consistency too if you like. Continue processing until it's well mixed but still rustic. Add the vinegar and salt at the very end, taste it to adjust to your taste.
******************************

Calcots.- Onions from Cataluna, a type of spring onion grown there. Calçotades, feasts at which the humble calçot is the star attraction, are held all over Catalonia from midwinter to early spring. However, the region of Tarragona and particularly the tiny town of Valls (an hour and a half outside of Barcelona) are the cradle of the custom. Calçots are trimmed and laid out on large racks, char-grilled in batches over a small bonfire made from the vines of the grapes that were harvested, wrapped in newspapers to keep warm and then served in traditional clay roof tiles, whose shape fits the long onions perfectly. The coals that remain after grilling the calçots are used to prepare the roasted meats and sausages served as the second course. First, you slide off the charred outer coating of the calçot with one hand, holding on to the green ends with the other. Then, you dip the newly uncovered pearly white end into salvitxada or romesco sauce, traditional sauces that indispensably accompany calçots. Finally, you tilt your head back and lower the dangling calçots into your mouth, biting off the white portion and discarding the ends. The flavor is rich, creamy and beguilingly sweet. The most popular spots to experience calçotades are masies, large rural estates that have been converted into restaurants. There, calçots are more likely to be grown on-site and grilled over outdoor fires in the traditional manner.

To do at home: Using a grill or charcoal grill (wood is better), you lay lots and lot of spring onions with the tips cut off on the grill until they char or turn black. You then wrap them in a couple of sheets of newspaper, tightly wrapped, and lay them inside a thermos chest (usually used for cold foods at the park) so they can steam for 30-60 minutes. Then, package by package is unrolled and you follow the technique explained above. Don't forget to supply lots and lots of red wine, happy people, crusty bread and other goodies to make it into a feast.
*****************************

Bunuelos de Bacalao (Fried Cod Balls).- In Spain, Cod is King and there is no argument, so for those of us that love Cod, it's amazing! Try these easy and tasty Cod balls, you'll be glad you did....

1 lb Cod (usually salted and soaked) I prefer fresh
2 tablespoons onion, finely chopped
2 tablespoons green bell pepper, finely chopped
2 garlic cloves, chopped
Orly Paste (see below)
Olive oil

Orly Paste.- 1 lb flour / 2 cups beer / 1 teaspoon olive oil / salt to taste.
Mix everything well until smooth. Use for breading and frying.

Make the Orly paste and have it ready for use.

Shred the Cod and insure it's not wet. Dry with paper towels if needed. In a pan with a little oil, medium heat, add the onion, pepper, garlic and stir until almost golden, then add the Cod allow it cook slightly.

Drain this well and mix with the prepared Orly paste. Using two spoons, make balls of the Cod mix and fry in a generous amount of hot oil. Drain well before serving. Serve hot.
**************************

That was a nice little food trip that brought back good memories of time spent in Spain and the food that you find there, of course, there is so much more to discover and I hope if you ever have the opportunity of visiting Spain, you will search out the amazing food and experience their traditions for yourself.

Wishing everyone a lovely Easter, full of peace, renewal and good cheer. Talk soon.....

Tuesday, March 29, 2011

Some Lovely Little Things..... and Easy Too!


We're in a Oriental mood, something we get often and it really doesn't matter which type. Could be Chinese, Thai, Japanese or whatever as long as those particular flavors are there and we satiate our tastes. For one of our practicals, Rene made pot stickers and with those in mind we started running down a list of old favorites and came up with some that I thought you'd like, were easy to make and deliver not just the "punch" you need but can be made for company or any weekend.

Tasty little tidbits, fresh flavors, wonderful spices and flavorings..... always welcome and everyone seems to enjoy them equally, even the kids will like these! Perfect for game snacks, a lazy weekend at home or an impromptu cocktail party.... you'll see how satisfying they can be, for everyone.

Feel free to substitute and use your favorite ingredients, you'll see how flexible and versatile these recipes are. If you like more heat, go ahead and add it, same goes for sweetness or salt, make these customized to your family's tastes and enjoy!

So let's get started, ok?

Pot Stickers.- Wonderful flavor, delicate and pretty amazing!

1/2 pound ground pork
1/4 cup finely chopped scallions
2 tablespoons finely chopped red bell pepper
2 tablespoons finely chopped fresh ginger
1 egg, lightly beaten
2 teaspoons ketchup
1 teaspoon yellow mustard
2 teaspoons Worcestershire sauce
1 teaspoon light brown sugar
1 1/2 teaspoons kosher salt
1/2 teaspoon freshly ground black pepper
1/4 teaspoon cayenne pepper
35 to 40 small wonton wrappers
Water, for sealing wontons
3 to 4 tablespoons vegetable oil, for frying
1 1/3 cups chicken stock

Preheat oven to 200 degrees. Combine the first 11 ingredients in a medium-size mixing bowl. Set aside. To form the dumplings, remove 1 wonton wrapper from the package, covering the others with a damp cloth. Brush 2 of the edges of the wrapper lightly with water. Place 1/2 rounded teaspoon of the pork mixture in the center of the wrapper. Fold over, seal edges, and shape as desired. Set on a sheet-pan and cover with a damp cloth. Repeat procedure until all of the filling is gone.

Heat a 12-inch saute pan over medium heat. Brush with vegetable oil once hot. Add 8 to 10 potstickers at a time to the pan and cook for 2 minutes, without touching. Once the 2 minutes are up, gently add 1/3 cup chicken stock to the pan, turn the heat down to low, cover, and cook for another 2 minutes. Remove wontons to a heatproof platter and place in the warm oven. Clean the pan in between batches by pouring in water and allowing the pan to deglaze. Repeat until all the wontons are cooked. Serve immediately. You can serve with your favorite sauce on the side.
*************************

Shu Mai.- A very popular appetizer that you'll love!

Makes about 40 dumplings, serving 6 to 8 as an appetizer. The dumplings may be frozen for up to 3 months; cook them straight from the freezer for about an extra 5 minutes.

2 tablespoons soy sauce
1/2 teaspoon unflavored powdered gelatin
1 pound boneless country-style pork ribs, cut into 1-inch pieces
(or use lean, ground pork)
1/2 pound shrimp, peeled, tails removed and halved lengthwise
1/4 cup water chestnuts, chopped
4 dried shiitake mushrooms, in hot water 30 min, squeezed dry, cut small dice
2 tablespoons cornstarch
2 tablespoons minced fresh cilantro leaves
1 tablespoon toasted sesame oil
1 tablespoon Chinese rice cooking wine (Shaoxing) or dry sherry
1 tablespoon rice vinegar
2 teaspoons sugar
2 teaspoons grated ginger
1/2 teaspoon salt
1/2 teaspoon ground black pepper
1 (1 pound) package 5 1/2 inch square egg roll wrappers
1/4 cup carrot, finely grated (optional)

Combine soy sauce and gelatin in small bowl. Set aside to allow gelatin to bloom, about 5 minutes. Meanwhile, place half of pork in food processor and pulse until coarsely ground into approximate 1/8-inch pieces, about ten 1-second pulses; transfer to large bowl. Add shrimp and remaining pork to food processor and pulse until coarsely chopped into approximate ¼-inch pieces, about five 1-second pulses. Transfer to bowl with more finely ground pork. Stir in soy sauce mixture, water chestnuts, mushrooms, cornstarch, cilantro, sesame oil, wine, vinegar, sugar, ginger, salt, and pepper. Divide egg roll wrappers into 3 stacks (6 to 7 per stack). Using 3-inch biscuit cutter, cut two 3-inch rounds from each stack of egg roll wrappers (you should have 40 to 42 rounds). Cover rounds with moist paper towels to prevent drying. Working with 6 rounds at a time, brush edges of each round lightly with water. Place heaping tablespoon of filling into center of each round. Following illustrations below, form dumplings, crimping wrapper around sides of filling and leaving top exposed. Transfer to parchment-lined baking sheet, cover with damp kitchen towel, and repeat with remaining wrappers and filling. Top center of each dumpling with pinch of grated carrot, if using. Cut piece of parchment slightly smaller than diameter of steamer basket and place in basket. Poke about 20 small holes in parchment and lightly coat with nonstick cooking spray. Place batches of dumplings on parchment liner, making sure they are not touching. Set steamer over simmering water and cook, covered, until no longer pink, 8 to 10 minutes. Serve immediately with chili oil.
********************************

Vegetarian Steamed Dumplings.- Another well known and loved appetizer.

1/2 pound firm tofu
1/2 cup coarsely grated carrots
1/2 cup shredded Napa cabbage
2 tablespoons finely chopped red pepper
2 tablespoons finely chopped scallions
2 teaspoons finely minced fresh
1 tablespoon chopped cilantro leaves
1 tablespoon soy sauce
1 tablespoon hoisin sauce
2 teaspoons sesame oil
1 egg, lightly beaten
1 teaspoon kosher salt
1/4 teaspoon freshly ground black pepper
35 to 40 small wonton wrappers
Non-stick vegetable spray, for the steamer

Preheat the oven to 200 degrees. Cut the tofu in half horizontally and lay between layers of paper towels. Place on a plate, top with another plate, and place a weight on top (a 14-ounce can of vegetables works well). Let stand 20 minutes. After 20 minutes, cut the tofu into 1/4-inch cubes and place in a large mixing bowl. Add the carrots, cabbage, red pepper, scallions, ginger, cilantro, soy sauce, hoisin, sesame oil, egg, salt, and pepper. Lightly stir to combine. To form the dumplings, remove 1 wonton wrapper from the package, covering the others with a damp cloth. Brush the edges of the wrapper lightly with water. Place 1/2 rounded teaspoon of the tofu mixture in the center of the wrapper. Shape as desired. Set on a sheet pan and cover with a damp cloth. Repeat procedure until all of the filling is gone. Using a steaming apparatus of your choice, bring 1/4 to 1/2-inch of water to a simmer over medium heat. Spray the steamer's surface lightly with the non-stick vegetable spray to prevent sticking. Place as many dumplings as will fit into a steamer, without touching each other. Cover and steam for 10 to 12 minutes over medium heat. Remove the dumplings from the steamer to a heatproof platter and place in oven to keep warm. Repeat until all dumplings are cooked.
******************************

Thai Pork Lettuce Wraps.- These can be made with almost any protein, like the other one's too, and make an excellent lunch, brunch or dinner offering. Fresh and healthy!

Serve 6 as an appetizer or 4 as a main course.
1 pork tenderloin (about 1 lb), trimmed, cut into 1-inch chunks
(or use ground pork, chicken, small shrimp, stir fry vegetables, etc.)
2 1/2 tablespoons fish sauce
1 tablespoon white rice
1/4 cup low-sodium chicken broth
2 medium shallots , peeled and sliced into thin rings (about 1/2 cup)
3 tablespoons juice from 2 limes
2 teaspoons sugar
1/4 teaspoon red pepper flakes
3 tablespoons roughly chopped fresh mint leaves
3 tablespoons roughly chopped fresh cilantro leaves
1 head Bibb lettuce, washed and dried, leaves separated and left whole

Place pork chunks on large plate in single layer. Freeze meat until firm and starting to harden around edges but still pliable, 15 to 20 minutes. Place half of meat in food processor and pulse until coarsely chopped, 5 to six 1-second pulses. Transfer ground meat to medium bowl and repeat with remaining chunks. Stir 1 tablespoon fish sauce into ground meat and marinate, refrigerated, 15 minutes.

Heat rice in small skillet over medium-high heat; cook, stirring constantly, until deep golden brown, about 5 minutes. Transfer to small bowl and cool 5 minutes. Grind rice with spice grinder, mini food processor, or mortar and pestle until it resembles fine meal, 10 to 30 seconds (you should have about 1 tablespoon rice powder).

Bring broth to simmer in 12-inch nonstick skillet over medium-high heat. Add pork and cook, stirring frequently, until about half of pork is no longer pink, about 2 minutes. Sprinkle 1 teaspoon rice powder over pork; continue to cook, stirring constantly, until remaining pork is no longer pink, 1 to 1½ minutes longer. Transfer pork to large bowl; let cool 10 minutes.

Add remaining 1 1/2 tablespoons fish sauce, remaining 2 teaspoons rice powder, shallots, lime juice, sugar, red pepper flakes, mint, and cilantro to pork; toss to combine. Serve with lettuce leaves using each leaf instead of tortillas.
NOTE: These are super flexible and an type of protein works great, even tofu and veggie items!
**********************************

After reading these I'm sure you can see about feeling free to substitute ingredients, right? You can use your refrigerator leftovers and turn them into something pretty great, eliminating waste and saving money at the same time. Depending on your dietary needs, you can allow for these as well. Have friends, partners or kids join in the assembly and make it a group project. You'll get done in no time at all, everyone will enjoy it and sharing the results will be appreciated by all!

So go ahead and make these your family's choice for an Asian Night and savor something unusual that can be fun too! Hope you enjoy them....

Saturday, January 8, 2011

It's back to the same old grind ..... only more so!


With the holidays out of the way, sorry for the lapse in postings but went back to school and we've been covering so much space lately I only have time to come up for air now and then, that I just let it go..... it's the weekend and so I have a couple of minutes to stop and assess the damage (more or less) and I can take some time to give updates on our adventures.....

School is going at a furious pace. Truly. No more "book learning" and time to breathe, it's now "hands on" all the way and so everything we've talked about and seen is now on our plate..... or I should say on the plates we need to present to the Chefs who then criticize it down to: finish (or napè), texture, color, seasoning and look, plus how long it took to produce, did you follow the appropriate sanitation methods, did you work "clean", did you present correctly, did your knife cuts impress?. It better be 100% perfect or points get deducted, so far I've got a 4.00 GPA, I've got to insure I don't lose points or my average will go down (Oh no!)... and we can't have that, can we? So you can say everyone is feeling the pressure which is building each and every day.... plus after doing this, you have to clean the whole kitchen, pots and pans, throw out the trash and mop the floors.... all must be impeccable!

Got handed a 75 recipe PDF file and we're presenting from 4 to 6 recipes on a daily basis. We've got 3 hours to do it, including the base needed and everything else that each recipe entails. These can be from a very basic Bechamel Mother Sauce to a Navarin D’Agneau Printanier :( Lamb stew with Spring Vegetables) sound familiar? Made this for Ricardo's birthday so I've got a head start on this one and I'll take as much help as I can... - Cotes De Porc Charcutiere w/ Pommes Puree :( Pork Chops w/ Mashed Potato & Demi Glace Sauce w/ Gherkins - Escalope De Veau al a Crème Petits Pois al a Francaise: (Escalloped Veal w/ Mushroom Cream Sauce) - Ballotine de Poulet Grandmère (Deboned Chicken w/ Mushroom Dressing) - Canard Poele Aux Navets: (Pan Roasted Duck with Turnips - or other such delights..... (yes, we get to take it home or eat it...YUM!)

Considering that all dishes are classic French Cuisine means that should a recipe call for a specific sauce base or preparation, everything must be made without short cuts! You've got to make the Consomme or stock to use starting with roasting the bones (for color and flavor) along with aromatic vegetables (more color and flavor), cooking it to achieve the desired color, taste and texture expected THEN proceed to prepare the rest of the recipe.... lots of hard work at a fever pitch and people running around like headless chickens as you can imagine! Know something else? We don't use blenders or food processors. All whipping, blending and such is done by hand with a wire whisk and yes, my arm is ready to fall off..... (there are modern appliances here and the kitchens are state of the art, but you need to learn the classic ways before you can proceed to the other stuff which will come later).

This block, Culinary Foundations II, brings new Master Chefs to learn from and we have two, a very experienced female and a strict male Chef from Laos (who sometimes I can't understand, but I get the gist of what he wants mostly.... sometimes not), but they are picky and very demanding. We are doing very well and more than holding our own and it's been quite exciting really..... exhausting, nerve wracking, satisfying and frustrating all at the same time. At the end of the day you are T I R E D! Loving it!

To top of our return to school, we were greeted by a New Year's snowfall just outside the school, it was lovely..... just what we wanted to see and there it was, little plumes of snow floating towards us while all was quiet (seems than whenever it snows, the world get quiet- why is that? I love it!) Once again we're in our warm kitchens while snow falls upon the maples.... MMmmm.
But getting back to food and for those of you that love fish, here are two recipes that are equally wonderful with them. The first one is a traditional "Fish Fumet"..... lovely and light, while the second one is a basic tartar sauce type only much, much better and I like it on almost everything! So tasty..... hope you enjoy them....

Fish Fumet .- The best (the only) bones to use for fish fumet are saltwater white-fleshed fish bones. (If you can get the head included, that’s great, but remove the gills and eyes before using. This is what you want for it contains the most gelatin that will give the flavor you want) Fish to use are sole, halibut, flounder, turbot, etc. Do not use bones from fattier fish like trout, salmon or mackerel. Your best bet is ask your local fishmonger for bones or next time you serve fish, save the bones when you fillet it, freeze and use for this.

1 oz Butter (solid)
4 oz Yellow Onion, chopped fine
2 oz Celery, chopped fine
2 oz Mushrooms, quartered
4 lb Fish Bones
8 fl oz White Wine
Water (as needed to cover)
½ ea Bay Leaf for sachet (put these in some cheesecloth and tie them up, put in)
¼ tsp Black Peppercorns for sachet
8 ea Parsley Stems for sachet

Butter the bottom of a heavy stockpot or sauce pot. Place the onion, celery, mushrooms (called a white mirepoix) in the bottom of the pot and the bones over the top of it. Cover the bones loosely with a round of parchment paper. Set the pot over low heat and cook slowly for about 5 minutes, until the bones are opaque and begin to loose juices.

Add the wine, bring to a simmer, and add the sachet and water to cover. Bring to a simmer again, skim, and let simmer for 30-45 minutes. Strain through a Chinois or fine strainer or even a strainer with some cheesecloth or towel. Cool, in a cold water bath, and refrigerate.
NOTE: This is a lovely fish consomme that can be used alone or as a base for other sauces. Use this as a poaching liquid for fish, you can continue to simmer it until you reduce it and use like a more concentrated sauce or glace, use as a base for fish stew or chowder, paella and many more....
*****************************************

Remoulade Sauce.- A "tartar sauce" with all the trimmings, so if you like a cold sauce for fish, chicken, pork or whatever.... this is it. Easy to make and yummy to eat....

½ fl. oz. White wine vinegar
1/2 oz. Dijon Mustard
2 ea. Egg yolks
1 Pint Canola or vegetable oil
¾ oz. Capers, Chopped Fine
3/4 oz. Gherkins, Chopped fine
1/4 oz. Parsley, Chopped Fine
1/4 oz. Chervil, Chopped fine (you can just use all parsley if you like and omit this)
1/4 oz. Tarragon, Chopped fine
1/4 oz. Dijon Mustard
¼ oz. Anchovy essence (I use the oil from a can of anchovies, a drop at a time)
Salt and Pepper

Place the egg yolks in the bowl and beat with a whisk until pale yellow. Add white wine vinegar and beat well. Combine ingredients (mustard, salt, pepper) and add to the egg yolks. Mix well. Very slowly, almost drop by drop begin adding the oil beating continuously. Once the emulsion forms (it begins to thicken, this is the mayonnaise base), you can add the oil slightly faster. If the mayonnaise becomes too thick, thin with a little of the vinegar. (or water if already tart enough) Gradually beat in the remaining oil until it is fully incorporated and emulsified.

Adjust the tartness and the consistency by beating in a little lemon juice at the end. Add capers, gherkins and the rest of the ingredients. Refrigerate for at least 15 min, serve.
NOTE: You could skip over making your own mayonnaise but it's great this way, if you do then just use the mayo you've got and add the rest in and season. You can also add celery, endive, red cabbage or the like and turn it into a dressing for these too.....
***************************************

Sorry I'm not including more recipes but I will, soon. Right now it's getting late and sleep beckons more than anything else, just need to catch up and get back before I can devote time to fun pursuits. Looking to move closer to school, interviewing all over, doing volunteer projects with other Chefs to get experience, network and job leads while still do my "home" stuff..... The good thing is that it makes you want to get up in the morning and face the new challenges and that's amazing to have. Hoping everyone is well and happy and the New Year is off to a great start for all..... Talk soon

Thursday, December 30, 2010

Now New Year's is on our Mind......


We got Xmas and Ricardo's birthday out of the way and I can report that the Lamb Navarin I made for his birthday was a huge success and my guys raved about the subtle yet complex flavors found in this amazing dish! It was very good and although had some work, is an easy dish to master. I totally recommend it, YUM!

I also heard from a couple of people (my sister among them, Hi Karina!) asking what kind of food budget do I have if I am able to put the kinds of foods I write about on the table on a regular basis even though I'm always talking about comparison shopping and buying on the cheap. After talking about all this I found that among the things that allow me to do as much as I'm able to is the simple fact that Las Vegas DOES have cheaper food prices. We compared item by item prices and we do have preferential prices on most things, I had no idea there was such a difference but for whatever reason it helps us out a lot, otherwise our menus would be much simpler.....

Anyway, while I still can I will take advantage of whatever specials we get and continue preparing great food..... this time with New Year's in mind and here's the menu I've come up with. I should also mention that I shop twice a month to be better able to take advantage of specials so the menu I'm posting I actually shopped for on Dec. 15th..... I haven't been to the market since but I might get some more butter today.....

The Garcia's 2010-2011 New Year's Menu

Fiori di Zucca Ripieni (Stuffed & Fried Squash Blossoms)
served with a light Tomato Basil Sauce

Delicate Lobster Ravioli served with
Champagne Cream Sauce

Asparagus served with a White Wine Reduction Hollandaise Sauce

Cauliflower Florets with a Crunchy Lemony Butter Topping

Peach Baluchons (Lovely Peach Pastries)

Italian Prosecco Sparkling Wine

**************

Another menu worth anticipating don't you think? Plus if you look at my menus you can see that a lot of them repeat ingredients, thereby lowering their cost to produce and make them a viable option for me. I should also mention that the Lobster being used for the raviolis can only be possible due to an outrageous special at the Korean Market of $1.99 per pound because it was not whole but lobster pieces they had, so although it is fresh lobster meat it's only pieces along with some shells (which I want to flavor the broth and sauce) and since it will be mixed with other ingredients for the raviolis I don't need big chunks or a tail for presentation and saved me a lot.... otherwise, we'd be having something else. lol

Here are the recipes for our wonderful end of year meal:

Fiori du Zucca Ripieni (Stuffed & Fried Squash Blossoms).- An Italian recipe this time of a favorite Mexican dish, but any way you serve it it's wonderful.

12 Squash Blossoms, centers cleaned
1/2 cup Mozzarella, Jack or similar melting cheese, cut in small dice
3-6 Anchovy fillets, cut in small pieces
2 eggs
1/2 cup flour
Salt & pepper to taste
Oil

In a bowl combine cheese and anchovies well. Stuff into the flowers and lightly twist these so they will hold in the stuffing.

Beat the eggs well. Place flour in shallow dish, salt and pepper this. Add oil to pan to get about an inch or so depth and over med heat and dip flowers into the flour, dust off the excess, then into the egg and into the flour a second time and fry in the oil, turning several times, until golden.
Drain on paper towels and sprinkle salt over them while still hot.

Serve in a small dish putting some sauce down on the dish first then setting the blossoms on top.

Sauce: In a pan with a little oil, put 1/2 onion sliced thin and sweat for a couple of minutes, add 1-2 cloves of garlic which were pressed out from a garlic press, add salt and pepper and a pinch of red pepper flakes, add 1 small can of tomato sauce (or fresh) and 2-4 oz water plus 1 tsp of sugar, some Basil or Oregano and allow to come together for a few minutes, the sauce should be light and tasty.
NOTE: These can be served without stuffing and sauce, just lightly fried and crunchy.
*************************************

Lobster Ravioli with Champagne Cream Sauce.- These are always wonderful and delicate and everyone loves them. You can make your own pasta or simply use some Chinese Egg Roll Wrappers and save yourself the work.

1 package Egg Roll Wrappers
1 cup mushrooms (button or your choice), cleaned and chopped fine
1/2 med onion, chopped fine
1 cup lobster meat, chopped fine
2-4 tbl butter
1/4 cup Parmesan cheese, grated
1/4 cup Ricotta cheese (or cottage cheese mixed with 1 egg)
1 carrot, peeled and sliced into thin rounds
1 tbl tomato paste
the lobster shells
1 celery stalk, cut in half, add the leaves
1 garlic clove, peeled
1/4 onion
1/2 cup champagne or sparkling wine
1 tbl butter
1 tbl flour
1/4-1/2 cup heavy cream
Basil leaves cut into very fine ribbons
salt & pepper to taste

In small saucepan put the lobster shells with 2 cups water on the stove and bring to a boil, add the celery, the piece of onion and garlic and simmer until it's reduced to 1 cup or so. You will use this broth as a flavoring for the sauce.

In a pan with 1-2 tbl butter over med-high heat, add the onion and carrot and saute until tender. Then add the tomato paste and stir to cook it slightly. After about 3-4 min, add the lobster broth made before and the wine. Bring to a boil and simmer until this reduces down to a third it's original quantity.

Make a roux from the flour and butter by heating up the butter, adding the flour and cooking it to loose the flour taste. Add this to the sauce that's been simmering, whisking it to avoid lumps so that it thickens. To finish it, add some of the cream until you've got the consistency you like.
If you want it chunky with the veggies, leave as is, but I run it through a sieve and just use the creamy sauce. Set aside.

In a pan with a little butter in it, add the onion, mushroom and cook until tender, add salt and pepper and the lobster meat and lightly cook this. Do not overcook, you want it tender. Now put this mix into a bowl and add the Parmesan and Ricotta and mix well. This is your filling.

Take your egg roll wrappers (or pasta) and lay across your work surface making two rows and put a teaspoon of the filling onto each on the first row. Brush the edges of these and place the second row of the wrappers on top of the stuffing and seal the edges well either by pressuring them or by cutting with a cookie or pasta cutter so they are well closed. Lay these to the side, while you get your salted water ready for cooking them. They will cook rather quickly and float to the top, fish them out with a slotted spoon, place on plates with some sauce on top. Add some more cheese and the Basil leaves for presentation and enjoy!
************************************

Asparagus with White Wine Reduction Hollandaise Sauce.- One of our favorites done a quick way but with all the flavor..... if you peel them with a regular potato peeler you'll make even the toughest ones, tender and great!

1/4 cup white wine vinegar
1/4 cup white wine
10 black peppercorn
1/2 onion, finely chopped
8 egg yolks, beaten
1cup butter, melted and cooled
Kosher salt, to taste
Tabasco sauce or cayenne, to taste
1/4 cup warm water
1-2 tsp lemon juice
1-2 lb asparagus with stalks peeled for tenderness

Put vinegar, wine, peppercorns and onion in a pan and simmer over med-high heat until reduced to 2 tbl, about 5 min or so. Strain the reduction through a fine sieve and let cool.

Pour water into a med pot to about a 2 inch depth. Be sure you have a bowl that fits on top but won't touch the water so you have a bain marie or water bath. Bring the water to a simmer over med heat. In the bowl, away from the water, whisk together the reduction, yolks, butter, salt, Tabasco and set over the pan. Whisk quickly until the mix is rich and thick, at least 4-5 min without stopping. It doesn't matter how it looks, ok? Just forge ahead. Take the bowl off the water bath and add the water and lemon juice and keep whisking until the sauce becomes thick and velvety. Keep warm.

If you want you can tie the asparagus together with some kitchen twine (so they don't get injured and are easy to remove) and put in a pot with lots of salted water over high heat. Cook until still crisp or about 4 min, don't overcook or they will be wilted and mushy. Remove, drain and place on a platter, pour some sauce over top and serve at once.
************************************

Cauliflower Florets with a Crunchy Lemony Butter Topping.- You can serve this "head" complete or separate the florets, but if you serve whole the sauce won't cover the same so I leave the florets separate and toss.

1 head of cauliflower, cleaned
1 tsp of salt
2 slices of lemon
2 large eggs
7 tbl butter, melted
3 tbl breadcrumbs from the blender (made from lovely bread)
the juice of one juicy lemon
3 tbl parsley, finely chopped
salt & pepper to taste

In a big saucepan with water, salt and the lemon slices, place on the stove until it boils. Add the cauliflower(either whole or in florets) and cook until just done, about 15 min or just tender. Drain and reserve.

In a small sauce pan with water, also boiling add the eggs and cook for 10 min. then remove and run cold water over the eggs, peel and chop fine. Cover with plastic wrap and reserve.

In a large pan over med high heat, add the butter and add the breadcrumbs when the butter stops foaming. Stir them around to cook them and they become golden and crunchy. Remove from the heat and stir in the lemon juice then add the parsley and chopped egg and mix well. Season with salt and pepper.

Now, in the serving pan, put the cauliflower and top with the buttery breadcrumb mixture and toss well. Top with some extra parsley to serve. You can also add some red pepper flakes if you like or add or change seasonings.
**************************************

Pear Baluchons (Pear Pastries).- Pears were on special yet this presentation makes this lovely fruit truly special ..... You can make this a short cut version by using vanilla pudding (I had leftover Pastry Cream which is better because it really jells which makes it easy to use) and buy Puff Pastry at the store. Of course you can make your own but I've been lazy and decided to just buy some..... Those refrigerated dough canisters (crescents) are perfect!

Fruits, all types of stone fruits can be used for this, pitted and cut into wedges
1 package Puff Pastry or your choice
Creme Patissiere, Vanilla Pudding or your choice
1 egg yolk
2 tbl heavy cream
1/4 cup sugar
2 tsp cinnamon, ground
nutmeg
4 tbl sugar plus 1 tbl ground cinnamon - mixed together

Pre-heat oven to 400 F. Make 4.5 inch squares out of the pastry you're using and lay them flat on your work surface.

Place the fruit in a bowl, sprinkle with sugar, cinnamon and nutmeg. Reserve the "other" sugar-cinnamon mix for topping. Toss well and allow to rest for 5-10 min.

On baking sheets, either with PAM, parchment paper or a silpat, place some pastry squares and top each with about 2-3 tbl of the pastry cream. Top with about 1/4 cup of fruit and bring the ends together on the top and press together, they will look like little packages. Refrigerate at least to min and allow them to rest.

In a small dish mix together the egg yolk and the cream. When you are ready to take the pastries out of the fridge, you will "paint" them with the egg wash and then sprinkle them with the sugar-cinnamon mix and then bake in the oven for 15-20 min or until golden brown. You can serve with ice cream or make extra and have them as a breakfast or brunch pastry the next morning.
******************************************

There, you have my New Year's menu and we're all set. I just came back from the store and found a great Italian Prosecco for under $6 (big price difference from French Champagne) and I've got everything ready to start tomorrow. Made the seafood broth and cleaned the lobster. My "mis en place" is all done so everything should go smoothly. Both Rene and I are counting the days to go back to school and we've missed our routine a lot and can't wait to get back to it, we've got a very challenging block coming up which will be amazing!..... But for the time being I'd like to wish you and everyone at your house, the very best New Year's ever! May your bubbly be sparkling, and all your wishes come true... for all of us! Cheers to all!.......