Showing posts with label Drinks. Show all posts

Tuesday, December 28, 2010

Follow Up Recipes for You!

I posted my "other holidays" menu on the fly while cooking and neglected to include the actual recipes. I heard from more than several friends asking for them and after apologizing for my oversight am only more than glad to post them on here for you....

It was wonderful to hear from you and know that not only are you reading my posts but are actually interested in making some of my entries. Amazing! I love it! Thank You! This will keep me working on finding even more amazing food to make and share. Here we go!

Frisee Salad with Raisins, Pistachios and Roasted Apples served with a Sweet Cider Vinaigrette and Chevre Rounds.- A lovely, crisp and sweet beginning to any meal....

1 Frisee lettuce (or your choice), washed and separated
1/2 red onion, cut in very fine slivers
1/4 cup raisins (any color or nut you like)
1/4 cup pistachios, peeled and chopped rough
2 apples, Granny Smith, peeled, cored and cut in thin slices
3-4 slices of bacon, cooked and crispy, cut in small pieces
1/4-1/2 Blue cheese or other cheese crumbles you like
1 1/2-2 cups Sweet Cider, any kind but make it filtered
1 tbl Dijon or dark brown mustard
1/4-1/2 cups oil, preferably light oil like vegetable or canola
1 tbl water
salt and pepper to taste
1-2 tbl honey

Once you've got your apples sliced and ready, in a hot pan with a very little oil (just to keep it from sticking) or maybe some PAM, put the apple slices and cook them until they are browned, turn and do both sides. You could also split the apples in half and roast in the oven.

In a small sauce pan, place the cider and bring it to a boil, lower the heat to simmer and allow to reduce until you have about 1 cup left. Once this is done, allow it cool either at room temperature or by placing it in the fridge for a little while. Once it's cool and you're ready to put your salad together, put the cider in a bowl, add the honey, mustard, water, salt and pepper and whisk it to combine well. Begin adding the oil in a small stream while whisking all the while and keeping an eye for it to emulsify, you just want it to come together, then stop. You might use less or more oil, keep an eye on it. Taste the dressing and adjust seasonings.

In a larger bowl put your greens, onions, raisins, nuts and combine well. Place on your salad plates and arrange the apples and bacon on top and pour some dressing on it. Top with the cheese crumbles. Serve.
*********************************************

Lamb Navarin with a Cabernet Sauvignon Tomato Sauce
and Roasted Tourned Vegetables.- A flavorful stew type dish that can be both healthy and satisfying....

2 tbl oil
1 1/2 lbs lamb shoulder, cut into med. cubes
Kosher salt and freshly ground black pepper, to taste
4 med carrots, peeled and cut into 2 inch pieces
1 med carrot, chopped in rounds
1 med yellow onion, chopped
2 cloves garlic, crushed
2 tbl flour
1 tbl tomato paste
1 cup good red wine, your choice (optional)
4 med turnips, peeled and cut into 2 inch pieces
4 med potatoes, peeled and cut into 2 inch pieces
3 tbl butter
2 tsp sugar
12 pearl onions, peeled (optional)
1/3 cup peas (fresh or frozen)
1-2 tbl flat-leaf parsley, chopped fine , for garnish

Heat oven to 350F. Heat oil in a large heavy pot over med-high heat. Season lamb with salt and pepper. Working in batches, add lamb and cook, turning once, until browned, 8–10 min. Transfer lamb to a plate; set aside. Add the 1 carrot in rounds and yellow onions and cook, stirring until vegetables are soft and brown, about 10 min. Add garlic, flour, and tomato paste and cook, stirring, until tomato paste begins to brown, about 2 min. Add in 5 cups water, the wine and the lamb. If you're not adding wine then add 6 cups of water. Cover, bring to a boil, and put in the oven. Cook until lamb is tender, about 50-60 min.

Transfer lamb to a plate and cover with foil to keep warm, without liquid. Strain the liquid into a saucepan and discard solids. Bring liquid to a boil over med-high heat, skimming surface really well and cook until this is reduced down to 2 1/2 cups, about 25 min. Reserve.

Meanwhile, using a paring knife, trim each piece of the remaining carrots (the 4 in 2 inch pieces), as well as the turnips and potatoes, into tourne's (or cut them into a large dice). Set potatoes aside in a bowl of water. Heat a large skillet over med-high heat and add carrots, butter, sugar, salt, and 1 cup water. Partially cover and cook for 10 min. Add turnips and pearl onions, partially cover, and continue cooking until liquid has evaporated and vegetables are tender, about 10 more min. Uncover and continue to cook, swirling skillet, until vegetables are golden brown, about 3 min. Add 2 tbl water, swirl skillet to glaze vegetables, and remove from heat; set aside and keep warm.

To serve, put the lamb, carrots, turnips, pearl onions, potatoes, and peas into the sauce and cook until hot, about 2 min. Serve in bowls. Garnish with parsley.
NOTE: This preparation can be applied to other meats as well as you can imagine. This is a basic French procedure that can serve you well for a lifetime.
******************************************

Floating Islands (Ile Flottante) or Eggs in the Snow.- (Oeufs à la Neige) "Eggs in the snow" is one of the most ingenious of classical French desserts, and one that is well known in the traditional American culinary lexicon. Doesn't matter what you call them, they are delicate, lightly sweet and cloud like.

4 cups milk
1 vanilla bean (or 2 tsp vanilla extract)
6 eggs
1 1/3 cups sugar

Bring 2 cups of the milk to a boil, then remove from heat. Split vanilla bean in half lengthwise (or vanilla extract), add to milk, cover and allow steep for about 15 min with the heat off, and let rest. Separate whites and egg yolks. Set aside 4 of the egg whites and freeze the other 2 for another use. Beat yolks and slowly sprinkle in 1/3 cup of the sugar. Continue beating until thick and pale yellow in color.

Remove vanilla bean from milk (if using). Scrape seeds from bean and add to milk, discarding pod. Pour milk, in a fine stream, into egg yolks while beating them continuously. Pour mixture into another pan and cook over low heat, stirring constantly until it forms a custard thick enough to coat the back of a spoon, about 20 min or so, don't rush this or the eggs will scramble. Pour custard through a strainer into a shallow serving dish in which you will serve your "islands". Cool to room temperature, then refrigerate.

Beat egg whites until foamy, then add 1/3 cup of the sugar very slowly, continuing to beat until egg whites are shiny and stiff but not dry.

Put remaining 2 cups milk in a large shallow pan and bring to a low simmer. Using a large slotted spoon, form big egg shapes out of whites and poach them in the milk for 30 sec on each side. Do not overcook. Put the "eggs" on a clean towel to drain. These are the "islands".

Combine the remaining 2/3 cup sugar with 1/3 cup water in a small heavy saucepan. Cook over med-high heat until sugar caramelizes, turning amber in color. Keep and eye on it so it doesn't boil over. Remove pan from heat to prevent caramel from burning. This can happen very quickly, so it is best to take the pan from the heat just before the sugar darkens, as it will continue cooking. Cool for 5 min or until caramel forms into threads when drizzled from the tines of a fork. This is called "a continued stream".

Using a slotted spoon, carefully arrange the "eggs" on top of the custard which is in your serving dish. Dip a fork into the slightly cooled caramel—you will have to work quickly—and wave the fork over the dessert to form threads of caramel that crisscross and tangle. They will solidify over the "islands" and remain. Serve immediately.
****************************************

Italian Prosecco Wine or Bellini Cocktail.- Either just the Prosecco or turned into the great Bellini cocktail, this is sure to let you know it's a special occasion....Fantastic!

The Bellini is a rich blend of peach purée and Prosecco, a sparkling, dry Italian wine. Named for the Venetian painter Giovanni Bellini, the Bellini was created at Harry’s Bar in Venice in 1948 by owner Giuseppe Cipriani. This classic, refreshing drink was served only in the summer months, when white peaches were available. The juice and pulp of the peaches were extracted through a sieve and blended with Prosecco. The rosy-colored elixir became a year-round drink once frozen peach purée became available.

What to buy: Frozen peach purée is difficult to find, so you may be limited to savoring a Bellini during the summer months, when fresh peaches are at their finest. Despite what others tell you, only use white peaches for a Bellini, or the color and taste will be off.

3 parts Prosecco
1 part fresh or frozen and thawed white or see note.

Note: You may want to make your own peach purée by passing pitted peaches through a food mill, then passing the purée through a sieve. I've used canned peaches and we've still enjoyed it, and Jumex (Mexican fruit drinks in a brick) have an unfiltered peach juice that is good too since I haven't seen white peaches in the desert NEVER!
*****************************************

There you go! Happy cooking everyone..... I'm right in the middle of preparing the lamb so I can put it in the pot and let it cook until it's done. Ricardo is looking forward to having one of his favorite meals and is in a jolly mood receiving phone calls from all of the kids wishing him a "Happy Birthday"..... and even though the temperature is going down and we're expecting another storm to come in (watch out Midwest and East it will be on it's way to you shortly...) its expected to be below freezing for the BIG New Year's Eve celebration on the Las Vegas Strip this year..... but maybe with all the people (they're expecting over 300,000, can you imagine?) and the drinks and the lights, they won't feel it as much..... We will be staying away from the Strip..... Talk soon!

Sunday, August 1, 2010

Sundays are great Brunch Days......

What can I say about Sundays? Day of rest (from what? not working means every day is Sunday for me! Sounds nice but can be boring after a while...)- day to get together with friends and family, make Sunday dinner a tradition for your family, day to be lazy and selfish, day to get your act together for starting a new work week......

Whatever Sunday means to you, or even if you make another day of the week into "your" Sunday if you work on this day- we can make it a great day..... Sunday just seems to bring out the relaxed in us for some reason, from the time you wake up and carries it all throughout the day; maybe it's the sleeping in, not hurrying through breakfast or just being able to have breakfast that makes it special. In any case, it's good for us to try and conserve this feeling all week long, don't you think?

For us, Sunday means Brunch with a late breakfast that will carry us until dinner time. After sunset brings a special kind meal to top off the week and recharge energies to get us going on beginning a new week. It doesn't mean you have to spend all day preparing and working, not at all. I've found that I can get organized well in advance and it's now become natural for me to think ahead, sometimes weeks in advance, when I initially go shopping (sparing shopping time and having to think on the spot and gas savings too) to include items I might like for the next weekend or so.... this way I've already got one or two things chosen.

It also makes sense during the week when making other things for our daily menu's, if it's similar or can be worked into your time schedule, to make advance steps that will save time and energy during the weekend. Maybe you can recycle leftovers that with little effort can be turned into a Brunch item or prepare items and save them in zip lock bags to save prep time later; since sauces store well these can be made in advance too; freeze things that might work later, many items can be done in advance (look at all the recipes you're considering to see which can benefit from advance planning- at first it might take more time and planning but once you get used to working this way it's a snap) and you'll love the time and work this saves you later. Makes planning something special very easy.....

Also, think that when making a particular dish for one day might mean that if you make extra, half can be stored or frozen for it's use on the weekend. It can used as a base for other meals by simply adding this or that, giving it a different spin and coming up with an altogether different meal! Even pieces cut from vegetables, trimming meat or bones being prepared for one dish can be stored in zip lock bags and kept for the day when you need a soup, stock, sauce, chili, salad or ? You'll have less waste, save money and time.

I'm sure you get the idea (or maybe all this just sounds like more work to you.... ) but it will save time and money, really. The trick is to change your mind set and think in advance, but it does mean to give a spin in how you look at things.

Here are some great dishes you can incorporate into your Brunch or Family Dinner.....

Artichokes with Roasted Garlic Aioli.- A great appetizer or light lunch. We love the flavors here and have it often!

1 egg yolk
1 tsp white wine vinegar
1 tsp Dijon mustard
1 cup grape seed oil (I use olive oil usually)
1 head garlic, roasted (see note below)
Salt and pepper
Lemon juice to taste
12 baby artichokes (poivrade variety, which are the tiny ones)
1 to 2 lemons
2 to 3 tbl olive oil

Make the aioli: Beat the yolk with the vinegar and mustard. Whisk in the oil, drop by drop, to make a thick mayonnaise. Squeeze the garlic out of the roasted cloves into the mayonnaise and whisk smooth. Season with salt, pepper, and lemon juice, to taste.

Prepare the artichokes: Trim the artichokes, rubbing with lemon as you go, until you are down to the core with a bit of stem attached. Halve. While you’re trimming, bring a pot of water to the boil. Squeeze the juice of a lemon into it and salt it. Drop in the artichokes and cook until tender, about 10 minutes, depending on the size. Drain, and pat dry. Heat the olive oil in a skillet and brown the artichokes on all sides. Transfer to paper towel to drain. Serve with the aioli.
NOTE: To roast a head of garlic, wrap in foil with about 2 tsp olive oil and bake for an hour at 350F.
I also stretch the aioli even more by adding either heavy cream or sour cream (or creme fraiche too), to "loosen" it up and then turn it into a dressing which I use with salad, vegetables, as a dipping sauce, over fish or chicken or you name it.... it's wonderful!
*******************************************

Lovely Watercress S
alad.- How about this for a change? It's great! (I also use this salad in place of lettuce on all kinds of sandwiches, fantastic!)

4 handfuls watercress, with the stems trimmed, rinsed
Extra virgin olive oil to taste
Champagne vinegar to taste
Salt and pepper
2 handfuls small green grapes
1 handful slivered almonds, toasted

Toss the greens with the oil, vinegar, salt and pepper, to taste. Arrange on a serving platter and scatter over the almonds and grapes. Serve.
**********************************************

Belge-Ette de Veau (Belgian Veal Stew).- Belgian counterpart to the French version but very similar, truly comfort food. Don't like or want veal? Use pork!

4 lbs veal shoulder, cut in into chunks
8 cups chicken stock
1 boquet garni (see note below)
1 carrot
1 onion, poked with 2 cloves (just insert them into the onion and drop in)
Salt and pepper
5 tbl butter
12 oz small cremini or button mushrooms
3 tbl flour
1/2 cup crème fraîche (or half sour cream, half heavy cream)
A few handfuls of finely chopped parsley for garnish

Bring a large pot of water to the boil. Salt it, and blanch the onions one minute. Remove and set aside. In the same pot, blanch the meat four min. Drain, and rinse under cold water. Put the veal in a pot and cover with all but 1 cup of the chicken stock. (If you need more liquid, add water.) Drop in the bouquet garni, carrot, and clove-studded onion. Bring to a boil, reduce the heat, and simmer very gently, uncovered, 1 to 1-1/2 hours. (I make it in the pressure cooker and it takes all of 30 min....! I cook the entire dish in there and makes for less cleanup)

While the meat cooks, peel the blanched onions. Melt 2 tbl of the butter and gently fry them together with the mushrooms until golden, about 5 min. Pour over the remaining cup of stock and cook until tender and all the liquid has evaporated, about 10 min. Set aside.

When the meat is very tender, but not falling apart, remove from the heat. Discard the carrot, onion, and bouquet garni. Strain the liquid into a saucepan. You should have about 2 cups: if you have more, simply boil to reduce over med-high heat until you get the right volume. Set the meat aside with the mushrooms and onions and keep warm.

Melt the remaining butter in a saucepan. Whisk in the flour and cook one minute. Pour over the cooking liquid and simmer to thicken, about 10 min, skimming off any film that rises to the surface. Add the cream, season with salt and pepper, and pour over the meat. Gently reheat, transfer to a dish, scatter of the parsley, and serve.
NOTE: The bouquet garni is a bundle of herbs usually tied together with string and mainly used to prepare soup, stock, and various stews. The bouquet is boiled with the other ingredients, but is removed prior to serving. There is no generic recipe for this, but most recipes include parsley, thyme and bay leaf. Depending on the recipe, it may include basil, burnet, chervil, rosemary, peppercorns, savory and tarragon (my favorite!)....
-You can also add or substitute other vegetables for the ones here, follow your taste.
*******************************************

Meringue and Almond Cake.- Rich yet light and full of wonderful almond flavor..... It's also one of the prettiest cakes you'll see....

4 oz almonds or hazelnuts, finely ground
1 tbl cornstarch
1/2 cup sugar + 1 tbl sugar
4 egg whites
1/2 cup + 2 tbl sugar (for the butter cream)
4 egg yolks (for the butter cream)
1 cup butter, very soft (for the butter cream)
1 tsp vanilla extract (for the butter cream
1 cup slivered almonds, toasted (for the topping)
6 peaches, sliced thin, unpeeled (for the topping)

Make the cake: Heat the oven to 275F. Line two baking sheets with parchment and draw on two 9-inch. (You could also do rectangles). Combine the ground almonds, cornstarch, and all but 2 tbl of the sugar. Beat the whites to peaks, then beat in the remaining sugar to make a stiff meringue. Fold in the almond mixture in three batches to combine thoroughly but gently. Using a piping bag with a large tip, (or use a plastic bag with one of the bottom corners cut off) pipe the meringue onto the circles on the parchment. (so it looks like a thick white cord coming out, start on the center and work in a spiral, making it larger as it goes until you end up at the edge of the circle you drew on the paper) Bake until crisp and dry, about an hour and a half. Keep watch on it so it doesn't burn and get only slightly golden.

Make the butter cream: Heat the sugar with 1/3 cup + 2 tbl water to dissolve, then boil to soft-ball stage, which is just before the syrup changes color (239F on a candy thermometer if you're using one). Beat the egg yolks with a mixer, then, with the beaters running, quickly add the hot syrup in a thin stream, a little at a time. Continue beating until the mixture is cool and forms and thick mouse, about 5 min. Beat in the butter, gradually, and finally add the vanilla.

Assemble the cake: Set a round of meringue on a serving plate. Spread over a quarter of the butter cream. Lay in a layer of sliced peaches. Spread the top layer with butter cream and set it on top on the first. Spread the remaining butter cream over the sides of the cake. Press the toasted almonds all around the sides. Arrange another layer of peach slices on top.
NOTE: You can use other fruits for this as you like, but I've found that stone fruits work best.
*******************************************

"The 44" - Orange - Coffee Drink.- Sounds strange but tastes great and packs a punch! You really need to plan ahead for this one.....

1 large organic orange, well washed
44 coffee beans
44 sugar cubes
4 cups vodka

Poke the orange with a skewer or knitting needle and insert the coffee beans through the slits in the skin into the orange flesh. Put the orange in a sterilized preserving jar (with an opening large enough to fit an orange through), add the sugar, pour over the alcohol, seal, and shake. Store in a cool, dark place, giving the jar a shake every day for 44 days. Filter the liqueur through a coffee filter into a serving bottle.
NOTE: This recipe is for one jar or bottle that will accommodate 4 cups, if you want to make more then adjust the recipe as needed. I make all my home made liquors (kahlua, flavored vodkas, galiano, etc. about twice a year but in Sept/Oct for sure so they will be ready for Xmas since they make fantastic gifts and nice to gave during the holidays. More recipes under "gifts" section.
************************************************

Better Citron Presse (Lemon Beverage).- A popular beverage served in bistros which you can turn into a great aperitif....

2 cups sugar
Peel from 2 lemons, julienned
2 cups water
mint springs
Vodka

To make lemon syrup: put the sugar and lemon in a saucepan with water. Bring to a boil just 5 min. Remove from the heat and cool. Store in a glass jar in the refrigerator. Put 1-3 tbl of lemon syrup in a glass with a few ice cubes and a sprig of mint. Squeeze in the juice of half a lemon. Stir in 1 oz vodka, add cold water to lighten. Sweeten with more syrup, if you like.
NOTE: This can be non-alcoholic or with vodka if you like. You can also use sparkling or soda water if preferred or Lemon-Lime soda.... your choice.
*****************************************

I'm waiting for the guys to settle in before serving, we decided to leave the main dishes shown here for dinner yet we'll be having the artichokes and some crusty Bruschettas made with home made baguettes (Yay! so good!)..... here's the drill: Shredd Mozzarella, chop black olives and have ham and slices of tomato, basil leaves and onion on hand.

Mix the mozzarella, olive oil, vinegar, oregano, onion and black olives. Mound the mixture on the cut side of the baguette halves. Bake at 425 F for 8 - 10 min or until bubbly and golden.

Remove from oven and lay sliced tomatoes, basil leaves and ham over baked sandwich and serve. Amazingly easy and good! Hope you enjoy it, talk soon......

Thursday, June 10, 2010

More Summer Fruit Ideas..... Yum!

Summer is in full swing and more and more, seasonal fruit is all around us. What a perfect addition to the hot weather! Sweet & juicy, it certainly adds a lighter and fresher touch to Summer, plus it's just the thing for lighter meals.

Sometimes I've found that letting the fruit rest for a day or two after bringing them from the market (less if you've purchased them from the Farmer's Market or your own orchard) to allow them to come to temperature slowly and get rid of the refrigerated time they're been through in order to keep them from ripening. This lets them develop the sugars that were "stunted" by the cold.... Sometimes though this doesn't work and the fruit just never gets sweet and is a sad, sad thing since you're anticipating your lovely fruit, but we do what we can, right? Place in a brown paper bag to ripen but keep checking them or they will get "over" ripe.... You can also "macerate" fruit in wine like Sherry as this adds another depth of flavor and then you can use them like this with the addition of whipped or ice cream..... just put them in a bowl, sprinkle some sugar and add the Sherry, allow to rest for 1-2 hours.....

Don't forget that almost any fruit makes great drinks too! Make the same as you would a limeade, orangeade with water and sugar (use a blender for easier assimilation all around), add ice and Voila! "Aguas Frescas" as we call them in Mexico. We regularly have them made from Jamaica (Hibiscus Flowers), Tamarind, Orchata (Rice Water), Pineapple, Melon, Cantaloupe, Banana, Orange, Persian Lemons, Watermelon, Mandarin, Strawberry, Watermelon, Coconut, Grape, you name it - we make it. You could also use these as a base for other "concoctions" which have liquor or wine added to them.... Just great! So go ahead and create your own- Hint: Try any ripe fruit. If it has seeds or skin, then just run through a sieve after blending and you're set! The possibilities are endless...... plus even when baking, the addition of sugar to the fruit makes them "riper"...... (is that even a word?)lol

You could say the same thing about desserts and sweets made with fruit, since you can vary the fruit to suit what you have on hand or your preference. Just because a recipe has "peaches" as the ingredient doesn't mean that you can't substitute another fruit for it. As long as it makes sense to you, it would probably work.... so get creative and whip up something wonderful!

Here are some classics that you can adapt to your family's tastes. They're all easy and will soon give you many, many options during the summer:

Lovely Plum Tart.- A classic English recipe for a most favored summer "stone fruit".

7 tbl chilled butter, cut into 1/2 cubes, plus more for pan
1 cup flour, plus more for baking dish
1/2 cup plus 4 tbl sugar
1 tsp baking powder
1/4 tsp kosher salt
6 tbl milk
1/2 tsp vanilla extract
1 egg
1 lb plums or other firm plums, pitted and cut into eighths
1/2 tsp ground cinnamon

Heat oven to 400 degrees. Grease an 9" x 12" baking dish with butter and dust with flour; set aside. Whisk together flour, 4 tbl sugar, baking powder, and salt in a medium bowl. Add 4 tbl chilled butter and cut into flour mixture (with fork or pastry cutter) until pea-size pieces form. Mix together milk, vanilla, and egg in a small bowl; add to flour mixture and stir with a wooden spoon until just combined.


Transfer dough to prepared baking dish and spread over the bottom of dish; arrange plum slices in rows on top of dough. Combine remaining sugar and cinnamon and sprinkle over plums. Melt remaining butter and drizzle over plums. Bake until browned and bubbly, about 30 minutes. Let cool slightly before slicing and serving.
************************************************

Berry Slump.- Another classic summer fruit sweet. Adapts easily to a variety of fruits!

2 1/4 cups flour
1 1/2 cups sugar
2 tbl butter, in 1/2" cubes, chilled, plus 8 tbl melted, more for greasing pan
1/2 tsp baking powder
1/2 tsp kosher salt
1/2 to 1 cup dry white wine (to get a pourable batter)
1 tsp vanilla extract
2 eggs
1 lb fresh or frozen thawed berries, like: blackberries, blueberries, gooseberries, etc.

To make crumb topping, combine 1/4 cup flour, 1/4 cup sugar, and 2 tbl chilled and cubed butter in the bowl of a food processor and process until mixture takes on texture of coarse bread crumbs, about 10 seconds. Refrigerate for 30 minutes.

Heat oven to 350 degrees. Grease eight 6oz ramekins with butter and dust with flour (I've also used a single baking dish); set aside. In a medium bowl, whisk remaining flour, baking powder, and salt; set aside. In a large measuring cup, whisk together melted butter and wine; set aside. In a large bowl, whisk together remaining sugar, vanilla, and eggs until pale and thick, about 2 minutes. Add wine mixture to eggs and whisk until smooth. Add flour mixture; mix until just combined. Divide batter between ramekins (or dish) and top each with berries. Sprinkle reserved crumb topping evenly over berries. Put ramekins on a baking sheet and bake until golden brown and bubbly, about 1 hour. Transfer to a rack and let cool for 20 minutes; serve with scoops of ice cream on top or whipped cream.
*********************************************

Pears in Port Wine.- One of the signature deserts of old, known for it's elegance and flair. Plus it looks just lovely....

1 cup port wine (I've used red wine and other kinds, like Sherry, just added more sugar)
3/4 cups sugar
3 2" strips orange peel
1 2" strip lemon peel
1 stick cinnamon
4 firm ripe Bosc pears, peeled but leave the stem on

Combine wine, sugar, orange peel, lemon peel, cinnamon, and 2 cups water in a saucepan over medium-high heat. Cook, stirring, until sugar dissolves, about 5 minutes. Remove pan from heat and set aside

Cut 1/4" from pear bottoms to make a flat surface so they can stand. Peel pears and nestle them into bottom of pan containing wine mixture. Bring to a boil, reduce heat to medium-low, and simmer, covered, until a knife slides into pears with ease, 50–60 minutes. Remove from heat; let cool. To serve, transfer pears and stand on plate, drizzle some of the sauce from the pan over pears. You can top with ice cream or whipped cream.
******************************************

Lemon Curd.- Rich, tangy and smooth. Lemon (or lime) "pudding" that can be used "as is", as filling for pie or tarts, inside cakes or pastries or even on toast.

1 1⁄3 cups sugar
1⁄4 cup lemon zest
8 egg yolks
6 eggs
1 1⁄2 cups fresh lemon juice
8 tbsp. unsalted butter, cut into 1⁄2" pieces and chilled

Whisk together the sugar, lemon zest, egg yolks, and eggs in a saucepan. Whisk in the lemon juice and cook, stirring, over medium heat, until the mixture begins to simmer and thicken. Remove from heat; whisk in the butter 1 piece at a time until incorporated. Strain the curd through a sieve set over a large bowl; press plastic wrap onto surface. Chill before using. MAKES ABOUT 4 CUPS.
*******************************************

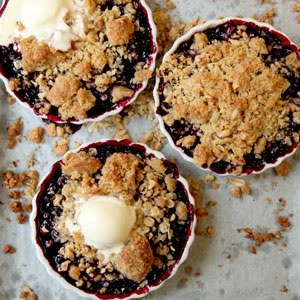
Blueberry Crisp.- Another recipe for any kind of berry..... just great! With the addition of oats and nuts gives you added nutrition and fiber too!

6 tbl plus 1/2 cup sugar
6 tbl flour
1/4 cup rolled oats
1/4 cup packed light brown sugar
1/4 cup chopped walnuts
1 tsp lemon zest plus 2 tsp lemon juice
3/4 tsp vanilla extract
1/2 tsp kosher salt
1/4 tsp ground cinnamon
4 tbl unsalted butter, softened
4 cups huckleberries, blueberries or your choice
2 tbl cornstarch
2 tsp brandy (optional but nice....)

Heat oven to 350 degrees. Place four 6oz ramekins on a parchment paper–lined baking sheet.

In a medium bowl, combine 6 tbl sugar, flour, oats, brown sugar, walnuts, lemon zest, 1/4 tsp vanilla, 1/4 tsp salt, and cinnamon. Using your fingers, work the butter into the flour mixture until crumbly; transfer topping to freezer to let chill for 30 minutes.

In a large bowl, stir together the remaining sugar and salt, lemon juice, and remaining vanilla, along with the berries, cornstarch, and brandy; divide berry mixture between the ramekins. Mound some of the topping over each ramekin. Bake until the berries are bubbly and the topping is browned, 35–40 minutes. Top each crisp with a dollop of crème fraîche, whipped cream or ice cream.
************************************************

Cool Grapefruit Cake.- A Texas summer staple! This cake is chilled and makes a wonderful addition to your summer meal.....

3 pink grapefruits
2/3 cup butter, softened, plus more
3 cups cake flour, plus more
1 tbl baking powder
1 tsp kosher salt
1 3/4 cups sugar
2 eggs
3/4 cup milk
1 1/2 tbl vanilla extract
2 pkg cream cheese (16oz), softened
2 1/2 cups confectioners' sugar

Zest 1 grapefruit to make 2 tsp zest; set aside. Peel and segment grapefruits (make supremes); set aside. Squeeze juice from remaining pulp, reserving 1/2 cup plus 1 tbl; set aside.

Heat oven to 350 degrees. Butter and flour a 9" x 13" baking dish; set aside. In a bowl, whisk together flour, baking powder, and salt; set aside. Into a large bowl, beat remaining butter and sugar with mixer until fluffy. Beat in eggs one at a time. Add 1/2 cup of the reserved juice, milk, and vanilla; stir. Add flour mixture; stir until combined. Line bottom of pan with half the reserved grapefruit; add batter; smooth top with a spatula. Bake until a toothpick inserted into the cake comes out clean, 40–45 minutes; let cool.

In a large bowl, beat reserved zest, remaining juice, and cream cheese until fluffy. Add confectioners' sugar 1/2 cup at a time; beat until smooth. Spread frosting over cake; top with the remaining grapefruit segments. Chill.
****************************************

Colonial Fresh Lime Soda.- Fresh lime soda was known as "the supreme quencher of colonial thirst" in India during the British Colonial period. We love it "virgin" but sometimes use it as a base for Vodka or Gin cocktails during the summer..... Cheers!

2 tbl simple syrup (first boil equal parts sugar and water, then let it cool)
1 1⁄2 tbl freshly squeezed lime juice (Persian limes—are the best ones to use)
3⁄4 cup soda water
Lime slice

Fill a glass with ice cubes, then add simple syrup and lime juice. Add soda water. Stir well, then serve garnished with a lime slice, if you like.
NOTE: You could also add cherries, strawberries to this..... simple syrup can be used for many other drinks and dishes as well.....
**********************************************

Jal Jeera.- Cumin Laced Tamarind and Mint Water.... Does this sound exotic or what? "Jal jeera" in Hindi means cumin water. Amid the street-food carnival that is Mumbai, this sweet, sour, and spicy drink provides cooling salvation for residents of the notoriously hot city.

1/4 lb tamarind pulp
2 tbl sugar
1/2 tbl toasted cumin seeds
1 tsp black salt (see note below to use kosher or sea salt)
1 tsp fresh lime juice
1/2 tsp red chile powder
1/8 tsp garam masala
10 large fresh mint leaves

Put tamarind pulp and 5 cups hot water into a bowl; let soak for 30 minutes, periodically mashing the tamarind with your fingers and freeing as much of the pulp as possible from the fiber and seeds. Working in batches, pour mixture into a strainer over a bowl. Press down on mixture until nothing but seeds and fiber are left in strainer. Discard solids.

To strained liquid, add sugar, cumin seeds, salt, lime juice, chile powder, garam masala, and mint leaves; stir to combine. Purée in a blender until smooth. Strain through a fine sieve into a pitcher and chill. Serve over crushed ice.
MAKES 1 QUART.
NOTE: Kala Namak "black salt" is considered a cooling spice in ayurvedic medicine and is used as a laxative and digestive aid. It is also believed to relieve intestinal gas and heartburn. It is used in Jammu to cure goiters. Use kosher or sea salt instead.
************************************************

Hope these give you some ideas for some summer sweets. I try to always have a pitcher of "agua fresca" in the fridge, it's better than soda and gives you so much more! (and not just flavor...). My guys are used to having something "sweet" around the house to lift your spirits in the middle of the afternoon (we call it "sweetening up your mood") or a little something after dinner while we sit and enjoy the cooler time of the day; always a nice touch that gives us the perfect opportunity for time together to relax and share our day..... Lovely summer nights..... Ciao!

Thursday, April 22, 2010

Unusual items found along the way......

Today the morning greeted us with cloudy skies and some light rain. The sound of the raindrops pelting the car port roof told me what the day would be like and got me up to make coffee and sit by the window while Kitty had her breakfast. A quiet house and one of my favorite times of the day allows me to take a moment to relax and plan the adventures and menu for today.

I had watched a Chilean friend's video blog where he was telling me about his plans and while I watched him, I heard his Mom ask him to tell me about her "Chilean Sopaipillas" I had inquired about some time ago. Naturally I was trying to get these right and went straight to the source since I didn't want fusion of any type to change the preparation and I wasn't let down at all.

Sopaipillas in Chile have been a comfort food staple since 1726 and can be sweet or salty. Served with mustard or "chancaca" which is a typical Bolivian, Peruvian and Chilean sweet sauce made of raw unrefined sugar crystallized with honey. It is often flavored with orange peel and is consumed on sopaipillas or picarones. You can easily use "piloncillo" for this plus I can use the Orange Marmalade I made some days ago. Picarones are also made with the same basic ingredients as the sopaipillas but are formed into a doughnut kind fritter and more popular in Peru where they are as traditional as you can get and mostly served along with "anticuchos" or meat on skewers.

You might remember that New Mexico has a variation on the sopaipillas as well but have changed them to make them mostly a dessert item, pouring a piloncillo syrup over them and much loved in that part of the country. In Mexico we have "Bunuelos" which are made from flour, look like fried flour tortillas (I've been known to use these in a pinch) and sprinkled with a sugar / cinnamon mix or with a cinnamon infused syrup (while I add some Cardamom too).

Today I am focusing on the Chilean version of "Sopaipillas" made from pumpkin, sweet potato or yam, giving them a lovely color and natural sweet flavor and while they too are fried, they are tender and moist and make a lovely snack with some hot chocolate, coffee or tea.

If you like the South American traditions you might serve these with "Hierba Mate", a classic drink in most of the populations there and now available here in the US in Latin markets. A high caffeine tea, Mate is served with a metal straw from a shared hollow gourd. The straw is called a bombilla and has little holes to filter out the leaves. The straw is traditionally made of silver. I used to have one but wasn't able to "get into it" due to it's taste. But the rituals associated with the drinking of Mate appealed to me since drinking the yerba mate is considered to be more than just good for the body; it's also good for the soul. Drinking it can be a form of meditation or reflection - allowing the goodness to infuse into the body while stimulating and resting the mind. Those who share the mate join in a kind of bond of total acceptance and friendship. Generally the server will start a new infusion and then take the first drink. This is considered an act of kindness by the other people in the circle, because usually the first serving is considered the worst.

Mate is very much like coffee and tea, and is considered safe by the US Food and Drug Administration. In-vivo and in-vitro studies are showing that yerba mate exhibits significant cancer-fighting activity. In 1995, research at the University of Illinois found yerba mate to inhibit the proliferation of oral cancer cells, which is great but the legend appeals more to me: The Guarani people started drinking mate in the region that now includes Paraguay, southern Brazil, south-easthern Bolivia, north-east Argentina, and Uruguay. The Guaraní have a legend that says that the Goddesses of the Moon and the Cloud came to the Earth one day to visit it but they instead found a Yaguareté (a jaguar) that was going to attack them. An old man saved them, and, in compensation, the Goddesses gave the old man a new kind of plant from which he could prepare a "drink of friendship" which was "Matte".

Seems we went off on a tangent thinking of all these rituals, but now we're back on track. All the Latin American countries share many similar dishes, with different names, but still have originals that never traveled past their individual countries and so set them apart. So much travel during the conquest years allowed for this exchange and as a result a varied and unique culinary diversity resulted. Chile has so much coastline that seafood dishes are always present, but then their agriculture is rich with the flavor of potatoes (over 200 variations of these) that go back hundreds of years, plus the potato originated in the Americas.

Although Peru is essentially the birthplace of the potato, today over 99% of all cultivated potatoes worldwide are descendants of a subspecies indigenous to south-central Chile. Based on historical records, local agriculturalists, and DNA analyses, the most widely cultivated variety worldwide, Solanum tuberosum ssp. tuberosum, is believed to be indigenous to the Chiloé Archipelago where it was cultivated as long as 10,000 years ago and where our "Sopaipillas" come from so we come full circle it seems. (How's that for beating the tangent...)

Since the sea occupies a major place in Chile, its so close by and makes fish and seafood high quality ingredients, you find raw dish dishes popular as well as many "casserole" type seafood dishes as well. Ceviche and it's variations are numerous, they still have Abalone (which is now almost gone in Mexico and miss a great deal) and their crab is exquisite. We all know Chilean Sea Bass, but the fusion made from European immigrants that settled in South America contributed to their cream sauces and wonderful wine species too. With the proximity of the pampas of Argentina and the rich grasses nearby, they also favor good meat and fire cooked dishes like the skewers and steaks that are also much loved. Depending if it's north, central or south area of the country there are variations to the dishes as well, but it's all good eats indeed.

Chilean Sopaipillas.- From the Chiloe Archipelago comes this very traditional snack bread.

2 cups flour
1 tsp baking powder
1/2 cup pumpkin, cooked, peeled and mashed (yam, sweet potato could be used)
3 tbl butter, melted
2 tsp salt
1/4 - 1/3 cup powdered sugar
1/2 cup oil

Cook the pumpkin in water with a tsp of salt and cook until tender. Remove from the water (but reserve the liquid). In a bowl, sift the flour, baking powder and salt and mix gently, without beating, the pumpkin puree, butter and flour mixture so it becomes a soft dough. You can use some of the pumpkin cooking water if the dough is too dry.

Take a quarter of dough and work on a flour covered space and roll out until it's about 1/8 inch thick and cut with a round cutting mold about 3 inch in diam. You could also use individual balls of dough and roll them out into circles instead if this is easier for you.

Pinch the "tortillas" with a fork so they don't inflate as much and fry in hot oil until lightly golden. You can serve them as is or sprinkle with powdered sugar or a "piloncillo" and cinnamon syrup, your choice.
*********************************************

Chilean Spicy Crab Cakes.- Here's a variation on the usual crab cake for you.

1/2 Pound Crab Meat, precooked (you could use Surimi if you need to chopped fine)
1 Small White Onion, chopped fine and sauted
1 Large Egg, beaten
1/2 Lemon Lemon Juice
Pepper — to taste
1 Pinch Spanish Paprika
1/2 Cup Flour
1 Tsp Aji Paste (or your favorite chili sauce)
1 Tbl Butter, melted
1 1/2 Cups Fine Bread Crumbs
1/2 Cup Oil
2 Tbl Mayonnaise, homemade preferable

In a glass bowl, mix crab meat, onion, egg, lemon juice, pepper, paprika, aji paste, flour, and butter. Mix well. Form cakes into 2 inch diameter cakes and refrigerate for 1 hour. Coat cakes in bread crumbs and fry in hot oil until golden brown on both sides. Serve hot with a dollop of mayonnaise (or you can use my homemade Ranch Dressing or Tartar Sauce on top.
********************************************

Homemade Tartar Sauce.- This sauce taste better than any bottled you can get. Easy, fast and great on lots of things.

1/2 cup good mayonnaise (or make your own)
2 tbl small-diced pickles or cornichons
1 tbl Champagne or white wine vinegar
1 tbl capers
1 tsp coarse-grained mustard< style="font-weight: bold;">

Parmesan Clams.- Here's a super easy preparation that tastes wonderful. A quick dish too.

4-5 lbs Clams (your choice), cleaned
1 cup of cheese (usually Parmesan but a melting one would do)
2-3 lemons or limes
1/2 stick of butter in pieces
1 cup tomato sauce (could be ketchup, cocktail sauce or chili sauce)

Open the clams and separate the meat from the shells for easier eating if you like. Make sure there is no sand or dirt inside. Put the clams on a baking sheet in one single layer in their own shell.

Pre-heat your oven to 400F. Into each clam shell put some drops of lemon or lime juice, a small piece of butter and some of the chosen tomato sauce, top off with some cheese. Place in the hot oven for about 4 min and serve at once.
NOTE: You could also add some finely chopped onion, celery or bacon bits and could be topped with some seasoned bread crumbs and baked for the last minute of time in the oven.
*****************************************

Drunken Pork Chops from Chile.- An easy preparation and wonderful flavors.

6 Pork Chops
1/2 stick of butter
2-3 tbl of oil
Salt and pepper to taste
1 1/4 cups of heavy cream
1 tbl of mustard (your choice but I like Champagne Mustard or Dijon)
1/2-3/4 cup Cognac or Brandy

Salt and pepper the pork chops well. In a large pan, put the oil and some of the butter to heat over med-high heat, once it hot add the pork chops and fry until cooked and tender. Remove to a serving platter to rest while you make the sauce.

In the same pan, lower the heat to med-low and add the cream, the mustard, salt and pepper and the cognac. Allow to come to a boil for 1-2 min. Mix well and taste to adjust seasonings. Once the sauce has thickened (3-4 min, watch it while mixing it) turn off the heat and pour over the pork chops. Serve at once.
*********************************************

Our little trip to Chile is now over and I leave you with some suggestions from this lovely land. I've got quite a few Chilean friends and we usually see them when there are big futbol matches and now with the World Cup coming up we're sure to have a good time with some great food to go along with it. It's still sprinkling here and the temperature is down to 47 degrees (Brrrr...) so I think I will do some baking to go along with the Drunken Pork Chops and take advantage of some Brandy I've got, will have to look around for that Brandy Cake with Raisins I posted around the holidays. I'll leave you now, hoping your day is lovely and that you will be inspired to try some Latin American dishes. Talk soon!

Saturday, December 12, 2009

I needed a Thai Food Fix..... YUM!......

I have to admit that Thai Food is a weakness for me, I love it! And so far, haven't found a dish I can't go crazy over either and we are lucky that there are really great Thai restaurants (dives, actually) here to get inspiration from. We go, we try, we shop and then we have it at home.....

A very healthy cuisine prepared with fresh ingredients that brings a lot of flavors which a lot of people consider "confusing" and turns some people off, but when you follow the Thai thought process, they consider "heaven" to be "sweet / sour / salty and hot" which describes this food to a"T" and is terribly addicting.... really!

So while making our holiday tour around town, and we've just started looking at all the Xmas decorations..... which seem to get better each year and this Xmas with the opening of the new "City Center" area on the Strip which promises to be the biggest and best so far with only THE very best stores and restaurants ever, gives us a new destination to check out and explore..... but after an afternoon of playing "tourist" comes the inevitable "how about stopping for a bite to eat....?" and off we go, usually to one of our favorite haunts to enjoy the food while we exchange views of our day's adventure.....

Last week I happened to run into an old friend, nephew to the owner of one of the best Thai places in town (where I've gotten recipes and tips from his grandmother who rules the kitchen and is a master a the Wok...), he reminded me that it had been a while since I'd stopped in and so it was the perfect place to rest and recoup while having delectable Thai specialties we all love. Here is a sampling of what we enjoyed:

Thai Fried Whole Fish with Tamarind Sauce.- An amazing dish with the sweet tart taste of tamarind (a familiar and popular ingredient in Mexico too!).... that is served for celebrations or family gatherings but can be a great weekend dinner too!

5 shallots, grilled and crushed
3 cups cooking oil
10 small cloves garlic
10 dried Anaheim chilies, cut into 2 inch strips
1 lb Red Snapper, Tilapia or similar firm white flesh fish
1 cup water
3 tablespoons tamarind paste
3 tablespoons palm sugar (can use cane sugar or light brown sugar too)
2 tablespoons fish sauce
10 white peppercorns

Over high heat, quick fry shallots in a dry wok or skillet until peels are burned, about 15-20 seconds. This will bring out the shallot's aroma. Remove charred peel and crush. Crush the garlic and set aside. Put a 1/2 cup of the oil in a saucepan over low heat. Add the garlic and keep stirring until it turns slightly yellow or about 1 minute. Transfer the garlic to a plate lined with paper towels. Add chiles to oil and deep fry over low heat for 30 seconds. Transfer to another plate lined with paper towels.

Add the rest of the oil and heat over high heat. Carefully add the fish and let it cook about 5 minutes on each side. Using a fork probe the fish meat, if the fork sticks with the meat the fish is not yet cooked. After the fish is cooked, transfer to a plate lined with paper towels and set aside.

Add the tamarind paste, palm sugar, fish sauce and water in a saucepan over medium heat for 5 minutes. Add the peppercorns and stir to mix well. Taste and adjust to balance the saltiness, sourness and sweetness. Turn off the heat. Set the fish on a serving plate and pour the sauce over the fish. Top with garlic, shallots and chiles. Serve hot with steamed jasmine rice.
***********************************************************
Thai Jasmine Rice.- Jasmine rice is a particularly fine, medium-grain type of rice. It is fragrant when cooked, hence the name. The polished white rice is prepared without salt to balance the Thai flavors. Please do not serve ordinary rice from the supermarket with Thai meals!

2 1/2 cups Thai jasmine rice< style="font-weight: bold;">
Traditional Red Curry.- A wonderful dish that can be prepared in advance, save the curry in an air tight container for later use, and brought out when you need it as it can be used in many ways and always wonderful...... be patient and you will be rewarded with an exotic meal!

A very small electric blender or electric coffee grinder makes this a quick job. If available, a very heavy stone mortar and pestle with at least a 2 cup bowl is traditional and makes a better textured paste.

Making the curry paste:
25-30 small dried hot red chile peppers(up to 70 if you really like it hot)
1 tbsp sea salt
4 cloves garlic, peeled
2-3 stalks of fresh lemon grass
2 1/2-3 tbsp shrimp paste
1/4 inch piece fresh turmeric or 1/8 tsp. dried turmeric

In the mortar and pestle or electric blender, grind together the dried chiles and salt. Allow at least 10 minutes by hand, or a couple of minutes with a blender. It should be smooth with just a hint of chile pieces. Add the garlic cloves and pound until smooth. Cut off the very root end of the lemon grass. Remove outer leaves and discard. Cut the lemon grass crosswise into 1/8-inch pieces with a very sharp knife. Add to the ground chiles, along with the turmeric. Grind again until smooth. Your arm will tire, so take a break.

Last of all, add the shrimp paste and blend together, mashing it into the chilies gently if you are using the mortar and pestle.

Preparing the Dish:
1 can coconut milk (13.5 oz) preferably Thai coconut milk
1 lb of pork riblets or 3/4 lb. fresh pork with some fat cut into 1x1 inch pieces
1 small pumpkin or squash cut in half and peel off the rough spots with a cleaver; cut the peeled flesh into 3/4 inch cubes
2-3 tbsp fish sauce

Cook the pumpkin in boiling water to cover until al dente (still firm in the middle), about 4 minutes. Drain and set aside. Pour the coconut milk into a medium-sized pot. Add the curry paste to and stir to blend. Bring to a boil over medium-high heat. Add the pork. Boil 3 minutes until the pork is partially cooked. Add the squash. Bring to a boil again and cook until the squash is soft, about 4 minutes. Add fish sauce to taste. Garnish with cilantro leaves if desired.
**************************************************
Thai Cucumber Salad.- Serve this cucumber relish alongside Satay or with any Thai meal that needs a cooling side-dish.

1 red spur chili, finely chopped (or 1/2 of a sweet red bell pepper)
1-2 Serrano chili, finely chopped (optional)
4 cucumbers
2 shallots, finely chopped
1 tbsp chopped coriander
1/4 tsp sea salt
2 tbsp sugar
1 1/3 cup vinegar

Wash the cucumbers, cut into quarters lengthwise, then cut across into thin slices. Mix vinegar, sugar and salt together, simmer over medium heat until dissolved and the sauce slightly thickens. Remove from the heat and allow to cool. Just before serving, pour the cold sauce over the vegetables, and sprinkle with chopped coriander on top.
***************************************************
Thai Iced Coffee.- Thai iced coffee is very popular with Thais and foreigners alike and is known in Thai as Oliang. This s a blend of coffee and other ingredients, like 50% coffee, 25% corn, 20% soya bean, 5% sesame seed. Which is why it's quite unique in it's taste.
Traditionally,oliang is brewed with a tung dtom kaffee, a metal ring with a handle to which a cloth bag is attached. It is sometimes referred to in English as a 'tea sock' (because this is what it really looks like, a sock hanging from a ring, lol) as it is also used for making Thai tea. To make coffee like this, put the oliang in the bag and pour boiling water through into a carafe. Let the bag steep for approximately 10 minutes until strong. Add sugar and stir to dissolve. Allow to cool. Pour into a glass with ice, and add the dairy product of your choice: half and half, condensed milk, evaporated milk or a mixture of these three.

The proportions of coffee, water and sugar may vary according to taste. Try using 2/3 part oliang to 1 1/4 parts sugar to 6 parts water. Thais like their coffee incredibly sweet!
**************************************************
A lovely time enjoyed by all, relieving some of our favorite tastes!.... and although it might not be a Christmas-e style taste or food you would associate with any holidays we celebrate, the subtle or exotic tastes really add a lot to our celebratory mood.... Thai food is great anytime!!!!

Sunday, October 25, 2009

Incredible Edibles for the Holidays?......Mmmmm

With the holidays just around the corner and everyone thinking about planning great get-togethers for friends and family, want some options that will not only let you shine but deliver the flavors associated with these special times?

I'm beginning MY holiday preparations and sometimes goodies get better with some aging... like Rum Cake, Fruit Cake and such.... home-made liquors also get much better if you give them some time for the flavors to come together and they must be made in advance so they're at their best when they're used or given out as gifts to friends or used at family celebrations.

You can plan on stocking up and saving your wine bottles or nice looking glass containers, nice shaped jars and covered containers you can use for food gifts add a nicer touch and give your offerings that added holiday sparkle... touch them up with a nice bow or gift wrap, some shiny decorations or labels and you've got something really special.

I've already given out some great food gift recipes. Candies, liquors, cakes and cookies to begin your production with, and I am adding to that list now to give you a better selection. Plus with the ingredients you need you'll be able to make several gifts and not just one, making these recipes a good deal. Make some and keep others for your own holiday parties..... I've also been able to ascertain that I like these better than even the original versions since you can add or reduce the ingredients and produce them to your taste, so they come out even better!

Hope you will try some of these so you can see just how good home-made food gifts can be!

BAILEY'S IRISH CREAM HOME-MADE VERSION.- Everyone loves this creamy liquor on the holidays or any time!

1 tablespoon instant coffee granules
3 whole eggs
1 tablespoon chocolate syrup
1 pint whipping cream
1 can Eagle Brand Condensed Milk
18-20 ounces Irish whiskey

Dissolve coffee in 1 oz very hot water. Combine all ingredients in blender. Blend& pour into container. Store in refrigerator.
*******************************************
HOME-MADE AMARETTO LIQUEUR.- Great tasting and perfect for mixed drinks!

3 cups sugar
2 1/4 cups water
3 lemons, finely grated rind (no white part)
1 quart vodka
3 tablespoons almond extract
2 tablespoons vanilla extract

Combine first 3 ingredients in a Dutch oven; bring to a boil. Reduce heat and simmer 5 minutes, stirring occasionally; cool completely. Stir in remaining ingredients; store in airtight containers( I use empty liquor bottles).
*******************************************
LONG ISLAND ICE TEA.- Everyone knows this one...... quantities are for 1 large drink, multiply if making more or filling a bottle....

1/2 ounce white rum
1/2 ounce vodka
1/2 ounce gin
1/2 ounce triple sec (or Grand Marnier)
Coca-Cola
sour mix

Add crushed ice to pint glass. Add first 4 ingredients. Shake. Top with cola and sour mix. Serve. *You can add raspberry liquor to this, and call it a Black Opal, even more tasty!
********************************************
RESTAURANT STYLE SWEET AND SOUR MIX.- Great for your mixed drinks.....

1 cup hot water
1/4 cup granulated sugar
3 tablespoons fresh lime juice
3 tablespoons fresh lemon juice
1 drop yellow food coloring

Combine the hot water with the sugar and stir until sugar dissolves. Add lime juice, lemon juice and food coloring. Chill.
*******************************************
PEPPERMINT BARK CANDY.- Totally Holiday Candy gift and great tasting too!
Nonstick cooking spray
1 pound white chocolate, chopped (do not use chips)
2 cups puffed rice cereal
1 bag (7.5 ounces) hard peppermint candies, unwrapped

Spray a 10-by-15-inch rimmed baking sheet with nonstick cooking spray; line with a piece of waxed paper. Crush candies (see note below). Place white chocolate in a heatproof bowl set over (not in) a saucepan of simmering water. Heat, stirring occasionally, until smooth, 4 to 6 minutes. Remove from heat; stir in rice cereal.

Transfer mixture to prepared pan; with a spatula, spread to edges of pan. Sprinkle with crushed candy; with a piece of waxed paper covering the entire surface, press in gently (paper prevents hands from sticking to candy and chocolate). Chill until firm, 20 to 30 minutes (no longer, as candy will begin to soften).Peel waxed paper off. Break bark into 2-inch pieces. Store at room temperature in an airtight container, up to 1 week.
*********************************************
PEPPERMINT ICICLES.- So lovely to look at and fun to eat! Get the kids to help with this or make it a cold evening project for you and your mate....fun!

Vegetable oil cooking spray
2 cups sugar
1/2 cup light corn syrup
1/2 cup water
2 teaspoons fresh lemon juice
1 teaspoon pure peppermint extract
1 drop blue gel-paste food coloring
1 drop violet gel-paste food coloring

Coat a rimmed baking sheet with cooking spray. Bring sugar, corn syrup, and water to a boil in a small saucepan, stirring frequently with a wooden spoon, until sugar dissolves. Cook, undisturbed, until mixture registers 305 degrees on a candy thermometer, about 12 minutes. Remove pan from heat, and stir in lemon juice and peppermint extract. Working quickly, pour hot sugar mixture onto prepared sheet. (Be careful not to touch hot mixture.) Let cool until bubbles subside, about 30 seconds.
Coat a metal spatula with cooking spray, then fold 2 edges of mixture inward, toward center (pictured, above left). Continuously fold candy in half on itself with spatula until it is cool enough to handle, about 1 minute (it will still be very hot).
Wearing rubber gloves and working quickly, pull candy to a length of 1 foot, then fold in half on itself. Repeat, twisting and pulling until candy starts to turn white. Remove a golf-ball-sized piece, and add food colorings to the smaller piece. Continue to stretch and fold both pieces separately. When candy is almost cool, and the uncolored piece is white, pull each piece into a 12-inch-long rope.

Place ropes side by side, and fold in half together to layer colors. Twist pieces together. Starting at 1 end, pull and twist until rope is 1/2 inch thick. Working quickly, twist and pull end to taper slightly, and cut off a 6-inch length with scissors. Continue twisting, pulling, and cutting icicles until candy becomes too hard and can no longer be pulled. (There will be some left over. Reserve for another use, such as crushing over ice cream or cookies. Transfer icicles to a baking sheet to harden. Store, covered, for up to 4 days.

The peppermint candy is very hot initially, so be sure to work quickly wearing protective rubber gloves. For the best results, at the beginning of the pulling stage in step three, two people should divide the candy between them. Use any color you prefer to tint these minty sticks.
*******************************************
HOME-MADE PEANUT BUTTER CUPS.- Since you're making these, you could switch out the nuts and pick your own!

4 ounces white chocolate, chopped
1/2 cup smooth peanut butter
12 ounces semisweet or bittersweet chocolate, chopped
2 tablespoons unsalted roasted peanuts, chopped

Line two 12-cup mini muffin pans with paper liners; set aside. In a microwave-safe bowl, combine white chocolate and peanut butter. Microwave, until almost melted, 1 to 1 1/2 minutes, stirring halfway through. Set aside to cool slightly.
Meanwhile, place semisweet chocolate in another microwave-safe bowl. Microwave, stirring once or twice, until almost melted, 2 to 3 minutes. Dividing evenly, use a spoon to layer semisweet chocolate and peanut-butter mixture into liners, beginning and ending with chocolate; sprinkle with peanuts. Place muffin pans in freezer until peanut butter cups are firm, about 15 minutes. Bring to room temperature before serving.
**********************************************
PISTACHIO-HONEY TORRONE (NOUGAT).- Wonderful candy and very versatile since you can change the nuts to almonds or hazelnuts or your favorite!

Edible wafer paper, enough for 2 layers in pan (at baking store)
1/3 cup cornstarch
3 large egg whites
1 cup honey
3 cups granulated sugar
1/2 cup confectioners' sugar
2 cups shelled raw pistachios

Piece together wafer paper, without overlapping, to fit bottom of a 9-by-13-inch baking pan, and set aside. Liberally sprinkle a clean surface with cornstarch. Pour egg whites into bowl of electric mixer fitted with the paddle attachment; set aside. In a medium saucepan, combine honey and granulated sugar. Place over medium heat; cook until mixture just begins to simmer, about 4 minutes. Clip a candy thermometer onto the side of saucepan; continue to heat, stirring occasionally.

Beat whites until stiff peaks form; add confectioners' sugar, and beat until combined. When thermometer registers 315 degrees, remove honey mixture from heat. Temperature will rise to 320 degrees. Stir until temperature drops to 300 degrees, 1 to 2 minutes. With mixer running, slowly pour honey mixture into egg-white mixture (at this point, whites will double in volume; let stand a few seconds; volume will return to normal). Beat until mixture thickens and begins to stick to beaters; fold in the nuts. Pour mixture onto cornstarch-covered surface; knead about 5 turns. Stretch and roll to fit pan; place mixture in pan. Cover with another layer of wafer paper; let cool on wire rack. Cut into slices while still warm; store in airtight container, with parchment between layers, for up to 2 weeks.
***********************************************
APRICOT GELT.- You can use other dried fruit as well......MMmmmm!

1 pound dried apricots
1 pound dark chocolate, finely chopped
Foil candy wrappers

Using a heavy mallet, flatten apricots to 1/4 inch thick; set aside. Microwave chocolate in a glass bowl in 15-second intervals, stirring vigorously with a rubber spatula and scraping down sides in between, until just melted (chocolate should be no warmer than 86 degrees).Dip each apricot in chocolate, coating evenly. Transfer to wire racks set over parchment paper; let stand until set. Transfer apricots to baking sheets lined with parchment paper. Refrigerate until firm, at least 25 minutes. Wrap in foil wrappers. Gelt can be refrigerated in an airtight container up to 3 days.
***********************************************
MARCONA ALMOND AND FLEUR DE SEL PRALINES.- Can you think of anything more sinful?

Vegetable oil
1 cup granulated sugar
1/4 cup water
4 ounces Marcona almonds or regular blanched almonds
1 1/2 teaspoons fleur de sel (imported natural salt)

Lightly coat a nonstick baking mat or a piece of parchment with oil, and place on a heatproof surface. Bring sugar and water to a boil in a small saucepan over medium-high heat, tilting pan to swirl and washing down sides with a wet pastry brush to prevent crystals from forming. Boil, without stirring, until mixture turns pale amber, about 8 minutes.

Remove from heat, and stir in almonds. Pour mixture onto center of prepared surface, and sprinkle with fleur de sel. Let stand just until the edges are cool enough to handle. Working quickly and using gloved hands lightly coated with oil, pull pieces of caramel and almonds away from the center until caramel starts to harden and you are able to pull long, thin pieces before they break away. Transfer to a parchment-lined baking sheet to cool completely. Repeat. (If praline begins to harden, place on a baking sheet in a 375-degree oven until pliable; you can do this only once before the sugar begins to crystallize.) Pralines can be stored in an airtight container at room temperature for up to 2 weeks.
***********************************************
Our home is always full of holiday goodies.... it makes it even more special since I wait until the holidays to make everyone's favorites. Create some holiday traditions and start a trend, or make several of these food gifts to put in gift baskets.... I make a selection of cooking sauces, cookies and candies, some wine or liquor and top it off with a pound cake or Christmas Cake.... how about that for a great gift to open on Christmas Morning...YUM! I also donated a couple of baskets to my local Church and watched them go up for auction..... Great, everyone loved them! (or could even be a side business during the Xmas Fairs coming up)....... Have a great time with these!