A cooking blog about it all..... come with me on a journey of discovery.... living in Mexico or in the US, traveling the world while learning what food is all about or just trying to "amp up the flavor" of it all!
Tuesday, December 6, 2011
Some Thoughts For The Holidays....
Planning for family dinners during this time, taking into consideration that the weather is cold, seems to me this makes it easier for us since hearty soups, stews and comforting meals are just the right thing to offer. Plus these types of meals are the kind that actually benefit from reheating. There's nothing like having a steaming pot of soup waiting for you after a busy day..... Mmmmm! Hits the spot. Or how about having a great casserole ready and waiting to be put in the oven while you change and put away the shopping? It's Tuesday evening, you just got home from work, still have some laundry to get done, you're tired and the family is hungry..... luckily there's a great dinner all ready to be heated up and the work has already been done? Amazing!
It's also a good thing to have some family pleasing dishes on hand that can be made in no time flat during this time too. Shopping in advance, in bulk and having all the ingredients can help make it easy and fast yet still give you and yours, a great family meal any time of the week. You don't have to wait for the Holidays to put these ideas into motion either, everyone's schedule is busy all year round, so they make sense all the time. It's a great time to take advantage of leftovers and recycle as much as possible to bring savings and shortcuts into the mix as well. Nothing wrong with saving a little money, heh?
So let's look at some ideas that maybe will help you during this time of the year......
1- LASAGNA.- Always a good idea and most people love it. Sure, it's work but if you go ahead and make at least 2 of them, you can have one for dinner while you wrap the other one up and freeze it for over the holidays. This is one of those dishes that increases in flavor with the reheating and if you make even more sauce, this can be frozen and used for a quick pasta dinner on another night too. Lasagna is also very flexible and is equally good with meat or vegetarian, with noodles or using zucchini or eggplant instead and save some carbohydrates, any meat can be used and almost any vegetables too. Here's a great version that's easy to make and yields amazing flavor:
Lasagna Noodles (or use thin sliced zucchini or eggplant)
salt & black pepper to taste
1-2 lb ground beef (I used hot Italian sausage instead) but you can use chicken, turkey or pork
1 green bell pepper, de-seeded and chopped
1 onion, small and chopped
3-5 garlic cloves, chopped
1 tsp red pepper flakes
1 cup tomato paste (or use 2 small cans of 6 oz each)
16 oz canned tomato sauce
1/2 - 1 cup red wine
2 tbsp fresh basil, chopped
1 tbsp fresh oregano, chopped
1-2 eggs (2, if you like it fluffy)
15 oz ricotta cheese (you can use cottage cheese instead if you like)
2 tbsp fresh parsley, chopped
16 oz spinach (frozen chopped, thawed and drained) optional
1 lb fresh mushrooms, chopped
8 oz shredded mozzarella cheese
8 oz grated parmesan cheese
Preheat oven to 325 F . Grease a deep 9x13 inch baking pan. If making noodles, follow package instructions and keep them in some water once cooked so they don't stick together. If making vegetarian: Slice zucchini (or eggplant) lengthwise into very thin slices. Sprinkle slices lightly with salt; set aside to drain in a colander while you make the sauce. Don't skip this step or they will be too soft.
To prepare the meat sauce: (or you can leave the meat out of it) Cook and stir ground beef and black pepper in a large skillet over medium high heat for 5 minutes. If too much fat is released, then drain it and leave 2-3 tblsp in the pan to continue cooking. Add in green pepper, onion, red pepper flakes & garlic; cook and stir until meat is no longer pink. Stir in tomato paste, tomato sauce, wine, basil, and oregano, adding a small amount of hot water if sauce is too thick. Bring to a boil; reduce heat and simmer sauce for about 20 minutes, stirring frequently. Meanwhile, stir egg, ricotta, and parsley together in a bowl until well combined.
To assemble lasagna, spread 1/3 of the meat sauce into the bottom of prepared pan. Then layer the noodles to cover well or 1/2 the zucchini slices, 1/2 the ricotta mixture, all of the spinach, followed by all of the mushrooms, then 1/2 the mozzarella cheese. Repeat by layering the remaining meat sauce, noodles or zucchini slices, ricotta mixture, and mozzarella. Spread Parmesan cheese evenly over the top; cover with foil. Bake for 45 minutes. Remove foil; raise oven temperature to 350 degrees F, and bake an additional 15 minutes. Let stand for 5 minutes before serving.
NOTE: If freezing then stop before baking, cool and cover very well with heavy duty aluminum foil and place in the freezer. Either put something on the top to prevent other foods from pressing on this or freeze first and then place other foods over it. You will need additional baking time when finally using it, add about 30 minutes to the first baking time and check to insure it's bubbly before raising the temperature. You can also thaw first before baking to shorten the baking time if you have time to get this done.
*******************************
2- CASSEROLES.- Just like Lasagna, these are very practical and can run the gamut from noodle, potato, rice based dishes with a variety of sauces that can be baked and served. Same goes for Chicken/Beef Pot Pies, Cassoulet, all types of Chili dishes (like Tamale Pie, Texas Chili) and most of all Stews which can be made in advance and be ready for reheating when needed. Here's a great recipe for one of our favorite Chili's: Don't be put off by the ingredients, this is an amazing Chili, you'll love it!
1 tablespoon vegetable oil
2 pounds ground buffalo meat (beef, pork, turkey or chicken) or leave vegetarian
1/2 medium onion, chopped
1 red bell pepper, seeded and chopped
1 green bell pepper, seeded and chopped
1 Poblano or Anaheim pepper, seeded and chopped
1 jalapeño pepper, seeded and chopped (I use Serrano 2-3)
2 cloves garlic, minced
1/4 teaspoon ground cumin
1/2 teaspoon dried oregano
1/4 teaspoon ground coriander
1 tablespoon ancho chile powder
Sea salt, to taste
Ground pepper, to taste
1 (14.5-ounce) can crushed fire-roasted tomatoes
2/3 cup low-sodium beef broth (can use chicken broth or vegetable)
1/2 tablespoon brown sugar
1 tablespoon Worcestershire sauce
1 (7-ounce) can chipotle sauce or 2 tablespoons adobo sauce from a can of chipotles in adobo
1 bay leaf
1 (15-ounce) can black beans, drained and rinsed
1 (15-ounce) can red kidney beans, drained and rinsed
1/3 bunch green onions, green parts only, sliced in rounds, for garnish
Chopped cilantro, for garnish
In a medium sized pot with a lid, heat oil over medium heat and add ground buffalo. Brown meat, breaking large chunks into smaller ones. Cook for about 5 minutes or until all meat is browned. Remove from pot and discard excess fat, leaving about 2 tablespoons. Bring back to medium heat, add onions, red bell pepper, green bell pepper and Poblano pepper and cook on medium heat for about 5 minutes, scraping bottom from time to time. Add jalapeño pepper and cook for another 3 minutes. Add garlic and then add cumin, oregano, coriander, salt and pepper. Let spices cook for another minute, stirring. Return browned meat to the pot. Stir in tomatoes and beef broth, brown sugar, Worcestershire sauce, adobo sauce and bay leaf, stir and bring to a boil. Once boiling, taste sauce and adjust salt and pepper to taste. Lower heat to a slow simmer, cover with a lid and cook for about 30 minutes. Add beans and continue simmering, covered, for another 10 minutes or until beans are warmed through. Serve in bowls and garnish with chopped cilantro and green onions.
NOTE: Spice quantities are just a guide, I use more of everything. I also have beans always on hand but you can use canned to make it easier and faster. Substitute ingredients to suit your taste....
************************************
3- TACOS, BURRITOS, TOSTADAS, SOPES: All these can make leftovers something to look forward to. My family loves them all! Just be sure to have tortillas (either corn or flour, the very best quality you can get so I won't make you make your own) and use leftovers for the fillings, add lettuce, Pico de Gallo, your favorite Salsa and you're done! Go to the nearest Mexican Market to find good quality tortillas, some of them have tortilla factories right inside the market and are made daily. Use up leftover corn tortillas, fried in some oil, for Nachos, Tortilla Soup or Dry Tortilla Soup too.
4- SOUPS: Almost anything can be turned into a soup. Leftover vegetables can be put in the blender with their own liquid, and turned into cream soup. Or use leftover meats, shredded, along with vegetables and some stock, top with some cheese and your're done. Cook some vegetables in some chicken or vegetable stock, either blend or use as is for a quick soup. Add some leftover noodles or rice. You can add some "roux" (equal parts fat/butter with flour, cooked in a pan 3-4 minutes then whisked into a clear liquid, to make a thick and creamy soup). Here's a great way to use leftover turkey or chicken and get a wonderful Main Dish Soup: Turkey Gumbo:
1 tablespoon extra virgin olive oil
2 cloves garlic, finely chopped
1 small yellow onion, chopped
1 (16-ounce) package frozen okra
1 (28-ounce) can diced tomatoes, with their liquid
Turkey, Chicken meat, shredded, about (about 1 pound)
1 cup cooked brown rice
Salt and pepper to taste
Hot sauce to taste
Heat oil in a large pot over medium heat. Add garlic and onion and cook, stirring occasionally, until softened, about 5 minutes. Add peppers, okra, corn and tomatoes and stir well. Add the meat and bring to a boil. Insure liquid covers everything, if more liquid is needed add stock or water. Cover, reduce heat and simmer, stirring occasionally, cook at least 20 minutes. Stir in rice, salt, pepper and hot sauce and cook about 10 minutes more.
NOTE: Once you have the ingredients in your pantry, this hearty soup comes together quickly to give you a complete meal. You could also cook a turkey leg in the soup if it's raw (nestle in the soup, cook about 60-90 minutes, insuring it's covered by liquid), then pull out, shred, return meat to the pot and finish by adding the rice and the rest of the ingredients. Same goes for chicken.
********************************
Be sure to use the search bar shown above to look for other alternatives that you might be able to use during this time, there's plenty of recipes here. Get the kids to help, thaw frozen casseroles in the fridge while you're at work so they're ready once you return home, save leftovers thinking ahead with other meals in mind, buy vegetables thinking of hearty and quick soups for another day..... It's never been so important to save your energy yet have something yummy and fast. Who doesn't like that, right?
Wishing everyone a lovely Holiday Season!..........
Saturday, September 3, 2011
Labor Day Weekend and the end of the Summer....
Do you know how the Labor Day observance came about? Seems in 1894 there were a number of deaths at the hands of the US Military and US Marshals due to the Pullman Strike. The President reconciled with the labor movement and fearing further conflict decided to establish a holiday a mere 6 days after.... signed into law, unanimously I might add, and so Labor Day became a long weekend..... All about labor and trades with parades, speeches, events for worker's families, etc. yet the rest of the world celebrates this day on the 1st of May (like Mexico for instance), and now it's become the official end of Summer as well.... typically, the last weekend before students had to report back to school, except that these days schools all start at different times, so go figure....
During this time of the year the weather is still warm so outdoor activities are the norm with picnics, camping and sports events all going on.... fireworks, games and family get togethers, BBQ's, swimming and everything relating to the warm weather activities beloved by all. Fall will be coming upon us shortly and so it might be one of our last opportunities to wear shorts, sandals, bathing suits before the sweaters and gloves make their reapperance and we settle in for the cool weather lifestyle. I can hardly wait, I love the cold! Yipee!
But for now, we've got a long weekend to think up yummy things to eat while relaxing and thinking up what else we can come up with (to tempt our tastebuds) and of course, an eclectic menu is de rigeur..... plus being the start of the month gives us a chance to recharge our menus, plan new items and deliver taste profiles that are truly memorable.... all staying within our food budget of course!
Before heading out to the supermarket, with list in hand based on the menus I've planned, lunch is prepared. NEVER go food shopping hungry.... or go without a list, this can spell disaster for both your budget and your family's meals later on, you're also liable to buy all sorts of "goodies" that while might be yummy, don't deliver good nutritional or $ value for you. Lay out your menus first, a two week period is what I work with since it allows me to plan on recycling leftovers, buy in bulk and get the best prices, economize on trips and gas (and with today's gas prices, makes more sense than ever!) and have more time to prepare meals and spend at home. You can use basic ingredients in many ways, leaving days in between so it doesn't seem like you eat the same thing all the time and gives your menus a lot more variety and flexibility, you also have time to take advantage of local specials, coupons and special buys to plan for the future. Of course, delicate items like greens must be purchased more often since they can lose texture and quality.
If you're adept at canning, freezing or preserving you've got a BIG advantage over most people and you can make bulk purchases of fruits and vegetables (check with your purveyor as they can give you a discount for buying by the case) , process them and have them ready in your pantry for use much later on. Being able to grow your own always make good sense but not everyone has the space, knowledge and dedication to take this on, it's a lot of work but yields amazing benefits for all! It's the gift that keeps on giving: health, savings, flavor and flexibility. I wish I had a garden..... maybe someday again.
We're going to the Friday specials at one of the local Mexican Markets (only thing is that each market has different specials each day of the week, I hate that!.....) so we've had lunch before taking off: Grilled Short Rib Sandwiches with a red onion marmalade and aged White Cheddar, a very satisfying meal that will keep temptation at bay for sure!
Whenever I make something "recyclable", I more than I need so I have it available for the next menu item. Last time I made short ribs I got a great sale on them so I bought a good amount. Cooked them all, yet only served half, the rest I froze both meat and sauce. So yesterday once they were thawed I had it available, deboned and chopped it up, gave it a good stir fry with some sauce and we were ready for these amazing sandwiches in record time! I always have roasted chicken, some sauces and cooked pork meat at the ready this way for quick and easy but gourmet goodies. This technique is especially beneficial for busy working people who don't want dinner to take forever but want to eat great stuff.... Also works for vegans since you can have your grains and starches pre-done so they make a quick and nutritious meal.
So off we go into Mexican Market land to shop for our ingredients and I can report that we made it back in record time without any casualties. I you've ever gone to these markets then you know what I mean.... the casualties wouldn't have been us either.....lol
We had seen an amazing "Bucatini All'Amatriciana" prepared on one of those gourmet sites the other day so we had planned on preparing this, it was our Friday night meal and let me tell you YUMMY!
8 ounces guanciale, cut in 1/4-inch strips (I use Pancetta since I can't find it)
2 large onions, cut in 1/2-inch dice
1/2 to 1 teaspoon crushed red pepper flakes
2 (28-ounce) cans San Marzano tomatoes, passed through the food mil (these make all the difference!) or very ripe, peeled tomatoes
1 pound bucatini (or other thick strand pasta) or make your own... sure, why not....
1/2 cup grated Parmigiano-Reggiano, plus extra for garnish
Coat a large saucepan with olive oil. Add the guanciale and saute over low heat. Cook until it is brown and crispy and has rendered a lot of fat. Remove and reserve 1/3 of the guanciale for garnish. Bring the pan to a medium heat and add the onions and crushed red pepper. Cook the onions until they are translucent, starting to turn golden. Add the tomatoes and bring to a boil, then reduce the heat and simmer the sauce for about 1 hour (or until it thickens), tasting periodically.
Bring a large pot of salted water to a boil over high heat, season liberally. Add the pasta and cook for 1 minute less than the instructions on the package tell you. If you think it's too much sauce, put 1/3 of it into another pot and hold, you can always store it for later use but you don't want to soak the pasta in sauce, it should coat but not down. Drain the pasta from the water and add to the pot of sauce. Stir to coat with the sauce. This is how you always finish pasta; you finish cooking it in the sauce. Add more sauce, if necessary. Add in the cheese and drizzle with olive oil to finish. Toss to coat and serve in shallow bowls garnished with cheese and the reserved guanciale.
*****************************************
I hope everyone will have a great holiday.... take care and we'll talk soon!
Saturday, July 9, 2011
Height...... Makes all the difference in presentation....
en said that baking is science while cooking is art, I believe it. In the first you follow formulas, if you don't get the right "ratios", your results won't be good. It's all about how one element reacts with another giving the desired effect, but in cooking you get so much freedom and leeway that "your" creativity, style and passion have a chance to interpret ingredients and take them to places maybe no one has taken them before and if you add artistic sensibility to this, well, a dish presentation can be brought to "art". Indeed.We have an old saying: "El amor entra por los ojos".... which means: "Love enters through the eyes" and if you apply this to Culinary Arts it definitely means that dish presentation or "plating" occupies a very important role in whatever you cook because if it's not well presented on the plate, taking into consideration colors, textures, ingredients, accents and most especially, height.... you could turn what could be an amazing dish that everyone wants to eat into a so-so meal that won't excite anyone. It could mean the difference between success and failure (or a good grade vs. a failing one if you apply this to Culinary training), or in the business world, could mean a popular selling offering that can deliver profits and acclaim. Who doesn't like great looking food?
You can get technical on the aspect of food presentation and there are several schools of thought on this from the "minimalist" to "architectural", "contemporary", "European", "classic", etc. that can get pretty involved and Culinary students are trained in so they can best recognize and produce successful "platings". You need to select the correct plate for the dish you are presenting, professionals prefer white plates in bold shapes (lik
e you see in prominent restaurants), since white shows off the food better and busy plates tend to obscure the food. One of the Master Chefs that trained me taught me to "think with the results in mind". Think of the colors of your food, the main element, the sauce, the garnishes and how they will all come together to be pleasing not just to the taste but to the eye as well.For the past couple of years there has been another element that has taken an important place in plating food: height. Now it's all about the height of the dish and how you can bring height into your dishes to better present them. Adding height to a dish makes for a bold statement drawing attention to the elements on the plate, creates interest plus it directs your sight exactly where you want it to go. So now you're asking yourself, how do I start? what will I need? how involved will all this be?
Never fear, these are easy to make, practical to serve and all you need is your imagination and some items. To make these little projects work you will need to use a free hand or maybe some empty cans of different sizes. Cut the tops and bottoms off (I have a can opener that cuts the outside of the can leaving a clean line and the tops to re-use), wash them really well (or you can use professional rings like the ones shown), molds, have vegetable spray on hand and your ingredients. Basics are: For Binders and to hold things together (yet don't go too wet or the stack will crumble): rice, pasta, avocado, couscous, potato, quinoa, wontons, cookies, crepes, etc. Then you will use any vegetable, meat, fish, cheese, fruit, seasonings or sauces you've planned on.
Now stacking food is not new, a long time ago "Timbales" or even "Terrines" functioned in this way by layering ingredients, adding texture and color to have a beautiful result. Same here, just with a new, more modern spin..... so let's see what we can come up with, ok? By the way, I love these, find them fun to do and enjoy showing them off. It never fails when you have company over or you do these for your family, once they see them.... they're impressed and delighted!
Here's an easy, pretty one: Zucchini Confetti Stack.- Lovely colors and a light texture combine to make a most attractive appetizer or side dish.
4 zucch
ini1 sweet red bell pepper
½ cup whipping cream
½ cup shredded Swiss cheese
2 large fresh eggs
1 tablespoon olive oil
salt and pepper
Slice zucchini lengthwise, thinly, save the middle two slices from each one. Chop the rest. Steam or blanch all zucchini and carefully remove the middle slices and dry on paper towel. Strain rest of zucchini until dry. Dice the red pepper finely and saute in the olive oil, until soft. Make a mixture with all of the ingredients, minus the middle slices and half of the pepper dice.
Butter, oil or spray your molds. Place in each mold two slices of the zucchini, arranging them as a cross on the bottom of the mold and up the sides. Fill the mold with the mixture and bake the in water bath for approximately 20 minutes at 400F degrees. Carefully invert them on individual plates. Sprinkle them with the saved pepper dice. You could serve with a little sauce, aioli if you like or you could add some shrimp, crab meat or ?
******************************
Avocado, Sweet Potato and Quinoa Salad.- The flavors coalesce to bring you amazing colors and an amazing dish!
1 cup quinoa, cooked in vegetable stock and cooled to room temperature
1/2 jalapeño, minced
1/4 cup plus 1 tablespoon fresh cilantro, minced

1 sweet potato, peeled and cut into 1/4-inch dice
5 tablespoons extra-virgin olive oil
Sea salt and freshly ground black pepper
Canola Oil
2 corn tortillas, cut into 1/4-inch strips
1 teaspoon Cajun seasoning
Juice of one lime
2 tomatillos in olive oil, skins removed
1 tablespoon rice vinegar
1 teaspoon light agave nectar
2 avocados, diced
In a medium bowl place quinoa, jalapeño, 1 tablespoon cilantro, 1 tablespoon extra-virgin olive oil, lime juice, and salt and pepper to taste, and toss to combine. Preheat the oven to 400F. In a small bowl, toss the sweet potatoes with 2 teaspoons olive oil, and season with salt and pepper to taste. Spread a single layer on a baking sheet and roast for 15 minutes, or until soft in the middle and lightly browned; be careful not to let the sweet potatoes burn.
Lower the oven temperature to 350F. In a small bowl, toss the tomatillos with 1 teaspoon of olive oil. Place on a baking sheet and roast for 15 minutes. Transfer to a food processor, add the vinegar, 1/4 cup cilantro, and agave nectar, and pulse to combine. With the motor running, pour in the remaining 3 tablespoons olive oil in a thin stream. Continue blending until emulsified. Season with salt and pepper to taste. Pour 2 inches of canola oil into a small, heavy pot and heat until the oil shimmers. Add the tortilla strips and fry until crisp and browned, 1 to 2 minutes. Drain on paper towels and sprinkle with Cajun seasoning.
Place a 3-inch mold in the center of one of 4 salad plates. Fill with 1/4 of the quinoa mixture and press down with a spoon to pack the mold, smoothing the top. Place 1/4 of the sweet potato pieces on top of the quinoa and press down gently. Top with 1/4 of the avocado and press down gently. Carefully remove the mold. Repeat on the remaining salad plates. Carefully place 2 tortilla strips parallel to each other about 1 inch apart on top of each. Place 2 more tortilla strips perpendicular on top of those. Top them with the microgreens and drizzle the dressing around.
***************************
Asian Crab Stack with Tomato Gazpacho.- Lovely color and sophisticated flavors, in other words, a hit!
Crab Salad:

4oz white crab meat
1/4 cup crème fraiche
1 tbs Dijon grain mustard
1tsp mayonnaise
1tbs chopped chives
Mix the ingredients together and chill
Salsa:
½ mango diced
2 avocados diced
1tsp finely chopped chile (no seeds)
1tbs chopped coriander
1tbs finely chopped red onions
1tbs lime juice
1tsp chopped pickled ginger
Mix all the ingredients together and keep in the fridge
Gaspacho:
4 vine ripe tomatoes
1 clove of garlic
1 spring of tarragon
1 spring of basil
1 red pepper
1 cucumber with skin off and seeds off
1 red chilli chopped with the seeds
1 tbs cherry vinegar
½ juice of a lemon
olive oil
Salt to taste
Put all the vegetables in a blender and process until smooth, strain through a fine sieve and finish with the olive oil, vinegar and lemon juice. Season and put in the fridge. Now build the stack in metal rings, first add the salsa then the crab mix and top it up with cream fraiche to seal.
Serve it with the gazpacho, very cold, and a drizzle of olive oil.
*********************************
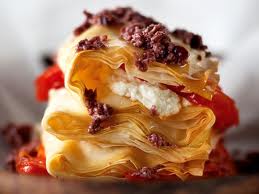
You can also build these "free form" without the use of molds or cans just by using things like Phyllo Dough, Fried Wontons, crepes, blinis, grilled veggies, tomato or bell pepper slices since you use these to make the "levels"..... then you add one ingredient, top it off with a sauce or cream or cheese, add another level and so on.... done in a jiffy and looks incredible! Here is an example:
Phyllo, Salmon, Onion and Greens Salad.- A wonderful first course or an elegant supper.....
Phyllo, baked to a golden brown with butter, add some pine nuts and dill, 4 in squares
Onion, caramelized in butter and oil until deep brown. Add some sugar and balsamic vinegar
Have the salmon sliced and ready
Goat cheese in thin slices, 1/8" thick, chilled

Chives, chopped, chilled and 2 left long for garnish
Microgreens, mixed greens, mesclun
Vinaigrette of your choice
Sour Cream
Caviar
When you're ready to assemble and serve (these don't keep well so be ready to serve), cut the phyllo diagonally into triangles. Select your plates and lay them out. Line your plates with the greens that have been lightly tossed in your vinaigrette. Place a phyllo triangle on top of the greens in the center. Top with salmon and 1 tbl of the onion. On goes another phyllo triangle, this time pointing the tips in another direction as the first. A slice of cheese now goes on top, followed by salmon and onions. The third phyllo triangle goes on, facing the points in another direction, the last slice of salmon now is placed with another tablespoon of onions.
To garnish, put some sour cream, caviar, sprinkle with some chives, and some pine nuts. Drizzle a little vinaigrette over everything and rest 2 whole chive spears on the side of the stack so they point upward. Serve.
**************************************
So now you're asking: "just salads?", "vegetables only?"..... Of course not, here are some combinations you can try:
For appetizers or starters:
- Cellophane noodles, mushrooms, ginger and scallops
- Tiny crepes with apples, duck and wild mushrooms, nuts
- Truffled mashed potatoes with caviar and lobster
- Pancetta, avocado and shrimp with pineapple or mango salsa
- Mushroom, Gruyere, spinach with barley
- Shrimp, roasted peppers and quinoa
- Sushi and rice
- Couscous with apricot glazed lamb and red onions
- Grilled fillet, garlic mashed potatoes, leeks and red wine sauce
- Sausage, red cabbage, apple and fruit coulis
t:- Brownies with grilled bananas, whipped cream, nuts and melted caramel sauce
- Pound cake, caramelized peaches, vanilla custard, whipped cream and berry coulis
- Phyllo, rhubarb & strawberries, peppered creme anglaise topped with toasted almonds
Tuesday, June 21, 2011
Is it too hot to cook?..... You're still hungry, right?.....

Yes, it is really hot. Supposed to be 104F today with an expected high tomorrow of 109F (yes, crazy... I know), and you can't just hole up at home, become "mole people", crank up the AC and wait it for to pass.... no matter how much you want this to be.... Just think of others that are under hotter conditions than you, like my friends in Merida, Yucatan where their summer is hot and humid, Yikes!!!! Gets so hot and feels much hotter than here, although I miss them all the time, the weather is worth it just to be there, really.....
Anyhoo, let's get back to living in Hades.... the weather does not keep up from eating, it should and we should just stop eating, I know, but we don't and have no plans to either, so we scurry out past sunset, quickly grill and run back. Luckily we like our meat rare so it doesn't take too long either, but even if you don't cook outside, meals are still de rigeur (required) so whatever, we're cooking but maybe we can make cooler foods that will allow us to eat yummy foods while trying to keep the house cool (have to conserve energy, AC is expensive after all... and so nice), so I've got some great options for you..... And no, we won't be eating just salads and ice cream either, we want real food after all.....
This traditional dish is supposed to cook in a Dutch Oven, first searing the meat stove top and then finishing it up in the oven for h o u r s, but here is where having a bomb at home is worth its weight in gold. Instead of heating up the house and the oven for hours, you can use the good 'ol Pressure Cooker (no heat felt) and cook for about 30-40 min max.... pretty nifty I say.
Traditional Italian Pot Roast.- Wonderful flavor, hearty meal and sure to become a favorite.
1 boneless beef chuck-eye roast (3-4 lbs), tied

2 tbls vegetable oil
1 med onion, rough chop
2-3 carrots, rough chop
2-3 turnips, rough chop
1 rib of celery, chopped
1 pound cremini or white mushrooms, in large pieces
2 tbls tomato paste
2 cups tomatoes, medium dice or 1 (14 1/2 oz) can diced tomatoes
1/2 fresh tomato sauce or 1/2 cup canned tomato sauce
2 tsp sugar
1/2 cup water
1 cup red wine, Merlot or Beaujolais preferably
1 large head of garlic, remove the outer paper skin, then cut in half
1 sprig thyme, fresh
1 sprig rosemary, fresh
salt & pepper to taste
If using regular method, but you will begin the same for both techniques:
Put your oven rack in the middle position and heat the oven to 300F. (If using bomb, don't turn on the oven and you will sear the roast in the pressure cooker pot). Pat fry the roast with paper towels and salt and pepper liberally. Heat some oil in the Dutch oven (or pressure cooker) over med-high heat until just smoking and brown the roast on all sides, about 10 min. Transfer roast to large plate until you're ready to put it back in the pot.
Reduce heat to medium and cook the onion, celery, mushrooms, and tomato paste until the vegetables begin to soften, about 6 min. Add the diced tomatoes, tomato sauce, sugar, water, 1/2 cup of the wine (reserve the rest), garlic, and thyme. Return roast and the juices in the plate to pot and bring to simmer over medium-high heat. Place piece of foil over pot, cover with lid, and transfer pot to oven. (If using the pressure cooker, turn the heat to high and cover. Wait for the pot to come up to temperature and once the cooker begins to hiss, lower the heat to low and set the timer to 30 min.)
If using the oven: Cook until roast is just fork-tender, 2 1/2 to 3 1/2 hours, turning the roast after 1 hour. Uncover pot and let the roast rest in its juices for 30 min, skimming any surface fat after 20 min. Transfer the roast to a carving board and cover with foil. Remove and reserve the garlic head and skim any remaining fat from the pot (once you open the cooker you can skim off fat too). Add remaining 1/2 cup wine to pot, bring to boil over medium-high heat, and cook until sauce begins to thicken, about 12 min. Meanwhile, carefully squeeze garlic from the halves and mash it into paste, it should be very soft. Add the rosemary to the pot and simmer about 2-3 min. Remove and discard the rosemary and thyme sprigs, stir in the garlic mash and season with salt and pepper.
Remove the twine from the roast and cut the meat against the grain into 1/2" thick slices, or you can pull it apart into large rustic pieces. Transfer the meat to a serving platter and pour some of the sauce over the meat. Serve the rest of the sauce at the table.
**************************
Or maybe y
ou just want to grill or pan fry a steak (chicken or pork even) and just get it over with yet it still has to taste great.... How about a great "Chimichurri Sauce":Chimichurri Sauce.- We all know Argentina is known for its beef (amazing!!!), here's their traditional accompaniment to beef, which I use on almost everything:
1/4 cup hot water
2 teaspoons dried oregano
2 teaspoons kosher salt
1 1/3 cups loosely packed flat-leaf parsley leaves
2/3 cup loosely packed cilantro leaves
6 medium garlic cloves, minced or pressed through garlic press (about 2 tablespoons)
1/2 teaspoon red pepper flakes
1/4 cup red wine vinegar
1/2 cup extra-virgin olive oil
Combine hot water, oregano and salt in small bowl; let stand 5 minutes to soften oregano. Pulse parsley, cilantro, garlic, and red pepper flakes in food processor until coarsely chopped, about ten 1-second pulses. Add water mixture and vinegar and pulse briefly to combine. Transfer mixture to medium bowl and slowly whisk in oil until incorporated and mixture is emulsified. Cover with plastic wrap and let stand at room temperature at least 1 hour (if preparing sauce in advance, refrigerate and bring to room temperature before using).
*******************************
Zucchini and Leeks en Papillote.- A traditional French technique that can be applied to many different dishes, is very healthy and locks in flavors and prevents food from drying out:
2 zucchini, cut in long, thin strips
1 leek, cut off the tough tops and slice the white in fine juliennes

1/2 lb asparagus, trimmed into 2 parts
4 sprigs tarragon, fresh
4 garlic cloves, unpeeled
salt & pepper to taste
1 egg, beaten optional
water (optional)
cornstarch (make paste optional)
Preheat the oven to 400F. You can use a potato peeler to slice the zucchini lengthwise into thin strips.
Cut 4 sheets of parchment paper, 12 x 15 inches in size. Fold it in half. Draw half a heart shape when folded so it will be a whole heart unfolded. Cut along the inside of the line and open out.
Divide the vegetables between each heart. Position the filling on the right side of the fold line and top with tarragon and the unpeeled garlic clove. Season to taste.
Brush the edges of the paper with the beaten egg and fold over. You don't have to use the egg and can fold it without using the egg. I found this site on the web which I thought was a really good explanations of how to accomplish this technique. Cut and paste onto your browser http://www.sundaysupper.com/parch.htm gives directions and shows photos of the no egg technique, it will make you an expert at "Papillote".
Pleat the edges so it is sealed. Put it on a cookie sheet and bake for 10 min. It will puff up so make sure to move the oven racks and leave room. Serve immediately. You can let each person open their own packet on their own with scissors, but be sure and tell them that heat will escape and could burn, so open with care and enjoy the lovely aromas this technique gives.
NOTE: Once you've mastered the making of the packets this way, you can use it for fish and vegetables giving you a clean and very healthy alternative to cook.
*******************************
In keeping with "cool" foods, here are two desserts which can be made ahead and will deliver flavor and comfort in a refreshing dish. First of all I want to give you a "foolproof" pastry crust you can use for all types of pies, you'll love it:
Foolproof Pie Crust.-This pie crust can be pressed into the pie plate and refrigerated for up to 2 days or double wrap in plastic and freeze for 1 month. Once baked, cool, the shell can be wrapped tightly in plastic and stored at room temperature for up to 1 day.
1 1/4 cups all-purpose flour
1/4 tsp table salt
8 tblsp butter (1 stick), softened but still cool (I've used shortening too)
2 oz cream cheese, softened but still cool
Lightly spray 9" glass pie plate with cooking spray. Whisk flour, sugar, and salt together in a bowl. With an electric mixer at med high speed, beat the butter and cream cheese, scrape down the beaters and sides of bowl, and beat until completely mixed, about 2 min. Add the flour mixture and combine on medlow until it looks like coarse cornmeal, about 20 seconds. Scrape down sides of bowl. The mixer speed now to med high and beat it until dough begins to forms large clumps, about 30 seconds. Set aside 3 tblsp of the dough.
Turn the remaining dough onto a lightly floured surface, gather it into a ball and flatten into a 6" disk. Transfer this disk to greased pie plate.
Press the dough evenly over bottom of pie plate toward sides, using heel of your hand or the bottom of a smooth cup (you can also roll out the pastry with a rolling pin as usual and then place it on the pie plate). Make sure that the dough is evenly distributed yet should be thin. Continue to work the dough over the bottom of the pie plate and up the sides until even. On floured surface, roll the reserved dough into a 12" rope. Cut into three pieces, then roll each piece into a 8" rope to form a fluted edge. Wrap it in plastic and refrigerate at least 1 hour.
With the oven rack in the middle of the oven turn oven to 325 F. Lightly prick the bottom of the crust with a fork. Bake until golden brown, 30 to 40 min. Cool on wire rack. (If large bubbles form, wait until the crust is fully baked, then gently press on bubbles with a kitchen towel or back of spoon. The bubbles will settle as crust cools.)
***********************************
Amazing Lemon Pie.-This simple recipe forms a custard type filling. You need 6 tablespoons of lemon juice for this recipe so have an extra lemons on hand in case the 3 sliced lemons do not yield enough juice.
1 double-crust pie dou
gh (see above and make 2 batches)3 large lemons, sliced thin and seeded (I use Persian Lemons)
1 cups sugar
1/8 tsp salt
1 tbls cornstarch
4 large eggs
1 tbls heavy cream
Adjust your oven rack to lowest position and heat the oven to 425 F. Line a 9" pie plate with 1 dough round and refrigerate for 30 min.
Squeeze the lemon slices into fine strainer set over a bowl; reserve the juice (you should have 6 tablespoons). Put the drained slices and 2 cups water to boil in a saucepan, then reduce the heat to med low and simmer until slices are soft, about 5 min. Drain the slices well and discard the liquid. Combine the softened lemon slices, sugar, salt, and 1/4 cup reserved lemon juice in a bowl; stir until the sugar dissolves.
Whisk the cornstarch and remaining lemon juice in a large bowl. Whisk the eggs into the cornstarch mixture, slowly stir in the lemon slice mixture until well combined. Pour into the chilled pie shell. Brush the edges of the dough with 1 tsp cream and top with the remaining dough round. Seal, crimp edges, and brush the top of dough with remaining cream. Using a paring knife, cut 4 vents in the top of the dough.
Bake until light golden, about 20 min, then lower the oven temperature to 375 F and continue to bake until golden brown, 20 to 25 min. Cool on wire rack for at least 1 hour. Serve. Pie can be wrapped in plastic and refrigerated for 2 days after baking.
NOTE: Found some tips on pies and it said that using a knife to evenly cut the lemons into paper-thin slices was a difficult and time-consuming task. You get better results with a mandoline (or V-slicer), which produced perfectly thin. But, if you didn't have a mandoline, putting the lemons into the freezer for about 30 minutes firms them up for better hand-slicing, which is best accomplished with a serrated knife. But same goes when you want to thin slice other things too, like fish or meat.....
********************************
Perfect Strawberry Pie.-Here is a strawberry pie that truly delivers, but you have to make sure you have 2 cups of the berry mixture and you need to measure! The frozen fruit helps develop flavor and texture.
2 lbs frozen strawberries

2 tbls lemon juice
2 tbls water
1 tbls unflavored gelatin
1 pinch salt
1 lb fresh strawberries, cleaned and sliced thin
1 9" pie shell, baked and cooled
4 oz cream cheese, softened
3 tbls sugar
1/2 tsp vanilla extract
1 cup heavy cream
Cook the frozen strawberries in a large saucepan over med low heat until berries begin to release juice, about 3 min. Increase the heat to med high and cook, stirring, until thick and jam like, about 25 min (should be 2 cups).
Put lemon juice, water, and gelatin in small bowl. Let stand until gelatin is softened and mixture has thickened, about 5 min. Stir gelatin mixture, sugar, and salt into cooked fruit mixture and return to simmer, about 2 min. Transfer to a bowl and cool to room temperature, about 30 min.
Fold the fresh berries into the filling. Spread evenly in the pie shell and refrigerate until set, about 4 hours or even overnight.
With an electric mixer on med speed, beat cream cheese, sugar, and vanilla until smooth, about 30 seconds. With mixer running, add cream and whip until stiff peaks form, about 2 min. Serve pie with whipped cream topping.
NOTE: Be sure to measure the reduced strawberry mixture: You need exactly 2 cups. Put the strawberry mixture into a measuring cup. If its more than 2 cups, return it to the pan and cook it down. It may seem OCD to to measure, but the pie won't set or slice properly if you have more than 2 cups of the strawberry mixture, so take the extra couple of minutes to insure a perfect pie.
*******************************

So far this is as far as I got this time, took too long and put other things on hold so now's the time to get going on the rest. The house is very smoky with the aroma of roasting Poblano's and the heat isn't letting me open windows for now so whatever.... at least I like the smell, right? But I've been whipping up some batches of some "fun food" from way back: jello & pudding shots in some creative flavors since these popular "kid friendly" foods grew up.... you'll see, I'll send you some ideas as soon as I finish this up later. Until then, relax and enjoy!......
Saturday, March 5, 2011
Salumeria - Pork Parts and other tasty bits.........

I have always been interested in cured meats, that came out of left field didn't it? lol.... but coming from a Basque family on my father's side (and you know how "different" this makes people... I'm being nice now...) means a strong independent streak when it comes to things and food in particular, and my Dad loved his cured meats and would make all kinds of tasty bits every now and then and if I was in the area, was known to be his "accomplice".... I learned about meat, smokers, fishing, hunting, camping and related items and it gives me a good appreciation when artisan producers present quality products.
Buying meats this way though isn't very satisfying and I've always maintained that if you're serious about a particular kind of food you'll ultimately figure out a way to make your own and make it better plus it will be custom designed to suit your taste, your nutritional needs and special health concerns. This is how it is. Sure, once again we come to the inevitable question I get from everyone: "But it's so much work and takes such a long time"..... Stop it! So it takes time? Anything worth anything is worth working on and if you're really interested, you find the time. Period. So no whining, ok? It's all work and dedication or just go to the market and buy it.
Moving so much and having gotten rid of most of my equipment means it's more challenging yet it doesn't mean you need to get specialized equipment or you can't get it done, hey I've smoked fish on top of the stove and it was easy and wonderful. Just adapt and be flexible but most of all, be creative and stick to it. You'll get there, there is no doubt, I've proven this time and time again. It's worth it too.
Now your taste could range from making your own bacon to Salami, Pancetta or even P
rosciutto. It's all good and possible. There are more and more shops opening up offering Artisanal products made with care and wholesome ingredients so it tells you that there are many of us out there that care about this. I wish I could find someone who could mentor me and teach me the old ways to produce these wonderful meats but for the time being, I am teaching myself with my Dad's way plus lots of books from the library and the good old Internet. So far, good stuff is the result and it's making us happy, happy but I know perfection is still ahead.First of all I'll say that I've read up many of Michael Ruhlman's posts on the subject of all things "pig" and his recipe for making your own bacon is amazing! I find pork belly at the local Korean Market at a reasonable price or this project wouldn't get off the ground, and the International Marketplace is responsible for the fresh herbs and spices that flavor the meats mentioned. Don't forget that I am on an even stricter budget due to the spikes in food prices of late but we are still making and enjoying amazing foods from all over the world on a regular basis due to our flexibility and creativity. Now the circle is complete and Rene is MY accomplice and we are having a great time! He is also VERY interested in all things cured meat.
Between Ruhlman's books (hope you don't mind my bastardizing your procedures Michael and take this as a tribute instead..) as well as many others, plus SO much information on the Web, this is what we've come up with....
Making Your Own Bacon at Home.- If you appreciate fantastic bacon, you will be happy! My favorite is Wild Boar Bacon but haven't been able to find fresh Boar meat... you can buy the bacon online....
You'll need:
Fresh pork belly, I followed the 5 lbs weight for this (if you want more or less, adjust)
1/4 cup Kosher Salt, coarse type (Ruhlman says to weigh it- 2 oz)
2 tsp Pink Curing Salt
4 tbl black pepper, coarsely ground or cracked
4-5 Bay Leaves, crumbled
1 tsp Nutmeg, fresh ground from a nut
6-12 Thyme Sprigs
3 tbl Juniper Berries, crushed (optional)
7-10 Garlic cloves, peeled, crushed or through a garlic press
1/2 cup Brown Sugar -or- Honey -or- Maple Sugar -or- your choice
Large Zip Lock Bags (2 Gal size) or aluminum foil or plastic wrap
NOTE: I've added red pepper flakes, regular sugar, cumin, mustard, etc. to vary the flavor and this is completely optional and up to you. This is just to get a different flavor.
In a large bowl put all the ingredients (after the pork belly) in an mix them all well. Put the pork belly in the zip lock bag (I've also used lots of plastic wrap when I've run out of zip lock bags), and rub the spice mix all over it, rubbing it well like you would a meat rub. Get as much of the air out of the bag and seal it up well. You could put this whole thing into another zip lock or wrap it up with plastic wrap so it's well sealed. Make room in your fridge and put it in there for at least a week. Every couple days or so, get it out and turn it while you "re-rub" the spices again.
After the week in the refrigerator, remove it from the fridge, take it out and rinse off th
e spices under cold water and dry it off with paper towels.
Turn the oven to 200 degrees F (or the lowest setting you have) and use a cookie/baking sheet to put the meat on. Let the meat sit in the oven for at least 90 minutes or if you use an instant read thermometer, it should read close to 150 degrees. Once it's there, take it out of the oven and allow to cool. If you're not using it right away, be sure to refrigerate it, otherwise, you're ready to begin using it.
Here are a couple of tips: I am not salty so too much salt makes it unpleasant for me. So go easy on the salt.
If you want smoked bacon then go ahead and follow directions for this. Just make sure you've cured it well. This can also be hung to dry like Salami if you like.***********************************
Home-Made Salami.- Easy to prepare and satisfying to eat, here's a beginner's guide to making your own Salami.
3 lbs ground
meat (pork / beef or ?)1 tsp garlic powder (not garlic salt)
1 tsp onion salt
1 tsp red pepper flakes, very finely crushed
3 tbl Liquid Smoke
3 tbl Curing Salt
2 1/4 cups water
In a large bowl, mix all the ingredients except the meat, until they are really, really well combined. Add the meat and mix together with the spices, again, really, really well. You don't want to have a piece with more salt or pepper than another piece, so mix, blend, fold until it's evenly mixed and you can see even color all over.
Once it's well mixed, shape the meat into "logs", these can be small or good sized, it's up to you but half pound logs are fine or maybe three pound logs if you use it a little bit more. Cover tightly with aluminum foil, insuring it's well sealed and put it in your fridge for about 2 days.

Preheat oven to 325 degrees F and then place a wire rack in a deep baking pan. Pierce the logs with a fork or small knife all over before placing in the oven and then sit the logs in the wire rack and place in the oven to bake for about 1 hour and 45 minutes. Check the logs and if they seem too wet, unroll the foil and bake the logs for an additional 15 minute increments, but lowering the heat this time to the lowest setting your oven has, about 200 degrees. This is to dry out the logs.
The Salami is now ready yet don't despair if it's not exactly the same as the store bought ones. Don't forget that commercially prepared cured meats contain colorants and preservatives, plus chemicals and additives that affect the colors.
*********************************

I can promise to do a lot more research into this matter and let you know what I find. I'm experimenting on Duck & Lamb Prosciutto, Chorizo Espanol and other wonders, we'll see what we come up with, but as lots of other things, the trip is exciting while the arrival is comforting. I'll report back.
Sending everyone my best wishes for a wonderful weekend and I've already started working on future posts full of interesting new concepts so I hope you will keep checking back to see what I can come up with. Take care and talk soon.............
Monday, February 21, 2011
Classic Mexican Cuisine for a cold and rainy day.... Just perfect!

I first began making "Birria Estilo Jalisco" in Puerto Vallarta. We had just moved there, gypsies that we are, and thought it would be easy to find since now we were in the state of Jalisco. Now, Birria is usually made out of goat meat but it's a stronger tasting meat and doesn't work for most people so I wasn't surprised to find it made out of beef or pork yet the only people offering this classic Mexican dish were carts on the street and while not bad (you think I didn't try this?) it didn't hit all the flavor notes I was looking for and the more I looked around and spoke to people, it became increasingly clear that "modern times" had hit Vallarta too.
Vallarta, as it's known to the locals, is a sleepy little beach town that was discovered way back when Elizabeth Taylor decided to have an affair with Richard Burton (yes, all that...) and this "scandal" brought the world's media in (along with the filming of the "Night of the Iguana"). The director, John Huston, had a particular preference for Vallarta since this is where he lived. While during those years it didn't have the infrastructure it has today, no fancy hotels, discos, restaurants or anything else for that matter, the natural beauty of the beaches, the jungle vegetation and tropical climate made converts of everyone and so the invasion began and Vallarta was "discovered".
The state of Jalisco is among the prime examples of the better known Mexican Cuisine since it's responsible for Tequila, Birria, Pescado Sarandeado, dishes using Maguey and it's derivatives, Pozole and many others. The state is among the richest and most progressive and having Guadalajara as its capital, offers the best medical care and Universities too. The climate is compared to an eternal Spring, local products are first rate and its women are considered among the most beautiful. Charros are from Jalisco and many traditions began here as well. So, it's a nice place.
Getting back to the "Birria", I found if I was going to get what I was going after I would have to make it myself and I set upon finding the real Jalisco style Birria recipe. I spoke to mothers and grandmothers who were the only ones cooking anymore (women here are out of the kitchen and in the workplace, younger generations no longer cook and fast food or take out are very popular, just like other places on the planet which means traditional cooking methods and foods will suffer) and pretty soon I had a good idea what I was after. This is my usual "modus operandi" when it comes to obtaining "true" recipes, I investigate, talk to the older people and reach a consensus on what the "real" version of dishes is all about; I insure I've got the "real" techniques and ingredients and once I produce an acceptable version do I consider "tweeking" to suit our individual preferences. It's worked in the past and I've been very successful doing it like this so I must be on the right track.
Here is an excellent version of "Birria Estilo Jalisco" that is perfuming my kitchen at this very moment. It is wonderful.....

1 lb lamb stew meat (you can use goat, beef or pork)
1 1/2 lamb ribs, cut in 1-2 inch pieces
2-4 chiles de arbol, dried, de-stemmed and de-seeded
2 chiles pasilla, dried, de-stemmed and de-seeded
2 chiles anchos, dried, de-stemmed and de-seeded
3-5 garlic cloves, peeled, roasted
2 lb tomatoes, roasted
1/2 large onion, cut in large dice
5-7 large peppercorns
1/2 tsp thyme
1/2 tsp oregano
1/2 tsp ginger
1/2 tsp sesame seeds
2 oranges, juiced
1/2-1 cup white vinegar (optional)
salt to taste
lard or oil for frying, your choice
Garnishes:
1 large onion, finely diced
2 tbl oregano, dried and crushed
2 tbl cilantro, finely minced
2-4 Persian lemons, cut in quarters
Hot sauce, your choice (optional)
Fresh tortillas
All the dried chiles are roasted on a dry pan until fragrant, turning. Then they are placed in a large bowl and covered with hot water where they will remain until soft. You can do this in a pot on top of the stove and simmer gently for at least 1/2 hour, test and decide if more simmering is needed. Roast the garlic and the tomatoes and place them along with the softened chiles into a blender (save the soaking liquid) along with the spices except for the marjoram. Add the orange juice and vinegar if using. Process very well and then run through a sieve (so no seeds or anything else is included) and in a large pot (I use a pressure cooker) with 2-4 tbl of lard or oil, brought to a hot temperature, you add the sauce and you cook it slightly so it's not completely raw.
To the sauce you will add the meat and the marjoram. The traditional way is to stop at this point and allow the meat to sit in the sauce overnight. I skip this step and proceed to cooking, your choice to wait or not but I don't feel it's truly necessary. You cook the meat until it is soft. About 30 min in the pressure cooker for me, might be 1-3 hours of regular cooking and some people bake it in a 375 degree oven, covered with foil really well too. Just watch it so it doesn't go dry and add chicken stock or make additional sauce to have on hand.
Have the garnish ingredients ready when you are going to serve since these are used as needed as a topping for the "Birria" which is traditionally served in soup bowls, with the toppings, hot tortillas and cold beer for a taste of Jalisco!
***************************************
Chalupas.- Nothing says "Puebla" to me like these little wonders. Nothing fancy, very simple... yet full of flavor and tradition. If you're in Puebla, go to "Memelas en la Calle 3", the best in town!
1 lb masa doug
h (you can make your own or store bought)1/2 lb shredded pork meat
1/2 lb shredded chicken meat
1 cup pork lard (manteca, yes.... won't taste the same)
1 onion, finely diced
2 cups Salsa Verde
2 cups Salsa Roja
Salsa Verde:
2 tbl manteca
1 1/2 cups green husk tomatoes, clean
1/2 onion, cut in quarters
3-4 garlic cloves
1-2 tbl cilantro leaves
1-3 chiles serranos (optional and depends if you want it hot or not, for taste only use 1 serrano)
salt & pepper to taste
Salsa Roja:
2 tbl manteca
1 1/2 cups Roma tomatoes
1/2 onion, cut in quarters
3-4 garlic cloves
2 dried chile moritas (seeded and deveined / toasted and soaked in hot water to soften)
salt & pepper to taste
Make the sauces: Green: Put all ingredients except the lard, cilantro and salt and pepper in a pan, cover with water and cook until the tomatoes have changed color. Put everything in the blender, adding the cilantro and salt and pepper and blend well. In another pan, get the lard hot and then pour in the blended sauce and cook about 5 min on med-low heat. Reserve
Red: Once the dried chilies are soft, put all ingredients (except the lard, salt & pepper) in the blender and blend well. You might have to run through a sieve if pieces of the dried chile remain), in another pan put the lard and get it hot, pour in the salsa and add salt & pepper. Cook 5 min and reserve.
If the masa is not soft, add very little warm water and work the dough (adding very little water) until it's workable. Make small tortillas which are put on a "comal" (or large pan) with some lard on it, already hot; the tortilla is cooking so dribble some more lard on top, now put some sauce on top followed by meat and finally some onion; more hot lard goes on top right before serving.
Comes with half green and half red and while these are considered appetizers, I used to have these as dinner along with a big glass of fresh squeezed orange juice! MMMMmmmmm!!!!
*************************************
Tlayoyos.- Another traditional "tidbit" that is second to none when it comes to flavor!
3 lbs masa for tortillas (make your own or store bought)
1 lb peas
Salt to taste
2 Avocado leaves
1/2-1 cup lard or oil
Red Sauce
Green Sauce
1 lb fresh Mexican Cheese (Cotija for instance), grated
Cook the peas with a little salt and the avocado leaves until very tender, drain and process until a paste is obtained. Add a little lard and mix well. Work the masa well until it's soft yet firm and make small tortillas which are filled with the pea paste, you fold so the filling is well encased and they look like elongated half moons.
Cook in some lard in a hot pan until golden and serve covered with sauce, half in green sauce and half with red sauce and sprinkle some grated cheese on top. Enjoy!
**********************************
If you've re
ad more of this blog then you know my penchant for "street food" anywhere in the world I happen to be, I love it! While Birria is not commonly a street food, Chalupas and Tlayoyos (or Tlacoyos as known elsewhere) are most definitely along with about a millions other offerings. I was talking to Rene about all this while typing and we recalled our favorite places while living in Puebla and we remembered "Sushi Itto", if you're ever in Puebla, make a point of going there to sample some of THE best sushi anywhere. They do a fussion of Japanese and Mexican ingredients that is not only flavorful but perfectly paired to deliver amazing products, you'll see! But do make a point to walk around the downtown area of Puebla and see the sights along with tasting the incredible traditions that this city/state offers the world, it's worth the trip...... Do use the search bar on top and look through all the Puebla info posted here..... Talk soon!
Sunday, January 23, 2011
I Need Something Exotic and Wonderful......

One sure fire way to break the "Blah's..." is to take a trip to an exotic place. Sure, but how often can you really do that, right? So a poor man's escape could be to simply create the "ambiance" wherever you are and take an imaginary journey for an evening, leaving your daily lives behind and step into another world's colors, aromas, sounds, flavors and customs that will give you that needed lift without having to use a Passport, Visas or make travel arrangements.
Your "trip" could be as simple as making a meal or if you really want to put your imagination to work and go all out you could take it to the next level and really create another world at your house. Change the lighting, get the right music, create the ideal setting and let it take you away. It can be as elaborate as your imagination and budget can allow or as simple as you like. It could be an ideal way to celebrate a special occasion or create a "date night" for your mate or maybe just take the routine away from a otherwise routine weekday meal. You can make it fun, adventuresome, entertaining, educational and very tasty and take advantage of the trip to stir some interest in your family, maybe for a future trip you can actually plan or just as family night with endless learning possibilities.... think about it, where would YOU like to go?
My kids are no longer small so they don't need me to help them with homework, history, language, anthropology or any of that but you can see what I'm getting at, right? Lea
rning can be fun and tasty. Maybe you've been wanting to try something new and haven't figured out a way to include your family in on it or maybe you want to plant the seed of possibility for next year's vacation. This could be a test drive of sorts..... Plus now, more than ever, most ingredients you need for almost anything are available at your local A&P so it's not only possible but quite easy to find all the information you'd need. At the very least it would be fun.Since we're getting organized for moving next week, we're not making any plans until then and just laying low which to me makes the perfect opportunity to try something and this is what I've planned. I need to go to the store anyway so if I need anything extra it won't involve an extra trip. We're going to Iran for the evening because I love Persian food and I haven't made it in a while, saw a picture in one of my books and it set my mind to wandering. I've got some great candles and luminaries I haven't packed yet to set the mood along with some great World Music I can use and I found some material I'd gotten that I never got around to sew into anything and they are kind of exotic colored and will use to cover lamps and windows which should do great too! As soon as my menu is set we will be almost there......
When I lived in San Diego, there was a massive Iranian immigration wave during the 80's and especially in the La Jolla area where I lived, we got lots of new neighbors. My best friend's brother married the daughter of the Sha's right hand man and so their family became part of our circle. The ladies of the family taught me a lot of their dishes and we were fortunate to be invited to t
heir meals, celebrations and daily life. We even attended a Persian school to learn Farsi but I've forgotten it now I'm ashamed to say. But the food remained with me and is one of our favorites due to the amazing flavors and colors. Ricardo's cousin (and one of mine) married into a prominent Persian family as well and they cook amazingly too!I'm looking at my books and this is what I've come up with for our night's foray into the Middle Eastern World: Nothing too elaborate but different enough to give us a needed change. I could make a tent out back in the garden with lots of candles and we can sit on the carpet covered artificial grass, lay back on pillows and watch the stars while wonderful music wafts around us. Since family style is acceptable for this cuisine, it will make it easy for me to serve and everyone can serve themselves what they like. I will make a series of small dishes to nibble on and a couple main dishes. It will be fun and tasty!
Persian Jeweled Rice (Javaher Polow).- This is a celebratory dish full of wonderful contrasts, totally worth making and sharing.
2 1/2 cups basmati rice, rinsed and soak in 5 cups of water with 2 tbl of salt for at least 2 hours
1 medium onion, slice thin
1/2 cup sliced pistachios, soak in water to soften
1/2 cup slivered almonds, peeled

1 cup sour cherries (or cranberries), pitted, rough chop
1/2 cup raisins, regular and golden
2 medium-size carrots, cut in very thin slices
2 large oranges, orange peel only cut in very thin slices
1/2 cup sugar
1/2 teaspoon saffron in 3 tablespoons of hot water
1/3 teaspoon ground cardamom
1/ teaspoon ground cumin
1/2 teaspoon rose petals, dried and crushed
1/3 teaspoon turmeric
Sugar as needed
Salt
Water
Butter and/or Oil
Bring 8 cups of water to a boil on med-high heat and pour in rice. Let boil for about 7-10 minutes or until the rice grains are "al dente". Drain and rinse with cold water.
Peel oranges. Cut the rind into very thin stripes and put in cold water for 10 minutes. Drain and repeat twice. Combine 1/2 cup of sugar and a cup of water in a pan, boil gently until the sugar dissolves completely and begins to thicken. Add orange zest and carrots and cook for 15-20 minutes on low heat. Melt 2 tablespoons of butter and in a large skillet, add a tablespoon of vegetable oil, cook onions until golden brown, add turmeric and stir. Add cherries and cook for 5 minutes on lower heat then add raisins, sprinkle a tablespoon of sugar on top and mix. Mix in the carrots and orange zest. Add the spices, taste and adjust seasonings. Add pistachios and almonds. Make sure everything mixed well.
In a large non-stick pot, heat about 3 tablespoons of oil over medium-high heat. Put the mixed rice into a pyramid shape. Gently sprinkle 1/2 cup of water over the top. Sprinkle the saffron over the rice before putting the lid on. Cover, and insure it's well sealed. If you have to put towels or foil around the cover to prevent steam escaping. Cook on med-high heat for 10-15 minutes, lower the heat to simmer when you see steam. Cook for another 40-50 minutes. Don't open the lid before the rice is done cooking. To serve, mound rice on a serving platter. Garnish and serve warm.
****************************************
Koofteh Tabrizi (Herbed Meat & Rice Balls).- Aromatic and full of flavor, these meatballs will give you another way to bring amazing food to your table!
1 lb grou
nd beef (or just use the beef)1 lb veal
1 1/2 cup rice, raw,well rinsed
2 eggs
1 tsp salt
1/4 teaspoon turmeric, ground
1/4 teaspoon pepper
2 tablespoons tarragon, dried
2 bunches Italian parsley, chopped fine in a processor
1 cup leek, finely chopped
2-3 garlic cloves, chopped fine
1/2 cup dill, fresh
1/2 cup onion, chopped fine
1/2 cup fruits (cherries or prunes or raisins, etc.) chopped fine and stuck inside the meatballs
BROTH
3 tablespoons oil
2 medium onions, sliced
1/4 teaspoon turmeric, ground
1 cup tomato, chopped
1 can, 16oz, tomato sauce
1 teaspoon salt
5 cups water
1 cup peas(fresh or frozen)
Mix all the meatball ingredients together and roll into balls, 2-1/2 inches in diameter, firmly packed. Refrigerate them for 1 hour.
To make the broth, heat the oil in a pan, add the onions and turmeric, and stir-fry over moderate heat until light brown, about 3 minutes. Add the tomatoes and salt and stir-fry for 2 minutes more. Add the water and bring to a boil. Moisten your hands with cold water. Take each herbed ball and roll it firmly; add the balls to the broth very carefully, one at a time, so that they do not not fall apart. The water should just cover the balls. Cover the pan and cook over moderately low heat, without stirring, for 45 minutes. Add the green peas and cook for 10 minutes more. The broth will reduce somewhat, the balls swell considerably due to the expansion of the rice. Serve warm-- with the meatballs in the broth.
*************************************
Taboulleh Salad.- A most refreshing and healthful way to add new flavors into your diet. Loaded with flavor, cool and crunchy! I love serving it with the inside leaves of Romaine Lettuce and eaten as "wraps".....

1 cup of uncooked bulgur wheat
2 cups of fresh parsley, leaves only, chopped fine
handful of fresh mint, leaves only, chopped fine
3 green onions, sliced thin
1-2 cloves of garlic (optional), chopped fine
1 tomato, seeded, chopped fine
1 cucumber, seeded, chopped fine
2 lemons, juiced
olive oil to taste
salt & pepper
Some Romaine Lettuce leaves, washed
In a bowl, cover your bulgur wheat with 2 cups of boiling water. Let it stand until all of the water has been absorbed (about a half-hour). Remove as many stems as possible from the parsley and mint, and process in the food processor or just chop by hand. Finely mince your other vegetables. Other veggies may also be added, per your tastes and what you have on hand. Toss your fresh herbs and vegetables in with the cooked bulgur, and add your lemon juice and olive oil to form a light dressing. Toss well. Salt to taste. Chill for about 15 minutes or longer to blend flavors.
***********************************
Lentil Salad.-Another economical and healthful addition you will appreciate.
1 lb lentils, sma
ll are best1 qt water
1/2 cup celery, chopped fine
1/2 cup carrots, chopped fine
1/4 cup red onion, chopped fine
2 tbl parsley, leaves only, chopped fine
2 tomatoes, seeded, chopped fine (optional)
olive oil to taste
lemon juice to taste (or you can use red wine vinegar)
salt and pepper to taste
Rinse and drain lentils. Put in pan with water to cook, bring to a boil, reduce heat and cook until tender but not falling apart, about 20-25 minutes. Drain and place in bowl.
Add the rest of the ingredients to the bowl and toss, insuring everything is well seasoned. Serve on a bed of lettuce either warm or cold. You can also add an unlimited amount of other vegetables you like.
**************************************
Wheatberries, Poblanos and Pecans.- A wonderful side dish, full of flavor and very easy and fun.
1 lb whole wheatberries, rinsed and soaked overnight in cold water

2 qt water
olive oil to taste
salt and pepper to taste
1/4 cup pecans, chopped
1 poblano pepper, roasted, seeded, peeled and cut in small squares
Drain the berries and place them in a pot to cook with the water. Bring to a boil and simmer until tender but still have some bite to them, about 45-60 min. Let them rest off heat for about 10 min, then drain.
Heat the olive oil in a pan and add the pecans, toast them slightly to bring out their flavor, about 1-2 min. Add the poblanos and saute another minute, then add the wheatberries and mix to combine well. Season and serve.
NOTE: I like to add Pomagranate Seeds to this if they are available. Amazing!
********************************************
Tahini Yogurt Dressing.- Smooth, cool and a great addition to any salad, sandwich or wrap. Use as a dip, instead of sour cream or in almost anything you like!
1 cup p
lain yogurt (we like Greek style)2-3 tbl Tahini sauce (Sesame Paste), sold in the imported food isle in jars or cans
3-4 tbl lemon juice or to taste
Mix all ingredients together and taste to adjust to your taste.
*******************************************
Falafel.- A chickpea based "meat", this nutritionally rich recipe is great tasting too. Make it into meatballs, or cilinders or flat patties on pita bread, load it up and enjoy! You can find dry mixes in your grocer's shelves now too and in bulk at Whole Foods. But here is a natural version in case you want to try it, it's definitely worth making.
2 lb chickpeas or gabanzos (fresh and cooked, drained or canned, drained is fine too)
4-5 garlic cloves, peeled
5-6 green onions, chopped fine

4 tbl parsley, leaves only, chopped
2 tsp cumin, ground
2 tsp coriander, ground
1/4 tsp cayenne
2 tsp salt
1 tsp pepper, ground
1-2 tbl Tahini Sauce (sesame paste)
2 eggs, lightly beaten
2-3 oz soft bread crumbs
Put chickpeas into a food processor (or blender) and chop well but don't puree. Add the remaining ingredients and mix well.
Use an ice cream scoop and make 2oz balls which you can flatten for a patty or leave as is or make any shape you like. Handle lightly and not too much since this will dry them out and then they will break apart. Deep fry in hot oil until brown and crisp.
Serve with soft Pita bread and top with fresh tomato, onion, cucumber slices. Add Tahini Yogurt Dressing on top and enjoy! A meatless wonder that can stretch your budget while giving you amazing flavors.
NOTE: These make amazing little appetizers to serve at parties with their dipping sauce. Or just serve as patties with the veggies on the side. Vegetarians love them! Or make the patties and freeze them so you can have them available for a quick veggie burger, really great!
***********************************************
What to have for dessert? Fruit Salads, Baklava, Halvah, Cheese and Honey, sweet mint tea.... So light up the candles, put on that exotic music and turn the lights down low..... the trip is just about to start and you're in for a lovely time! Plus what lovely leftovers we will have too!
Best wishes to everyone, talk soon......