Showing posts with label Desserts. Show all posts

Wednesday, November 27, 2013

Not Everyone Celebrates Holidays.......... 

Okay, we had Turkey Dinner with all the trimmings about 10 days ago. Turkey was on special, so much so that it would not have made any fiscal sense to not purchase one so we went ahead. It was a great meal which we all enjoyed, the sandwiches were good and we even had a couple of casseroles out of it too. Turkey is not one of our protein favorites and since we have it very infrequently, turns out special when we do serve it. Hope your holiday meal is a wonderful one.....

I had a day off and had made some pies for the turkey dinner, the pumpkin pie was outstanding and Ricardo wanted another one but there were no pumpkins at the store (that was weird..) so had to make another choice, this is how I came up with Persian Lemon Curd with Meringue and French Apple Pie, both easy to make, very good too.

In Mexico, yellow lemons are not the norm. We use Persian Lemons (green, with no seeds), you call them "limes" in the US but we also have Limes which are nothing like the Persian Lemons so whatever, but if you use the Persian Lemons for say, lemonade or lemon curd...... The difference is amazing!!!!!! So guess which type of lemon went into my Lemon Curd? You guessed it...... 

Green Lemon Curd with Meringue Pie.- A classic with a spin......

1 1/2 cups all purpose flour
1/8 teaspoon salt
1/2 cup butter, room temperature
1/4 cup granulated white sugar
1 large egg, lightly beaten

Lemon Curd:
3 large eggs
1/3 cup fresh lemon juice (do not use the bottled lemon juice)
3/4 cup granulated white sugar

4 tablespoons butter, at room temperature and cut into small pieces
1 tablespoon lemon zest

Meringue:
4 large egg whites
1/2 cup plus 2 tablespoons white granulated sugar
1/2 teaspoon cream of tartar

Sweet Pastry Crust:  In a bowl, sift or whisk together the flour and salt.  Set aside.  Place the butter in your mixer and beat until softened.  Add sugar and beat until light and fluffy. Gradually add the beaten egg, beating just until incorporated.  Don't over mix or the butter will separate and lighten in color.  Add flour mixture all at once and mix just until it forms a ball.  Don't overwork or pastry will be hard when baked.
  
Flatten dough into disk, cover with plastic wrap, and refrigerate for about 30 minutes or until firm. Have ready an 8 - 9 inch tart pan with removable bottom.  On a lightly floured surface, roll out the pastry into an 11 - 12 inch circle that is about 1/8 inch thick.  To prevent the pastry from sticking to the counter and to ensure uniform thickness, keep lifting up and turning the pastry a quarter turn as you roll (always roll from the center of the pastry outwards to get uniform thickness). To make sure it is the right size, take your tart pan, flip it over, and place it on the rolled out pastry.  The pastry should be about an inch larger than pan.

When the pastry is rolled to the desired size, lightly roll pastry around your rolling pin, dusting off any excess flour as you roll.  Unroll onto top of tart pan.  Never pull pastry or you will get shrinkage (shrinkage is caused by too much pulling of the pastry when placing it in the pan).  Gently lay in pan and with a small floured piece of pastry, lightly press pastry into bottom and up sides of pan.  Roll your rolling pin over top of pan to get rid of excess pastry.  With a thumb up movement, again press dough into pan.  Roll rolling pin over top again to get rid of any extra pastry.  Prick bottom of dough (this will prevent the dough from puffing up as it bakes).  Cover and refrigerate for about 20 minutes to chill the butter and to rest the gluten in the flour.
Preheat oven to 400 degrees F (205 degrees C) and place rack in center of oven.  Line unbaked pastry shell with parchment paper or aluminum foil.  Fill tart pan with pie weights, rice or beans, making sure the weights are to the top of the pan and evenly distributed over the entire surface.  Bake the crust for 20 to 25 minutes or until the crust is dry and lightly golden brown.  

For Lemon Curd  In a stainless steel bowl placed over a saucepan of simmering water, whisk together the eggs, sugar, and lemon juice until blended.  Cook, whisking constantly (to prevent it from curdling), until the mixture becomes pale in color and quite thick (like a hollandaise sauce or sour cream) (160 degrees F or 71 degrees C on a thermometer).  This will take about 10 minutes.  Remove from heat and immediately pour through a fine strainer to remove any lumps.  Cut the butter into small pieces and whisk into the mixture until the butter has melted.  Add the lemon zest.  Immediately pour the lemon curd into the baked crust and smooth the top.

Reduce the oven temperature to 350 degrees F (177 degrees C).  Bake the tart for about 10 minutes or until the lemon curd is firm but still a little wobbly in the center.  Do not let it brown or burn. 

For Meringue: Meanwhile, in a clean bowl of your electric mixer, with the whisk attachment, beat the egg whites until foamy.  Add the cream of tartar and continue beating until soft peaks form.  Gradually add the sugar and continue to whip until stiff peaks form.

Using a spoon, place dollops of the meringue over the entire surface of the hot lemon curd, starting at the outside edge of the tart.  (Make sure the meringue comes right up to the crust and there are no gaps between the crust and the lemon curd.) Then, with the back of your spoon, gently press down on the meringue to get rid of any air pockets and to make sure all the lemon curd is covered with the meringue.  If desired, swirl the meringue making a few decorative peaks.  Return the tart to the oven and bake for about 10 to 15 minutes or until the meringue has nicely browned.

Remove from oven and place on a wire rack to cool, away from any drafts.  When cool, serve or else cover and refrigerate.

Now you might think this is too much work for you, but I hope that you will try it, it's really worth it. If you want something simpler.... then make the Lemon Curd.  Once you taste this, you'll be motivated to use it often and will come around to searching for other recipes.

So go ahead and make something tasty..... share it and enjoy!


Friday, November 4, 2011

Bread Pudding..... Do you know how many kinds you can have?

Bread Pudding.... What does it mean to you? Did you know that most cultures on this earth have their own version of this popular comfort food? From Creole to French, Italian to Mexican and Spain, everyone developed a tasty way to deal with left-over hard bread. Bread has always been considered "the staff of life" so cultures of old showed its respect by never throwing out the bread, instead transforming it into everything from salad, like the Italian Panzanella, to soup as is used in Spain with Gazpacho and their version of the pudding called "Migas".... Mexico has the ever popular "Capirotada" which is a traditional dish containing both sweet and savory flavors for the holidays.... in other words, and in all languages, the trick is to conserve, recycle, make do and fix it up but under no circumstances is it a good idea to throw food out.

Bread Pudding, while most people think of it like a dessert, doesn't have to be sweet at all, but since we're starting with the sweet let's talk about it a while. Using a thick egg based custard base, flavored with cinnamon, nutmeg, ginger and allspice, a lot of times raisins, nuts, fruits and liquors of all types become part of this as well. Ice cream can be seen topping it as well as heavy cream, Pastry Cream, Vanilla Sauce, Bourbon Sauce and on and on and on.....like Lemon Curd or Dulce de Leche or Chocolate Croissant with Nuts..... what's your favorite? Do tell.....

While Bread Pudding doesn't have to be sweet, the savory brother of this hearty and flavorful dish can be quite a creation too. How about a Baby Spinach, Cream and Garlic Bread one? or a Spinach - Shitake one? How about Mushroom, Leek and Parmesan Bread Pudding.... or a Artichoke Heart, Asparagus & Mozzarella one? A Spring Onion and Goat Cheese one? Any combination you can come up with will make a great one. The base is very much like the one used for Quiche, except that it fills the spaces in between the bread and jells in the same firm-soft manner, so any accessories that you add to it are enhanced by the amalgamation that happens in the oven. Love that word because it's so perfect for what happens here.

So which kind will you make? Here's some prime examples for you to try......

GOAT CHEESE AND SPRING ONION BREAD PUDDING.- Tangy, lemony and very satisfying. You can make it ahead of time in either a casserole dish or in individual ramekins and have them ready when you are!

1 lb sourdough bread, crust removed, cut into cubes
5 tablespoons butter
3 bunches of green onions, cut into 1/2-inch portions
2 garlic cloves, finely chopped
Kosher salt and freshly ground pepper
4 large eggs
1 1/2 cups heavy cream
3/4 cup sour cream
1 tablespoon chopped basil
1- 10 oz log of goat cheese, crumbled

Preheat the oven to 400F. Put the bread cubes on a baking sheet and toast in the oven for 10 minutes, or until golden.

In a large pan, melt the butter over medium-high heat. Add the green onions and garlic and cook, keep stirring until the scallions are beginning to get tender, 2- 3 minutes. Season with salt and pepper. Set aside.

In a large bowl, whisk the eggs with the heavy cream and sour cream. Gently fold in the bread cubes, green onions, basil and half the goat cheese. Season with salt and pepper. Let rest until the liquid has been absorbed, about 30 minutes. Pour the bread pudding into a baking dish and sprinkle the rest of the goat cheese on top. Put the baking dish inside a roasting or larger pan and add enough hot water to the pan to reach halfway up the side of the baking dish. (like when making custard, in a bain marie).

Bake for 40 minutes, or until the pudding is set and the top is golden brown. Serve hot or warm.

NOTE: The unbaked bread pudding can be refrigerated overnight. Bring to room temperature before baking. Take into consideration the size of the vessel you're using, it can either add to the baking time or reduce it substantially.....
******************************

LEMON CURD BREAD PUDDING.- Oh so lemony and fresh, you must try this one!

1 loaf of brioche, about 1.4 lbs, crusts removed, bread sliced 1/2 inch thick
1 quart whole milk
3/4 cup sugar
4 large eggs
1 1/2 teaspoons lemon zest, minced
3 tablespoons fresh lemon juice
Lemon Curd
1 cup heavy cream

Preheat the oven to 350F. Line the bottom and sides of a 12-by-16-inch jelly-roll pan with aluminum foil and coat with cooking spray. Arrange the brioche slices in the prepared pan, fitting them in a snug single layer, insuring a good fit.

In a medium heavy saucepan, combine the milk with 1/4 cup plus 2 tablespoons of the sugar and bring to a simmer. In a medium bowl, whisk the eggs with the remaining 1/4 cup plus 2 tablespoons sugar. Whisk 1 cup of the hot milk into the eggs, then whisk in the remaining hot milk until thoroughly blended, tempering the mix. Add the lemon zest and slowly whisk in the lemon juice. Pour the custard mixture evenly over the brioche and soak for 10 minutes.

Bake the brioche on the middle rack of the oven for 30 minutes, turning the pan after 15 minutes. Transfer the pan to a cooling rack and let the bread pudding cool to room temperature, about 1 hour. Refrigerate until chilled, 1 hour.

Line a 10-by-5-inch loaf pan with plastic wrap, allowing 3 inches of plastic to hang over the edge. Lightly coat the inside of the plastic wrap with cooking spray. Trim 1/2 inch off the edges of the bread pudding. Cut the bread pudding into three 5-by-11-inch strips. Gently press 1 strip of the bread pudding into the loaf pan, on the bottom. Spread 3/4 cup of the Lemon Curd evenly over the bread pudding. Repeat to form a second layer of pudding and top with more curd, making a second layer. Press the last piece of bread pudding on top, sealing the whole thing. Cover with the overhanging plastic wrap and refrigerate overnight.

In a medium bowl, beat the heavy cream until stiff. Fold in the remaining 1/2 cup of Lemon Curd. Uncover the bread pudding and turn it out onto a serving plate; remove the plastic wrap. Using a hot knife, slice the bread pudding 3/4 inch thick, top with a dollop of the lemon whipped cream and serve.
NOTE: You can fold the whipped cream with other flavors that complement the Lemon Curd as well, I like blueberry compote but I've also used Apple and Pear Compotes too which work beautifully. You could also leave a plain whipped cream or add some sugar to it, you could also add some Vanilla Sugar or Cinnamon as well.
**********************************

So next time you're wondering what to do with that loaf of bread that's too hard to use.... and you're about to toss it out, remember this post and look in your fridge or pantry.... you could have your own little masterpiece right before your very eyes. It's very satisfying to come up with an amazing dish made from scraps or leftovers you thought was done..... go ahead and enjoy it.

Whether it's a Bread Pudding, Quiche, Pizza, Casserole, Pie, Calzone, Pasta or Rice Dish that will integrate those "odds and ends" is up to you, but there are so many creative and wonderful ways to make use of it all, you'll need a long time before running out of ideas..... go ahead and give it a try, you'll be glad you did!

Wouldn't some of these make excellent additions to your Holiday Table?  MMmmmm.......

Tuesday, June 21, 2011

Is it too hot to cook?..... You're still hungry, right?.....


Yes, it is really hot. Supposed to be 104F today with an expected high tomorrow of 109F (yes, crazy... I know), and you can't just hole up at home, become "mole people", crank up the AC and wait it for to pass.... no matter how much you want this to be.... Just think of others that are under hotter conditions than you, like my friends in Merida, Yucatan where their summer is hot and humid, Yikes!!!! Gets so hot and feels much hotter than here, although I miss them all the time, the weather is worth it just to be there, really.....

Anyhoo, let's get back to living in Hades.... the weather does not keep up from eating, it should and we should just stop eating, I know, but we don't and have no plans to either, so we scurry out past sunset, quickly grill and run back. Luckily we like our meat rare so it doesn't take too long either, but even if you don't cook outside, meals are still de rigeur (required) so whatever, we're cooking but maybe we can make cooler foods that will allow us to eat yummy foods while trying to keep the house cool (have to conserve energy, AC is expensive after all... and so nice), so I've got some great options for you..... And no, we won't be eating just salads and ice cream either, we want real food after all.....

This traditional dish is supposed to cook in a Dutch Oven, first searing the meat stove top and then finishing it up in the oven for h o u r s, but here is where having a bomb at home is worth its weight in gold. Instead of heating up the house and the oven for hours, you can use the good 'ol Pressure Cooker (no heat felt) and cook for about 30-40 min max.... pretty nifty I say.

Traditional Italian Pot Roast.- Wonderful flavor, hearty meal and sure to become a favorite.

1 boneless beef chuck-eye roast (3-4 lbs), tied
2 tbls vegetable oil
1 med onion, rough chop
2-3 carrots, rough chop
2-3 turnips, rough chop
1 rib of celery, chopped
1 pound cremini or white mushrooms, in large pieces
2 tbls tomato paste
2 cups tomatoes, medium dice or 1 (14 1/2 oz) can diced tomatoes
1/2 fresh tomato sauce or 1/2 cup canned tomato sauce
2 tsp sugar
1/2 cup water
1 cup red wine, Merlot or Beaujolais preferably
1 large head of garlic, remove the outer paper skin, then cut in half
1 sprig thyme, fresh
1 sprig rosemary, fresh
salt & pepper to taste

If using regular method, but you will begin the same for both techniques:
Put your oven rack in the middle position and heat the oven to 300F. (If using bomb, don't turn on the oven and you will sear the roast in the pressure cooker pot). Pat fry the roast with paper towels and salt and pepper liberally. Heat some oil in the Dutch oven (or pressure cooker) over med-high heat until just smoking and brown the roast on all sides, about 10 min. Transfer roast to large plate until you're ready to put it back in the pot.

Reduce heat to medium and cook the onion, celery, mushrooms, and tomato paste until the vegetables begin to soften, about 6 min. Add the diced tomatoes, tomato sauce, sugar, water, 1/2 cup of the wine (reserve the rest), garlic, and thyme. Return roast and the juices in the plate to pot and bring to simmer over medium-high heat. Place piece of foil over pot, cover with lid, and transfer pot to oven. (If using the pressure cooker, turn the heat to high and cover. Wait for the pot to come up to temperature and once the cooker begins to hiss, lower the heat to low and set the timer to 30 min.)

If using the oven: Cook until roast is just fork-tender, 2 1/2 to 3 1/2 hours, turning the roast after 1 hour. Uncover pot and let the roast rest in its juices for 30 min, skimming any surface fat after 20 min. Transfer the roast to a carving board and cover with foil. Remove and reserve the garlic head and skim any remaining fat from the pot (once you open the cooker you can skim off fat too). Add remaining 1/2 cup wine to pot, bring to boil over medium-high heat, and cook until sauce begins to thicken, about 12 min. Meanwhile, carefully squeeze garlic from the halves and mash it into paste, it should be very soft. Add the rosemary to the pot and simmer about 2-3 min. Remove and discard the rosemary and thyme sprigs, stir in the garlic mash and season with salt and pepper.

Remove the twine from the roast and cut the meat against the grain into 1/2" thick slices, or you can pull it apart into large rustic pieces. Transfer the meat to a serving platter and pour some of the sauce over the meat. Serve the rest of the sauce at the table.
**************************

Or maybe you just want to grill or pan fry a steak (chicken or pork even) and just get it over with yet it still has to taste great.... How about a great "Chimichurri Sauce":

Chimichurri Sauce.- We all know Argentina is known for its beef (amazing!!!), here's their traditional accompaniment to beef, which I use on almost everything:

1/4 cup hot water
2 teaspoons dried oregano
2 teaspoons kosher salt
1 1/3 cups loosely packed flat-leaf parsley leaves
2/3 cup loosely packed cilantro leaves
6 medium garlic cloves, minced or pressed through garlic press (about 2 tablespoons)
1/2 teaspoon red pepper flakes
1/4 cup red wine vinegar
1/2 cup extra-virgin olive oil

Combine hot water, oregano and salt in small bowl; let stand 5 minutes to soften oregano. Pulse parsley, cilantro, garlic, and red pepper flakes in food processor until coarsely chopped, about ten 1-second pulses. Add water mixture and vinegar and pulse briefly to combine. Transfer mixture to medium bowl and slowly whisk in oil until incorporated and mixture is emulsified. Cover with plastic wrap and let stand at room temperature at least 1 hour (if preparing sauce in advance, refrigerate and bring to room temperature before using).
*******************************

Zucchini and Leeks en Papillote.- A traditional French technique that can be applied to many different dishes, is very healthy and locks in flavors and prevents food from drying out:

2 zucchini, cut in long, thin strips
1 leek, cut off the tough tops and slice the white in fine juliennes
1/2 lb asparagus, trimmed into 2 parts
4 sprigs tarragon, fresh
4 garlic cloves, unpeeled
salt & pepper to taste
1 egg, beaten optional
water (optional)
cornstarch (make paste optional)

Preheat the oven to 400F. You can use a potato peeler to slice the zucchini lengthwise into thin strips.

Cut 4 sheets of parchment paper, 12 x 15 inches in size. Fold it in half. Draw half a heart shape when folded so it will be a whole heart unfolded. Cut along the inside of the line and open out.
Divide the vegetables between each heart. Position the filling on the right side of the fold line and top with tarragon and the unpeeled garlic clove. Season to taste.

Brush the edges of the paper with the beaten egg and fold over. You don't have to use the egg and can fold it without using the egg. I found this site on the web which I thought was a really good explanations of how to accomplish this technique. Cut and paste onto your browser http://www.sundaysupper.com/parch.htm gives directions and shows photos of the no egg technique, it will make you an expert at "Papillote".

Pleat the edges so it is sealed. Put it on a cookie sheet and bake for 10 min. It will puff up so make sure to move the oven racks and leave room. Serve immediately. You can let each person open their own packet on their own with scissors, but be sure and tell them that heat will escape and could burn, so open with care and enjoy the lovely aromas this technique gives.
NOTE: Once you've mastered the making of the packets this way, you can use it for fish and vegetables giving you a clean and very healthy alternative to cook.
*******************************

In keeping with "cool" foods, here are two desserts which can be made ahead and will deliver flavor and comfort in a refreshing dish. First of all I want to give you a "foolproof" pastry crust you can use for all types of pies, you'll love it:

Foolproof Pie Crust.-This pie crust can be pressed into the pie plate and refrigerated for up to 2 days or double wrap in plastic and freeze for 1 month. Once baked, cool, the shell can be wrapped tightly in plastic and stored at room temperature for up to 1 day.

1 1/4 cups all-purpose flour
1/4 tsp table salt
8 tblsp butter (1 stick), softened but still cool (I've used shortening too)
2 oz cream cheese, softened but still cool

Lightly spray 9" glass pie plate with cooking spray. Whisk flour, sugar, and salt together in a bowl. With an electric mixer at med high speed, beat the butter and cream cheese, scrape down the beaters and sides of bowl, and beat until completely mixed, about 2 min. Add the flour mixture and combine on medlow until it looks like coarse cornmeal, about 20 seconds. Scrape down sides of bowl. The mixer speed now to med high and beat it until dough begins to forms large clumps, about 30 seconds. Set aside 3 tblsp of the dough.

Turn the remaining dough onto a lightly floured surface, gather it into a ball and flatten into a 6" disk. Transfer this disk to greased pie plate.

Press the dough evenly over bottom of pie plate toward sides, using heel of your hand or the bottom of a smooth cup (you can also roll out the pastry with a rolling pin as usual and then place it on the pie plate). Make sure that the dough is evenly distributed yet should be thin. Continue to work the dough over the bottom of the pie plate and up the sides until even. On floured surface, roll the reserved dough into a 12" rope. Cut into three pieces, then roll each piece into a 8" rope to form a fluted edge. Wrap it in plastic and refrigerate at least 1 hour.

With the oven rack in the middle of the oven turn oven to 325 F. Lightly prick the bottom of the crust with a fork. Bake until golden brown, 30 to 40 min. Cool on wire rack. (If large bubbles form, wait until the crust is fully baked, then gently press on bubbles with a kitchen towel or back of spoon. The bubbles will settle as crust cools.)
***********************************

Amazing Lemon Pie.-This simple recipe forms a custard type filling. You need 6 tablespoons of lemon juice for this recipe so have an extra lemons on hand in case the 3 sliced lemons do not yield enough juice.

1 double-crust pie dough (see above and make 2 batches)
3 large lemons, sliced thin and seeded (I use Persian Lemons)
1 cups sugar
1/8 tsp salt
1 tbls cornstarch
4 large eggs
1 tbls heavy cream

Adjust your oven rack to lowest position and heat the oven to 425 F. Line a 9" pie plate with 1 dough round and refrigerate for 30 min.

Squeeze the lemon slices into fine strainer set over a bowl; reserve the juice (you should have 6 tablespoons). Put the drained slices and 2 cups water to boil in a saucepan, then reduce the heat to med low and simmer until slices are soft, about 5 min. Drain the slices well and discard the liquid. Combine the softened lemon slices, sugar, salt, and 1/4 cup reserved lemon juice in a bowl; stir until the sugar dissolves.

Whisk the cornstarch and remaining lemon juice in a large bowl. Whisk the eggs into the cornstarch mixture, slowly stir in the lemon slice mixture until well combined. Pour into the chilled pie shell. Brush the edges of the dough with 1 tsp cream and top with the remaining dough round. Seal, crimp edges, and brush the top of dough with remaining cream. Using a paring knife, cut 4 vents in the top of the dough.

Bake until light golden, about 20 min, then lower the oven temperature to 375 F and continue to bake until golden brown, 20 to 25 min. Cool on wire rack for at least 1 hour. Serve. Pie can be wrapped in plastic and refrigerated for 2 days after baking.

NOTE: Found some tips on pies and it said that using a knife to evenly cut the lemons into paper-thin slices was a difficult and time-consuming task. You get better results with a mandoline (or V-slicer), which produced perfectly thin. But, if you didn't have a mandoline, putting the lemons into the freezer for about 30 minutes firms them up for better hand-slicing, which is best accomplished with a serrated knife. But same goes when you want to thin slice other things too, like fish or meat.....
********************************
Perfect Strawberry Pie.-Here is a strawberry pie that truly delivers, but you have to make sure you have 2 cups of the berry mixture and you need to measure! The frozen fruit helps develop flavor and texture.

2 lbs frozen strawberries
2 tbls lemon juice
2 tbls water
1 tbls unflavored gelatin
1 pinch salt

1 lb fresh strawberries, cleaned and sliced thin
1 9" pie shell, baked and cooled

4 oz cream cheese, softened
3 tbls sugar
1/2 tsp vanilla extract
1 cup heavy cream

Cook the frozen strawberries in a large saucepan over med low heat until berries begin to release juice, about 3 min. Increase the heat to med high and cook, stirring, until thick and jam like, about 25 min (should be 2 cups).

Put lemon juice, water, and gelatin in small bowl. Let stand until gelatin is softened and mixture has thickened, about 5 min. Stir gelatin mixture, sugar, and salt into cooked fruit mixture and return to simmer, about 2 min. Transfer to a bowl and cool to room temperature, about 30 min.

Fold the fresh berries into the filling. Spread evenly in the pie shell and refrigerate until set, about 4 hours or even overnight.

With an electric mixer on med speed, beat cream cheese, sugar, and vanilla until smooth, about 30 seconds. With mixer running, add cream and whip until stiff peaks form, about 2 min. Serve pie with whipped cream topping.

NOTE: Be sure to m
easure the reduced strawberry mixture: You need exactly 2 cups. Put the strawberry mixture into a measuring cup. If its more than 2 cups, return it to the pan and cook it down. It may seem OCD to to measure, but the pie won't set or slice properly if you have more than 2 cups of the strawberry mixture, so take the extra couple of minutes to insure a perfect pie.
*******************************

So far this is as far as I got this time, took too long and put other things on hold so now's the time to get going on the rest. The house is very smoky with the aroma of roasting Poblano's and the heat isn't letting me open windows for now so whatever.... at least I like the smell, right? But I've been whipping up some batches of some "fun food" from way back: jello & pudding shots in some creative flavors since these popular "kid friendly" foods grew up.... you'll see, I'll send you some ideas as soon as I finish this up later. Until then, relax and enjoy!......

Tuesday, December 28, 2010

Follow Up Recipes for You!

I posted my "other holidays" menu on the fly while cooking and neglected to include the actual recipes. I heard from more than several friends asking for them and after apologizing for my oversight am only more than glad to post them on here for you....

It was wonderful to hear from you and know that not only are you reading my posts but are actually interested in making some of my entries. Amazing! I love it! Thank You! This will keep me working on finding even more amazing food to make and share. Here we go!

Frisee Salad with Raisins, Pistachios and Roasted Apples served with a Sweet Cider Vinaigrette and Chevre Rounds.- A lovely, crisp and sweet beginning to any meal....

1 Frisee lettuce (or your choice), washed and separated
1/2 red onion, cut in very fine slivers
1/4 cup raisins (any color or nut you like)
1/4 cup pistachios, peeled and chopped rough
2 apples, Granny Smith, peeled, cored and cut in thin slices
3-4 slices of bacon, cooked and crispy, cut in small pieces
1/4-1/2 Blue cheese or other cheese crumbles you like
1 1/2-2 cups Sweet Cider, any kind but make it filtered
1 tbl Dijon or dark brown mustard
1/4-1/2 cups oil, preferably light oil like vegetable or canola
1 tbl water
salt and pepper to taste
1-2 tbl honey

Once you've got your apples sliced and ready, in a hot pan with a very little oil (just to keep it from sticking) or maybe some PAM, put the apple slices and cook them until they are browned, turn and do both sides. You could also split the apples in half and roast in the oven.

In a small sauce pan, place the cider and bring it to a boil, lower the heat to simmer and allow to reduce until you have about 1 cup left. Once this is done, allow it cool either at room temperature or by placing it in the fridge for a little while. Once it's cool and you're ready to put your salad together, put the cider in a bowl, add the honey, mustard, water, salt and pepper and whisk it to combine well. Begin adding the oil in a small stream while whisking all the while and keeping an eye for it to emulsify, you just want it to come together, then stop. You might use less or more oil, keep an eye on it. Taste the dressing and adjust seasonings.

In a larger bowl put your greens, onions, raisins, nuts and combine well. Place on your salad plates and arrange the apples and bacon on top and pour some dressing on it. Top with the cheese crumbles. Serve.
*********************************************

Lamb Navarin with a Cabernet Sauvignon Tomato Sauce
and Roasted Tourned Vegetables.- A flavorful stew type dish that can be both healthy and satisfying....

2 tbl oil
1 1/2 lbs lamb shoulder, cut into med. cubes
Kosher salt and freshly ground black pepper, to taste
4 med carrots, peeled and cut into 2 inch pieces
1 med carrot, chopped in rounds
1 med yellow onion, chopped
2 cloves garlic, crushed
2 tbl flour
1 tbl tomato paste
1 cup good red wine, your choice (optional)
4 med turnips, peeled and cut into 2 inch pieces
4 med potatoes, peeled and cut into 2 inch pieces
3 tbl butter
2 tsp sugar
12 pearl onions, peeled (optional)
1/3 cup peas (fresh or frozen)
1-2 tbl flat-leaf parsley, chopped fine , for garnish

Heat oven to 350F. Heat oil in a large heavy pot over med-high heat. Season lamb with salt and pepper. Working in batches, add lamb and cook, turning once, until browned, 8–10 min. Transfer lamb to a plate; set aside. Add the 1 carrot in rounds and yellow onions and cook, stirring until vegetables are soft and brown, about 10 min. Add garlic, flour, and tomato paste and cook, stirring, until tomato paste begins to brown, about 2 min. Add in 5 cups water, the wine and the lamb. If you're not adding wine then add 6 cups of water. Cover, bring to a boil, and put in the oven. Cook until lamb is tender, about 50-60 min.

Transfer lamb to a plate and cover with foil to keep warm, without liquid. Strain the liquid into a saucepan and discard solids. Bring liquid to a boil over med-high heat, skimming surface really well and cook until this is reduced down to 2 1/2 cups, about 25 min. Reserve.

Meanwhile, using a paring knife, trim each piece of the remaining carrots (the 4 in 2 inch pieces), as well as the turnips and potatoes, into tourne's (or cut them into a large dice). Set potatoes aside in a bowl of water. Heat a large skillet over med-high heat and add carrots, butter, sugar, salt, and 1 cup water. Partially cover and cook for 10 min. Add turnips and pearl onions, partially cover, and continue cooking until liquid has evaporated and vegetables are tender, about 10 more min. Uncover and continue to cook, swirling skillet, until vegetables are golden brown, about 3 min. Add 2 tbl water, swirl skillet to glaze vegetables, and remove from heat; set aside and keep warm.

To serve, put the lamb, carrots, turnips, pearl onions, potatoes, and peas into the sauce and cook until hot, about 2 min. Serve in bowls. Garnish with parsley.
NOTE: This preparation can be applied to other meats as well as you can imagine. This is a basic French procedure that can serve you well for a lifetime.
******************************************

Floating Islands (Ile Flottante) or Eggs in the Snow.- (Oeufs Ă  la Neige) "Eggs in the snow" is one of the most ingenious of classical French desserts, and one that is well known in the traditional American culinary lexicon. Doesn't matter what you call them, they are delicate, lightly sweet and cloud like.

4 cups milk
1 vanilla bean (or 2 tsp vanilla extract)
6 eggs
1 1/3 cups sugar

Bring 2 cups of the milk to a boil, then remove from heat. Split vanilla bean in half lengthwise (or vanilla extract), add to milk, cover and allow steep for about 15 min with the heat off, and let rest. Separate whites and egg yolks. Set aside 4 of the egg whites and freeze the other 2 for another use. Beat yolks and slowly sprinkle in 1/3 cup of the sugar. Continue beating until thick and pale yellow in color.

Remove vanilla bean from milk (if using). Scrape seeds from bean and add to milk, discarding pod. Pour milk, in a fine stream, into egg yolks while beating them continuously. Pour mixture into another pan and cook over low heat, stirring constantly until it forms a custard thick enough to coat the back of a spoon, about 20 min or so, don't rush this or the eggs will scramble. Pour custard through a strainer into a shallow serving dish in which you will serve your "islands". Cool to room temperature, then refrigerate.

Beat egg whites until foamy, then add 1/3 cup of the sugar very slowly, continuing to beat until egg whites are shiny and stiff but not dry.

Put remaining 2 cups milk in a large shallow pan and bring to a low simmer. Using a large slotted spoon, form big egg shapes out of whites and poach them in the milk for 30 sec on each side. Do not overcook. Put the "eggs" on a clean towel to drain. These are the "islands".

Combine the remaining 2/3 cup sugar with 1/3 cup water in a small heavy saucepan. Cook over med-high heat until sugar caramelizes, turning amber in color. Keep and eye on it so it doesn't boil over. Remove pan from heat to prevent caramel from burning. This can happen very quickly, so it is best to take the pan from the heat just before the sugar darkens, as it will continue cooking. Cool for 5 min or until caramel forms into threads when drizzled from the tines of a fork. This is called "a continued stream".

Using a slotted spoon, carefully arrange the "eggs" on top of the custard which is in your serving dish. Dip a fork into the slightly cooled caramel—you will have to work quickly—and wave the fork over the dessert to form threads of caramel that crisscross and tangle. They will solidify over the "islands" and remain. Serve immediately.
****************************************

Italian Prosecco Wine or Bellini Cocktail.- Either just the Prosecco or turned into the great Bellini cocktail, this is sure to let you know it's a special occasion....Fantastic!

The Bellini is a rich blend of peach purĂ©e and Prosecco, a sparkling, dry Italian wine. Named for the Venetian painter Giovanni Bellini, the Bellini was created at Harry’s Bar in Venice in 1948 by owner Giuseppe Cipriani. This classic, refreshing drink was served only in the summer months, when white peaches were available. The juice and pulp of the peaches were extracted through a sieve and blended with Prosecco. The rosy-colored elixir became a year-round drink once frozen peach purĂ©e became available.

What to buy: Frozen peach purée is difficult to find, so you may be limited to savoring a Bellini during the summer months, when fresh peaches are at their finest. Despite what others tell you, only use white peaches for a Bellini, or the color and taste will be off.

3 parts Prosecco
1 part fresh or frozen and thawed white or see note.

Note: You may want to make your own peach purée by passing pitted peaches through a food mill, then passing the purée through a sieve. I've used canned peaches and we've still enjoyed it, and Jumex (Mexican fruit drinks in a brick) have an unfiltered peach juice that is good too since I haven't seen white peaches in the desert NEVER!
*****************************************

There you go! Happy cooking everyone..... I'm right in the middle of preparing the lamb so I can put it in the pot and let it cook until it's done. Ricardo is looking forward to having one of his favorite meals and is in a jolly mood receiving phone calls from all of the kids wishing him a "Happy Birthday"..... and even though the temperature is going down and we're expecting another storm to come in (watch out Midwest and East it will be on it's way to you shortly...) its expected to be below freezing for the BIG New Year's Eve celebration on the Las Vegas Strip this year..... but maybe with all the people (they're expecting over 300,000, can you imagine?) and the drinks and the lights, they won't feel it as much..... We will be staying away from the Strip..... Talk soon!

Monday, December 27, 2010

My "other holiday" menus..... Worth anticipating!


As I had mentioned before, during this holiday season we have "other" holidays to include as well, plus I have Ricardo's birthday tomorrow too. I've got New Year's and Holy Kings Day to plan along with the Xmas food, so I just got done with our menu preparation meeting (yes, we are a democratic republic here yet I retain veto power...) and I can now report our "other holidays" menu is done.... and what a holiday these will be, YUM!

These are along the lines of what I had previously thought of when I went shopping for our Xmas goodies so the ingredients are in my pantry already (YAY! let's hear it for forethought!) except for dairy items which we seem to go through like water. So eggs, heavy cream and butter demand a quick trip to the store but I need them so can't be avoided, plus I just finished reading Michael Ruhlman's "The Making of a Chef" (first of a three part series of what it takes to turn people into professional cooks and makes great reading...) and I need to return it to the library so will make it a two fold trip.

First up on my "other holidays" schedule is Ricardo's Birthday tomorrow and he chose the main dish, Lamb. He didn't care about the preparation so I chose a classic French preparation which he will love. I had found a lovely piece of Lamb and had saved it for a special occasion so when he selected this as his choice it fell right in line with me, all I had to get were the vegetables to include and both Rene and I will put our Knife Skills to the test to produce "tournes" (little footballs) which add to the presentation. This was an important part of our final practical exam and every Chef must learn to produce. Add this to a wonderful tomato wine sauce, simmered long and slow (or the lamb won't be fork tender) and you've got magic in a dish.....

He's also been waxing nostalgic and mentioned "Islas Flotantes" which are another classic old-timey French dish which seems to have been forgotten by many but having made it like a madwoman during my Personal Chef tenure in Chicago, I know and love well. These are little islands of a sweet meringue "floating" on a vanilla infused creme anglaise, very rich and light all at the same time. You'd know it as "Floating Islands" and we will have this as dessert. Put this along with a fantastic salad and Bellini cocktails, the dinner is sure to make him happy..... here's the menu I will print and put on our formal table:

***************

Ricardo's Birthday Celebration 2010


Frisee Salad with Raisins, Pistachios and Roasted Apples
served with a Sweet Cider Vinaigrette and Chevre Rounds


Lamb Navarin with a Cabernet Sauvignon Tomato Sauce
and Roasted Tourned Vegetables


Ile Flottante - Floating Islands


Italian Prosecco Wine or Bellini Cocktail

***************

Sounds like a plan to me and I've already done my initial prep work and am ready for tomorrow's dinner. It will be easy to produce results that are impressive, have to love that. I should also mention that I've got a big jump on New Year's menu as well, since I dropped in on the Korean Fish Market (you should see this place, the meat and fish are incredible!) and had not found anything that let me make a statement while still being cheap (must stick to my budget after all) until I came upon some Rock Lobster they had on sale, it was lovely, still had their shells and all of a sudden the image of New Year's came to mind.

So now I'm almost set and our "other holidays" will be memorable while still staying not only on budget but give us the "special" flavors such dates demand, no one will be able to tell that the dishes served are among the lowest per person cost around while still being luxurious, elegant and all around amazing! Lots to look forward to and if you follow a popular idiom, "how you welcome the new year sets the tone for the whole year to come", it's a good "karma" thing to "do it up right" and get those good vibes going, right?

I hope everyone is looking forward to the end of this year (it's been a challenging one, he?) and we're all ready for better times ahead, so here's to all of us..... Cheers!

Thursday, December 23, 2010

Still Christmas Season but different traditions this time..... now it's Yucatan!


Still bearing down on Christmas Holidays (or is it PC to say Winter Holidays or what?) but this time we're in a different area of Mexico, the Yucatan Peninsula that is filed with warm memories of our time lived there. Although we went all over this extensive area of land, for the most part flat and vast, Merida the capital, was home base and what a wonderful city to live in! Due to it's close association in the past with the French and other Europeans like the Spanish, they all left their contributions here and so you have a lovely city with wide avenues and majestic buildings speaking of their regal past, but the Mayan Empire is still very much evident and not just in the museum either and you've got hundreds of archeological sites within an hour or less to show you exactly what this means. The Mayan language is an everyday thing as well with radio stations giving bilingual accounts of their programming (Spanish and Maya Kiche) and billboards are also in both languages.

We had an assortment of neighbors in our part of town, old Santiago, and while some were Yucatecan, others were definitely Mayan leavning us the lone representation of what they used to call "huachos"....or something definitely neither Yucatecan nor Mayan. They seemed to be intrigued by these tall, white people not "gabachos".... speaking a different Spanish too, wonder what we were? They finally got around to asking and got a kick finding out we were Mexicans or "brothers from another mother"..... I say tall (and I'm not), because Mayan are a very small race and we tower over them, kind of like at the ending of Close Encounters of the Third Kind when Richard Dreyfuss is taken by the small aliens into the ship with them. Once, we were at the local Walmart (inside a Mayan looking pyramid building no less) which is rare for me, but Rene was with me and he'd walked away looking at something else. He stands 6ft tall and I could see him across the store easily, talking to some locals who came to the middle of his chest only, it was a sight to see. You should see their babies, like little dolls, but very friendly and courteous.

Anyway, back to the food. Yucatan has a very special culinary heritage due to the influence of the Mayan, European, New Orleans and Cuban people who came to this hard to access land way back then, causing a marriage of styles that remain to this day. Nothing is like Yucatecan cooking and it's not Mexican (and they don't like to be called it either, why, they would still like to secede from the country and keep their own flag and refer to the area as the "Yucatecan Nation", kind of like the south, huh?. They've got their own style for sure and while some things might sound weird, we enjoyed it all! So let me give you a sampling of what you could find at a Yucatecan celebratory event.

This is the land of the "deer and pheasant" as it's been called since ancient times and their food reflects this fact with exotic fruits, special varieties of chiles and spices, vegetables not available in other parts of Mexico and a prevalence for pork and turkey. They love their hot salsas and I mean hot, as Habanero Chile is a traditional side dish and served with your food but not as a salsa like everywhere else, these are pure chiles with just a touch of bitter orange juice and some finely shredded onion- full blast and potent! Once again, use the search bar at the top of the blog to search for recipes and more information on this most enigmatic and mysterious land.....

Pavo en Relleno Negro (Turkey in Black Stew)- Before I give you the recipe for this elaborate Mayan dish, you need to know the significance of this preparation and it makes an interesting read:

TURKEY – A new world native, has been an important part of the diet throughout Mesoamerica for at least 3000 years. Meleagris gallopavo– the species we still use – was domesticated in Mexico’s central plateau as early as 200 B.C. and is indigenous to YucatĂĄn and is the wild turkey still preferred by the Maya. It is the first turkey tasted by Europeans, and soon became the rage of royal banquet halls in the Old World. This turkey cannot be domesticated, but archaeological evidence shows that the Maya captured chicks in the wild and caged them to fatten them up for feasting. Turkeys played and still play a vital role in Mayan ritual, and were important components for worshiping the rain god, for curing and for planting ceremonies. Pavo en Relleno Negro originated as such a dish. Traditionally, the dish was prepared by forming a ball of chopped, seasoned meats (known in Mayan as "but" around the yellow of a boiled egg, stuffing the turkey cavity with the balls, then simmering in a broth of charred chiles(Recado Negro) overnight as grandma kept vigil from her hammock slung in the cookhouse. The post-conquest introduction of "alcaparrado", a Moorish/Andalusian mix of capers, olives, raisins and almonds – later enriched the but. Highly symbolic to the Maya, Pavo en Relleno Negro refers to the Creation and to resurrection: the intense black color of the burned chiles represents death or “no life” while the eggs buried deep inside represent hope and new life. To eat Pavo en Relleno Negro is to cheat death: having it right in front of you, but surviving and being nicely sated at the end.

How about that? Told you it's a great story and most dishes here have similar beginnings..... but here's the recipe:

Recado Negro.- The black chile paste (also called Chilmole) you will need which can be purchased at local markets or made from scratch: Make the first two in advance so you can have them available at the end.
2 tablespoons achiote seeds (or paste from the market)
3/4 cup bitter orange juice (or a mixture of sweet orange juice and fresh lime juice)
2 lbs. dried ancho chiles, seeded and deveined
2 large whole cloves
4 large whole allspice
1 tablespoon black peppercorns
1 tablespoon dried oregano
1/2 teaspoon cumin seeds
1 head garlic, peeled (about 10 large cloves)
salt to taste

Place the achiote seeds in a small bowl, pour the juice over them, and allow to soak 2-3 hours. Or
soak the paste with sour orange juice (or white vinegar) to make a thick liquid

Toast the chiles just until they give off their fragrance, soak them in hot water until they soften,
and drain them well. Place all ingredients in a spice mill or food processor and process until
they are well blended. They should form a thick paste, the consistency of a chilled cookie dough.

The "But"- Another important piece of this death puzzle:
1 lb ground pork
1 tsp black pepper, ground
1 tomato, finely chopped
1/4 cup red bell pepper, chopped fine
2 tbl mint or spearmint leaves, finely chopped
1 hard boiled egg, rough chop
1 egg
salt to taste

You combine all the ingredients and wrap them up in a cheesecloth square and tie it off securely.
You place it in stock to cook gently at a simmer for 30-45 min. Once cooked, you allow to cool
and then slice.

The rest of the recipe, you will need:
6 cups turkey, shredded (could use chicken if need be)
9 cups turkey stock (or chicken)
"but", sliced
1/4 cup Relleno Negro (home made or purchased paste)
2 hard boiled eggs, sliced

To finish you need to bring the turkey stock up to temperature and add the shredded turkey meat and cook bout 10 min. then add the Recado Negro, breaking it up in some stock first to avoid lumps before adding it to the stock, then add the sliced "but" and top it off with the sliced hard boiled egg.
NOTE: I've given you the shortened version of this dish since the haute cuisine one goes on for pages and pages.....
*********************************************

Pan de Cazon (Tower with Shark Meat)- The Peninsula with so much coastline offers great fish and seafood dishes, "cazon" is baby shark cooked in the Yucatecan / Campeche style and is wonderful.

8 corn tortillas (preferable homemade and tender)
1 cup black beans, refried (typical beans in this area)
1/2 avocado
Oil

For the "cazon"-
2 tbl oil
1/2 med onion, chopped fine
2 Epazote le aves, chopped (available at most latin supermarkets)
1 tomato, peeled & seeded, chopped fine (concase...)
1 lb Cazon (baby shark meat), grilled or cooked with onion and Epazote, shredded

For the Sauce-
1 tbl oil
1 onion, chopped fine
2 Epazote leaves, chopped
6 small tomatoes, cooked in water and ground up, strained (or tomato puree)
salt to taste
5 habanero chil es, roasted
salt to taste

For the Cazon-
Saute the onion in some oil. Add the shredded shark, the epazote and the tomato puree.
Add some salt and allow to cook so the flavors come together.

For the sauce-
Saute the onion in some oil, add the Epazote and the tomato puree. Allow to cook until thick. The
original sauce asks for the Habanero Chiles to be simply ground up with some salt and a few drops of water so it turns into a paste, but unless you are able to tolerate this kind of heat, I would sugges t you simply roast 1 chile, make small slits on the sides and once the sauce is done and cooking, lay the chile in it and allow it to permeate it and then remove. Save the chile for those that are truly brave.

Putting it together-

Fry the tortillas in some oil. Once fried, put in a plate and smear it with a small quantity of the black bean
s. Place 2 tbl of the prepared shark meat on top of this and place another another fried tortilla on top, you will now repeat the same procedure as before, two more times (you are building a tower, remember?) and y ou end with a tortilla on top.

Pour the tomato sauce over the tower and decorate it with some avocado slices and maybe the Habanero Chile as well. The hot sauce, if you decided to serve it, is placed on the side. Serve and enjoy at once.
NOTE: This is a pretty great dish and we have enjoyed it often. You can also use the prepared "cazon meat" and instead use it to stuff Xcatic Chilies (a yellow, mild chile which is a local specialty) as shown in the picture. These chiles are also stuffed with the ever popular Cochinita Pibil (the recipe is on this blog, use the search feature), or you can substitute other fish for this as well.
*******************************************

Yucatan and the whole peninsula is well known for it's amazing variety of ice creams and sherbets making the most of all the tropical fruits, and other ingredients, found in the area, but there are also other sweets available as well, such as this version of bread pudding.

Caballeros Pobres (Poor Knights)- To use the stale leftover bread always present in any home, but "dandied up" with ice cream and some spirits, it's not a poor dish at all!

2 cups milk
3 tbl sugar
2 tsp vanilla
1 loaf stale French bread, sliced into 3/4-inch thick rounds
6 eggs
2 cups vegetable oil
1 cup water
1 cup sugar
1 cone piloncil lo, chopped or 1 cup brown sugar
2 whole cloves
5 sticks of canela (stick cinnamon)
1/2 cup whole almonds or pecans
1/4 cup brandy or KahlĂșa

Combine milk, sugar and vanilla, dip each slice of bread into the milk mixture, then put bread in a colander placed over a bowl to drain.

Separate the eggs. Beat the whites until stiff but not dry. Beat three of the egg yolks, fold carefully into the meringue, being careful not to deflate the whites. Heat oil in a heavy skillet until hot but not smoking. Dip each bread slice into the meringue to coat, then fry in the oil. When browned, flip rounds to cook the other side. Drain on paper towels.

Add the water, sugar, piloncillo and spices in a small saucepan. Simmer, stirring frequently, until sugar and piloncillo are completely dissolved. Allow to continue cooking until the syrup coats a spoon and reduces. Strain into another small pan; place canela sticks on waxed paper to cool; discard cloves. Add liquor, along with nuts, and continue cooking another 5 min, or until syrup re-thickens.

Preheat the oven to 350F. Meanwhile, in a deep baking dish or in individual soufflé molds, place fried bread rounds in one layer at the bottom. Pour on a large spoonful of the syrup/almond mixture. Repeat with one more layer of bread. Finish by topping with more syrup and almonds. Bake for 30-40 min or until syrup begins to boil and you see caramelization occurring on the top. Allow to rest at room temperature for 15 min before serving.

Garnish with the cinnamon sticks and top with a scoop of the ice cream of your choice.
NOTE: I also make bread pudding with egg bread or Panettone which gives a wonderful richness to the dish, I add raisins and almonds too. Here's the Creamy Brandy Sauce to top it with:

Creamy Brandy Bourbon Sauce: What else can I say but MMMMm mmm...... great on any desert.
1 cup sugar
1/4 cup ha
lf-and-half cream
1/3 cup brandy
1/3 cup bourbon
1/2 cup butter (1 stick)

Place all brandy sauce ingredients in sauce pan.
Heat gently and stir often. Don't over cook- only about 5 min. Pour over any dessert and enjoy!
***********************************

What can I say except that the holidays are shaping up to be a very tasty with all these wonderful recipes. I only gave you but a sampling of the foods from Yucatan, these is so much more to try and learn about as dishes usually have a very interesting story to them which you can discuss while having them, but Yucatan is one of the most amazing areas of Mexico and I hope that one day you too will come to see it firsthand......

Friday, November 12, 2010

It's getting to be that time of year again......


Thanksgiving is not far away, can you believe it? Came around really quickly, didn't it? Along with cooler temperatures (which we were so looking forward to) comes a series of holidays that tend to stress a lot of people out for a long list of reasons, but that's not my specialty.... mine is the comforting type of thing that although associated sometimes with emotional issues, definitely brings lots of good things to the party- like great taste, amazing aromas and nostalgic memories.

If you come from a close knit family where your Mom likes to cook and you've got great holiday memories you might not need this, but for those of us that didn't, this one's for you. I hate to admit to having relaxed the etiquette rules we grew up with (yes, I did have those) and sometimes I think we need a little bit more of those, especially when I see us sitting around in front of the TV (OMG! no table manners needed!!!! LOL) and some of us no longer dress for dinner (you're lucky I dress at all.....) and when I talk to people I'm not surprised anymore that so many are this way too.

But there's one thing we still all have in common and that's great holiday foods, and it doesn't matter if you buy it from a local restaurant or market (you see? I have relaxed a lot!) or if you make it yourself or get together with friends to share the work. I also don't make a big deal if your holiday favorites are unpredictable or ordinary, as long as YOU feel they're right, they are. So go ahead and spend your time off taking naps and not cleaning the house; watching sports on TV or renting movies; eating delivery food or Dagwood Sandwiches..... it's all good and we're entitled to it, right?

However, if you're up to the task and want something special, you've come to the right place. I'll post an elaborate presentation and then an easy one. Anyone can do both, there's just more work on the first but nothing you can't accomplish, ok? So if you're up for it, the first recipe will wow anyone! Read it all first and then you'll be able to see a lot of steps that can be done in advance to make it easier for you come the big day, so don't sweat it and get to work!

Bacon Roasted Turkey.- What more can you expect from Daniel Boulud but a masterpiece! Don't let the list of ingredients scare you off, this one if definitely worth it! It's amazing!!! Just start at the top and work your way down, one step at a time.....

Serves 10 to 12
1 (10- to 12-pound) turkey, liver and gizzard removed and finely chopped

FOR THE TURKEY BREASTS
30 slices smoked bacon
4 fresh sage leaves, torn
1 teaspoon fresh rosemary leaves
Grated zest of 1/2 orange
Coarse sea salt
1 teaspoon freshly ground pepper

FOR THE TURKEY LEGS
Sea salt and freshly ground pepper
2 tablespoons unsalted butter
1 cup coarsely chopped onion (1 medium)
2 cups coarsely chopped apple (2 medium)
1 cup peeled and coarsely chopped chestnuts (about 12)
1 tablespoon finely chopped garlic
1 teaspoon grated orange zest
Leaves from 1 stem fresh rosemary, finely chopped
5 fresh sage leaves, finely chopped
Pinch of ground cinnamon
Pinch of ground allspice
Pinch of ground nutmeg
Pinch of ground coriander
4 cups 1/2-inch cubes sourdough bread, dried
1/4 cup raisins
1/4 cup sliced almonds or walnut halves
2 large eggs
1 1/2 cups Chicken Stock
1/4 cup finely chopped fresh flat-leaf parsley

FOR ROASTING THE TURKEY BREASTS AND THIGHS
1/4 cup vegetable oil
2 tablespoons unsalted butter
1 cup white wine
1/2 pound shallots, coarsely chopped (about 1 cup)
2 large stalks celery, coarsely chopped
1 large carrot, coarsely chopped
1 sprig fresh rosemary
1 sprig fresh sage
2 sprigs fresh savory
Grated zest of 2 oranges

FOR THE ROASTED VEGETABLES
2 tablespoons unsalted butter
2 tablespoons olive oil
2 butternut squash, necks only, peeled and cut into 1/2-inch-thick slices
12 endive leaves
24 cippollini or pearl onions
2 celeriac, peeled, halved, and cut into 1/2-inch-thick slices
12 large white or cremini mushrooms, cleaned and trimmed
2 sprigs fresh rosemary
1 sprig fresh sage
2 sprigs fresh savory
Coarse salt and freshly ground pepper
1 tablespoon honey

Using a boning knife, remove the legs and thighs in one piece from each side of the turkey. Cut the meat away from the thigh bone. Holding the thigh bone, use your other hand to carefully cut the meat from around the leg-thigh joint without cutting through the skin. Use the blade of the knife to scrape away the meat from the leg bone up to 2 inches from the tip end. Using a cleaver, break the leg bone, leaving the tip end intact. Remove the leg and thigh bone in one piece. Refrigerate until ready to stuff. Remove the breast meat, with the skin intact, from each side of the turkey; set aside. Using the cleaver, chop all of the bones into 3-inch pieces and set aside.

For the breasts: Lay 15 slices of bacon horizontally and overlapping slightly, on a clean work surface. Repeat with remaining 15 slices of bacon (the bacon should be equal in length to the breasts). Sprinkle the bacon with sage, rosemary, orange zest, sea salt and the peppercorns. Center each breast, skin-side down, vertically on the bacon. Wrap the slices around each breast very tightly to enclose. Using kitchen twine, truss each breast to secure the bacon to the breast. Chill for at least 1 hour and up to overnight.

For the legs: In a large saute pan over medium heat, melt butter. Add onion, apples, chestnuts, garlic, orange zest, rosemary, sage, cinnamon, allspice, nutmeg, and coriander. Cook for 5 minutes. Add the reserved chopped liver and gizzard. Season with salt and pepper, and cook for 5 minutes more. Meanwhile, combine in a large bowl the bread, raisins, and almonds. Add the cooked vegetable mixture. Gently stir in eggs. Add chicken stock, slowly, until the stuffing is moist but not wet. If necessary, add more chicken stock to moisten. Sprinkle with parsley; stir to combine.

Firmly press about 1 1/2 cups of the stuffing into the center of each leg. Wrap the meat tightly around the stuffing to enclose. Truss with kitchen twine to enclose. Chill for at least 1 hour and up to overnight. Transfer any extra stuffing to a buttered baking dish, and bake, covered, for 30 minutes and uncovered for 15 minutes more in 400 degree oven.

Roasting the breasts and legs: Preheat the oven to 400 degrees with the racks in the lower third and upper third of the oven. Combine 2 tablespoons vegetable oil and reserved turkey bones in a large roasting pan. Transfer to the bottom rack in the oven and roast until well-browned, about 45 minutes.

In a large saute pan, heat remaining 2 tablespoons vegetable oil and the butter over medium-high heat. Add the chilled turkey breasts, and cook until golden brown all over. Remove and set aside. Repeat with the chilled legs; reserving any accumulated fat in the saute pan. Remove the roasted turkey bones from the oven, and set wing pieces aside. Add wine to the roasting pan; stirring to loosen bones from the bottom of the pan. Add shallots, celery, carrots, herbs, and zest to the roasting pan, stirring to combine. Place the browned breasts and legs on top of the roasted bones. Return to the oven, and roast for 45 minutes, basting every 15 minutes, with the pan juices. Remove the breasts; set aside and keep warm. Continue to roast the legs, basting and turning, until the legs are cooked through, 1 to 1 1/2 hours more. When done, remove the legs; set aside and keep warm. Strain the pan juices through a fine sieve, skimming off any excess fat, and keep warm.

Meanwhile, prepare roasted vegetables. In a large heavy-bottomed roasting pan over medium-high heat, melt butter with olive oil. Add the reserved wing pieces, squash, endive, onions, celeriac, mushrooms, and herbs. Drizzle with 2 tablespoons of the reserved fat, and season with salt and pepper. Cook, stirring occasionally, until the vegetables are lightly browned. Drizzle with honey. Transfer to the top rack in the oven, and roast until the squash and the endive are fork-tender, about 1 hour. Remove the twine from the breasts and legs. Slice crosswise into 3/4-inch slices. Arrange the slices on the platter with the roasted vegetables. Drizzle with the strained pan juices. Serve remaining juices on the side.

*************************************************

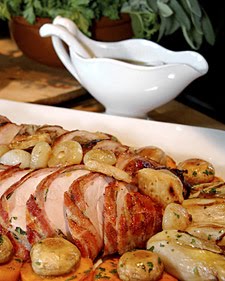
Stuffed Turkey Breast.- Here's a lovely presentation and you don't need a huge turkey, just get a turkey breast and it's so easy, it'll be ready in one hour but looks fabulous!

Serves 6
1 cup chopped fresh flat-leaf parsley
2 cloves garlic, minced
1 teaspoon grated lemon zest
Coarse salt and ground pepper
1 (about 1 3/4 pounds) boneless, skinless turkey breast
4 slices (4 ounces) bacon
1 pound white potatoes, well scrubbed and cut into 1-inch chunks
4 (about 8 oz) carrots, peeled, halved lengthwise, and cut into 1-inch pieces

In a small bowl, combine parsley, garlic, lemon zest, 1/2 teaspoon salt, and 1/4 teaspoon pepper. Slice breast almost in half horizontally, leaving it attached on one side. Open like a book; season inside and out with salt and pepper. Stuff turkey (below) with herb mixture; cover with bacon slices, tucking ends under the turkey.

Quick Cooking Instructions.-
Combine potatoes, carrots, and 1/2 cup water in a microwave-safe dish. Place turkey on top. Cover, and cook on high 15 minutes. Stir vegetable mixture; return dish to microwave. Cook, uncovered, until turkey is 160 degrees.on an instant-read thermometer (juices should run clear when meat is pierced with a knife) and vegetables are tender, 5 to 10 minutes more. Let turkey rest 5 minutes before slicing crosswise and serving with vegetables.

Regular Oven Instructions.-
Do not remove skin from turkey breast. Butterfly and pound until 1/2 inch thick. Place breast, skin side down on cutting board and spread the stuffing mixture evenly over the turkey, leaving the edges clear all around. Roll the turkey up over the filling and secure with cotton string.

Place roast in a roasting pan, skin side up and brush with olive oil. Season with garlic powder, salt and pepper.

Roast in a preheated 500°F oven for 20 minutes, or until roast is well browned. Reduce temperature to 325°F and roast an additional 60-90 minutes, or until temperature reads 165-170°F on an instant read thermometer. Allow roast to rest for 15 minutes before carving. Cut into 1/2" slices and serve with pan drippings as gravy.
*********************************************

Okay, turkey's done, now what about side dishes? Here are some ideas..... (Note: I don't stuff the turkey, I put my stuffing in a casserole dish and bake separately, it works and serves better and insures a quality product).

1- Garlic Mashed Potatoes.- Put a whole head (yes, the whole thing- cut off about 1/4 inch off the bottom) in a 1 foot square piece of foil and sit it on 1-2 tbl of olive oil, seal it up and put alongside the turkey in the oven for at least 1 hour or until they are very soft. Add to your cooked potatoes along with salt, pepper and lots of butter. YUM!

2- Cornbread Stuffing.-
1 pound fresh pork sausage, casings removed, crumbled (plus giblets, diced
1 large onion, (about 2 cups), finely chopped
3 celery, finely chopped (1 1/2 cups)
Coarse salt and ground pepper
2 pounds prepared cornbread, cut into 3/4-inch cubes (12 cups)
3 tablespoons finely chopped fresh sage
3 large eggs, lightly beaten
1 to 2 cups chicken broth

Preheat oven to 350 degrees. In a large nonstick skillet, cook sausage (and giblets, if using) over medium-high heat, stirring often, until browned and cooked through, 5 to 8 minutes. With a slotted spoon, transfer to a large bowl.

To pan, add onion, celery, and 1/4 cup water. Reduce heat to medium; cook, scraping up browned bits with a wooden spoon, until vegetables soften, about 10 minutes. Season generously with salt and pepper. Add to sausage.

Add cornbread, sage, and eggs to sausage and vegetables. Bring broth to a simmer in a small saucepan; pour 1/2 cup over stuffing, and toss gently (cornbread will break down into smaller pieces). If needed, add up to 1/2 cup more broth, until stuffing feels moist, but not wet. Spoon stuffing into a baking pan; it should reach the top. Refrigerate stuffing in pan and remaining broth separately, covered, until ready to bake. (Make cornbread a day ahead and cover, you can also prepare everything in advance.
Note: I add everything I can find, like nuts, dried or fresh fruit, mushrooms, etc. Anything you like......

3-Cranberry and Dried Cherry Relish.- Can be made way in advance and just brought to room temperature when you're ready for it.... great on sandwiches too!
1 package (12 ounces) fresh or frozen cranberries
1 cup dried cherries
1 cup sugar
2 cups water

In a large saucepan, combine cranberries (no need to thaw if frozen), cherries, sugar, and water. Bring to a boil; reduce heat to medium-low. Simmer until most berries have burst and liquid is syrupy, 20 to 25 minutes. Transfer to a bowl. Cover, pressing plastic wrap directly on surface of relish; refrigerate.
Note: I also add orange peels and nuts sometimes, your choice.

4- Cheese and Spinach Souffle.- Very easy and wonderful, can be made in advance and refrigerated, then cover with foil and bake. A snap!
Butter, for baking dish
3 packages (10 ounces each) frozen chopped spinach, thawed and squeezed dry
1 1/2 cups half-and-half
3 large eggs, lightly beaten
1 1/2 cups coarsely grated Gruyere cheese (about 6 ounces)
Coarse salt and ground pepper
1/4 teaspoon ground nutmeg

Preheat oven to 350 degrees. Butter a shallow 1-quart baking dish. In a large bowl, combine spinach, half-and-half, eggs, 1 cup Gruyere, 2 teaspoons salt, 1/8 teaspoon pepper, and nutmeg; stir to combine. Spread evenly in prepared baking dish, and top with remaining 1/2 cup Gruyere. Bake until set and top is golden brown, 30 to 35 minutes.
Note: Change the cheese if you like too!

5- Sweet Potato and Pecan Pie.- We all know about Pumpkin Pie but how about a new take on an old favorite....
1 pound 3 ounces sweet potatoes, peeled and cubed
1 1/4 cups plain yogurt
3/4 cup packed, dark brown sugar
1/2 teaspoon of cinnamon
1/4 teaspoon of nutmeg
5 egg yolks
Salt
1 (9-inch) deep dish, frozen pie shell (or make your own)
1 cup chopped pecans, toasted
1 tablespoon maple syrup

Put cubed potatoes into steamer basket and place steamer into a large pot of simmering water that is no closer than 2 inches from the bottom of basket. Allow to steam for 20 minutes or until the potatoes are fork tender. (You can also cook in the oven until tender or in water like before) Mash with potato masher and set aside.

Preheat the oven to 350 degrees F. Place sweet potatoes in the bowl of a stand mixer and beat with the paddle attachment. Add yogurt, brown sugar, cinnamon, nutmeg, yolks, and salt, to taste, and beat until well combined. Pour this batter into the pie shell and place onto a sheet pan. Sprinkle pecans on top and drizzle with maple syrup.

Bake for 50 to 55 minutes or until the custard reaches 165 to 180 degrees. Remove from oven and cool. Keep refrigerated after cooling.
***********************************************

Well, there you have it, a mostly hassle free holiday meal that will impress anyone and since most of the dishes can be made in advance, will let you be a guest at your own party. Make it even easier on yourself and turn it into a Buffet Service and let everyone serve themselves while everyone relaxes and enjoys the family! Relax and create some lovely memories.

Our holiday will be spent as interns for several holiday events, the World Culinary Forum (Chefs from Europe are coming to the school to lead seminars and teach new techniques)and Red Rock Casino's Holiday Event where we'll be helping out the Pastry Chef who just won a prestigious competition!.... so no rest for the wicked but we'll be getting lots of experience and we're jazzed about it! (My feet still hurt and will be hurting even more.....)

If you're looking for something special or specific and you want some help, drop me a line (use the comment section below) and let me know or send me your email and I will help as much as I can. It doesn't have to be a Thanksgiving Dish either..... Talk soon!