 en said that baking is science while cooking is art, I believe it. In the first you follow formulas, if you don't get the right "ratios", your results won't be good. It's all about how one element reacts with another giving the desired effect, but in cooking you get so much freedom and leeway that "your" creativity, style and passion have a chance to interpret ingredients and take them to places maybe no one has taken them before and if you add artistic sensibility to this, well, a dish presentation can be brought to "art". Indeed.
We have an old saying: "El amor entra por los ojos".... which means: "Love enters through the eyes" and if you apply this to Culinary Arts it definitely means that dish presentation or "plating" occupies a very important role in whatever you cook because if it's not well presented on the plate, taking into consideration colors, textures, ingredients, accents and most especially, height.... you could turn what could be an amazing dish that everyone wants to eat into a so-so meal that won't excite anyone. It could mean the difference between success and failure (or a good grade vs. a failing one if you apply this to Culinary training), or in the business world, could mean a popular selling offering that can deliver profits and acclaim. Who doesn't like great looking food?
You can get technical on the aspect of food presentation and there are several schools of thought on this from the "minimalist" to "architectural", "contemporary", "European", "classic", etc. that can get pretty involved and Culinary students are trained in so they can best recognize and produce successful "platings". You need to select the correct plate for the dish you are presenting, professionals prefer white plates in bold shapes (lik
 e you see in prominent restaurants), since white shows off the food better and busy plates tend to obscure the food. One of the Master Chefs that trained me taught me to "think with the results in mind". Think of the colors of your food, the main element, the sauce, the garnishes and how they will all come together to be pleasing not just to the taste but to the eye as well.
For the past couple of years there has been another element that has taken an important place in plating food: height. Now it's all about the height of the dish and how you can bring height into your dishes to better present them. Adding height to a dish makes for a bold statement drawing attention to the elements on the plate, creates interest plus it directs your sight exactly where you want it to go. So now you're asking yourself, how do I start? what will I need? how involved will all this be?
Never fear, these are easy to make, practical to serve and all you need is your imagination and some items. To make these little projects work you will need to use a free hand or maybe some empty cans of different sizes. Cut the tops and bottoms off (I have a can opener that cuts the outside of the can leaving a clean line and the tops to re-use), wash them really well (or you can use professional rings like the ones shown), molds, have vegetable spray on hand and your ingredients. Basics are: For Binders and to hold things together (yet don't go too wet or the stack will crumble): rice, pasta, avocado, couscous, potato, quinoa, wontons, cookies, crepes, etc. Then you will use any vegetable, meat, fish, cheese, fruit, seasonings or sauces you've planned on.
Now stacking food is not new, a long time ago "Timbales" or even "Terrines" functioned in this way by layering ingredients, adding texture and color to have a beautiful result. Same here, just with a new, more modern spin..... so let's see what we can come up with, ok? By the way, I love these, find them fun to do and enjoy showing them off. It never fails when you have company over or you do these for your family, once they see them.... they're impressed and delighted!
Here's an easy, pretty one: Zucchini Confetti Stack.- Lovely colors and a light texture combine to make a most attractive appetizer or side dish.
4 zucch
 ini
ini1 sweet red bell pepper
½ cup whipping cream
½ cup shredded Swiss cheese
2 large fresh eggs
1 tablespoon olive oil
salt and pepper
Slice zucchini lengthwise, thinly, save the middle two slices from each one. Chop the rest. Steam or blanch all zucchini and carefully remove the middle slices and dry on paper towel. Strain rest of zucchini until dry. Dice the red pepper finely and saute in the olive oil, until soft. Make a mixture with all of the ingredients, minus the middle slices and half of the pepper dice.
Butter, oil or spray your molds. Place in each mold two slices of the zucchini, arranging them as a cross on the bottom of the mold and up the sides. Fill the mold with the mixture and bake the in water bath for approximately 20 minutes at 400F degrees. Carefully invert them on individual plates. Sprinkle them with the saved pepper dice. You could serve with a little sauce, aioli if you like or you could add some shrimp, crab meat or ?
******************************
Avocado, Sweet Potato and Quinoa Salad.- The flavors coalesce to bring you amazing colors and an amazing dish!
1 cup quinoa, cooked in vegetable stock and cooled to room temperature
1/2 jalapeño, minced
1/4 cup plus 1 tablespoon fresh cilantro, minced

1 sweet potato, peeled and cut into 1/4-inch dice
5 tablespoons extra-virgin olive oil
Sea salt and freshly ground black pepper
Canola Oil
2 corn tortillas, cut into 1/4-inch strips
1 teaspoon Cajun seasoning
Juice of one lime
2 tomatillos in olive oil, skins removed
1 tablespoon rice vinegar
1 teaspoon light agave nectar
2 avocados, diced
In a medium bowl place quinoa, jalapeño, 1 tablespoon cilantro, 1 tablespoon extra-virgin olive oil, lime juice, and salt and pepper to taste, and toss to combine. Preheat the oven to 400F. In a small bowl, toss the sweet potatoes with 2 teaspoons olive oil, and season with salt and pepper to taste. Spread a single layer on a baking sheet and roast for 15 minutes, or until soft in the middle and lightly browned; be careful not to let the sweet potatoes burn.
Lower the oven temperature to 350F. In a small bowl, toss the tomatillos with 1 teaspoon of olive oil. Place on a baking sheet and roast for 15 minutes. Transfer to a food processor, add the vinegar, 1/4 cup cilantro, and agave nectar, and pulse to combine. With the motor running, pour in the remaining 3 tablespoons olive oil in a thin stream. Continue blending until emulsified. Season with salt and pepper to taste. Pour 2 inches of canola oil into a small, heavy pot and heat until the oil shimmers. Add the tortilla strips and fry until crisp and browned, 1 to 2 minutes. Drain on paper towels and sprinkle with Cajun seasoning.
Place a 3-inch mold in the center of one of 4 salad plates. Fill with 1/4 of the quinoa mixture and press down with a spoon to pack the mold, smoothing the top. Place 1/4 of the sweet potato pieces on top of the quinoa and press down gently. Top with 1/4 of the avocado and press down gently. Carefully remove the mold. Repeat on the remaining salad plates. Carefully place 2 tortilla strips parallel to each other about 1 inch apart on top of each. Place 2 more tortilla strips perpendicular on top of those. Top them with the microgreens and drizzle the dressing around.
***************************
Asian Crab Stack with Tomato Gazpacho.- Lovely color and sophisticated flavors, in other words, a hit!
Crab Salad:

4oz white crab meat
1/4 cup crème fraiche
1 tbs Dijon grain mustard
1tsp mayonnaise
1tbs chopped chives
Mix the ingredients together and chill
Salsa:
½ mango diced
2 avocados diced
1tsp finely chopped chile (no seeds)
1tbs chopped coriander
1tbs finely chopped red onions
1tbs lime juice
1tsp chopped pickled ginger
Mix all the ingredients together and keep in the fridge
Gaspacho:
4 vine ripe tomatoes
1 clove of garlic
1 spring of tarragon
1 spring of basil
1 red pepper
1 cucumber with skin off and seeds off
1 red chilli chopped with the seeds
1 tbs cherry vinegar
½ juice of a lemon
olive oil
Salt to taste
Put all the vegetables in a blender and process until smooth, strain through a fine sieve and finish with the olive oil, vinegar and lemon juice. Season and put in the fridge. Now build the stack in metal rings, first add the salsa then the crab mix and top it up with cream fraiche to seal.
Serve it with the gazpacho, very cold, and a drizzle of olive oil.
*********************************
You can also build these "free form" without the use of molds or cans just by using things like Phyllo Dough, Fried Wontons, crepes, blinis, grilled veggies, tomato or bell pepper slices since you use these to make the "levels"..... then you add one ingredient, top it off with a sauce or cream or cheese, add another level and so on.... done in a jiffy and looks incredible! Here is an example:
Phyllo, Salmon, Onion and Greens Salad.- A wonderful first course or an elegant supper.....
Phyllo, baked to a golden brown with butter, add some pine nuts and dill, 4 in squares
Onion, caramelized in butter and oil until deep brown. Add some sugar and balsamic vinegar
Have the salmon sliced and ready
Goat cheese in thin slices, 1/8" thick, chilled
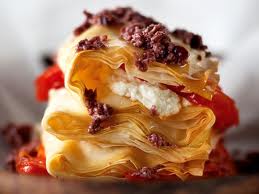
Chives, chopped, chilled and 2 left long for garnish
Microgreens, mixed greens, mesclun
Vinaigrette of your choice
Sour Cream
Caviar
When you're ready to assemble and serve (these don't keep well so be ready to serve), cut the phyllo diagonally into triangles. Select your plates and lay them out. Line your plates with the greens that have been lightly tossed in your vinaigrette. Place a phyllo triangle on top of the greens in the center. Top with salmon and 1 tbl of the onion. On goes another phyllo triangle, this time pointing the tips in another direction as the first. A slice of cheese now goes on top, followed by salmon and onions. The third phyllo triangle goes on, facing the points in another direction, the last slice of salmon now is placed with another tablespoon of onions.
To garnish, put some sour cream, caviar, sprinkle with some chives, and some pine nuts. Drizzle a little vinaigrette over everything and rest 2 whole chive spears on the side of the stack so they point upward. Serve.
**************************************
So now you're asking: "just salads?", "vegetables only?"..... Of course not, here are some combinations you can try:
For appetizers or starters:
- Cellophane noodles, mushrooms, ginger and scallops
- Tiny crepes with apples, duck and wild mushrooms, nuts
- Truffled mashed potatoes with caviar and lobster
- Pancetta, avocado and shrimp with pineapple or mango salsa
- Mushroom, Gruyere, spinach with barley
- Shrimp, roasted peppers and quinoa
- Sushi and rice
- Couscous with apricot glazed lamb and red onions
- Grilled fillet, garlic mashed potatoes, leeks and red wine sauce
- Sausage, red cabbage, apple and fruit coulis
 t:
t:- Brownies with grilled bananas, whipped cream, nuts and melted caramel sauce
- Pound cake, caramelized peaches, vanilla custard, whipped cream and berry coulis
- Phyllo, rhubarb & strawberries, peppered creme anglaise topped with toasted almonds
No comments:
Post a Comment